Turbocharger Jet Engine Relies On Wood Pellet Ignition

Turbochargers as used on cars bear some similarities with jet engines. Fundamentally, both contain a turbine that harvests energy from hot gas, using it to spin a compressor which sucks in fresh air for combustion. Thus, turning a turbocharger into a jet engine is entirely possible, and [HRom] decided to have a crack at it. 

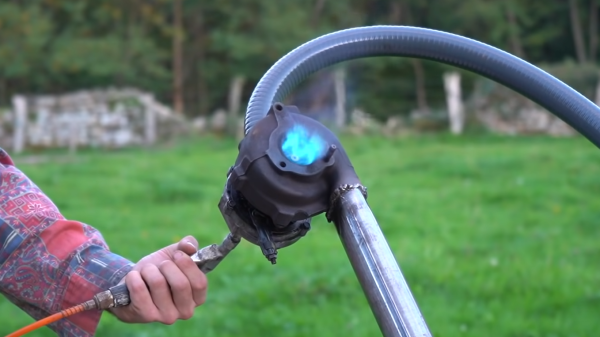
The build starts with a turbo that appears to have been used on a diesel engine from the Volkswagen group. The first step was to cut the integral exhaust manifold off the turbo housing. A combustion chamber is then added which takes in fresh air from the compressor housing, and delivers hot combustion products to the turbine inlet. The homebrewed jet engine burns propane as fuel, introduced into the chamber via a nozzle.

The initial test failed as combustion was occurring at the turbine exhaust rather than in the combustion chamber, likely due to the lack of a proper ignition source inside the combustion chamber. A redesign employed a bigger combustion chamber built out of a fire extinguisher, with smouldering wood pellets inserted inside to get the injected propane burning.

The redesign works, and the turbocharger jet engine releases a thunderous scream as it turns at ever-increasing speed. However, with no oiling system or any way of controlling air or fuel flow in the engine, it eventually stops in a huge puff of smoke. Regardless, the engine did run in a sustained manner even if the ignition method was rudimentary.

We’ve seen similar builds before, and the rudimentary construction means they’re typically nowhere near being flight-weight engines. They are incredibly cool, however, and a great way to learn the basic principles of how jet engines work. Video after the break.

Continue reading “Turbocharger Jet Engine Relies On Wood Pellet Ignition”

Engineering And Artistry Meet An Untimely End At Burning Man

Burning Man is so many different things to so many people, that it defies neat description. For those who attend, it always seems to be a life-changing experience, for good or for ill. The story of one man’s Burning Man exhibition is a lesson in true craftsmanship and mind-boggling engineering, as well as how some events can bring out the worst in people.

For [Malcolm Tibbets], aka [the tahoeturner], Burning Man 2017 was a new experience. Having visited last year’s desert saturnalia to see his son [Andy]’s exhibition, the studio artist decided to undertake a massive display in his medium of choice — segmented woodturning. Not content to display a bamboo Death Star, [Malcolm] went big– really big. He cut and glued 31,000 pieces of redwood into rings of various shapes and sizes and built sculptures of amazing complexity, including endless tubes that knot and loop around and back into each other. Many of the sculpture were suspended from a huge steel tripod fabricated by [Andy], forming an interactive mobile and kinetic sculpture.

Alas, Burning Man isn’t all mellowness in the desert. People tried to climb the tripod, and overnight someone destroyed some of the bigger elements of the installation. [Malcolm] made a follow-up video about the vandalism, but you’ll want to watch the build video below first to truly appreciate the scale of the piece and the loss. Here’s hoping that [Malcolm]’s next display is treated with a little more respect, like this interactive oasis from BM 2016 apparently was.

Thanks to [Keith Olson] for the tip.

Turning And Burning With A CNC Pyrography Machine

With CNC machines, generally the more axes the better. Three-axis machines with a vertical quill over a rectangular workspace are de rigueur, and adding an axis or two can really step up the flexibility of a machine. But can only two axes be of any use? Sure can, as witnessed by this two-axis CNC wood burning machine.

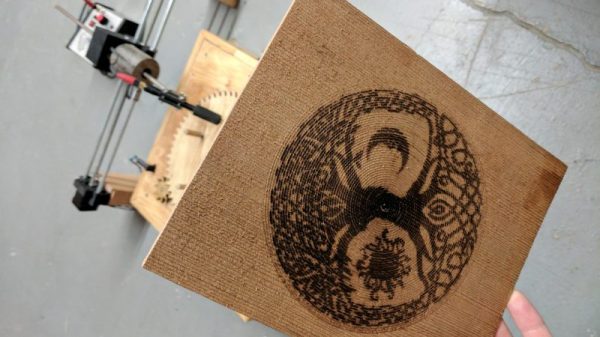
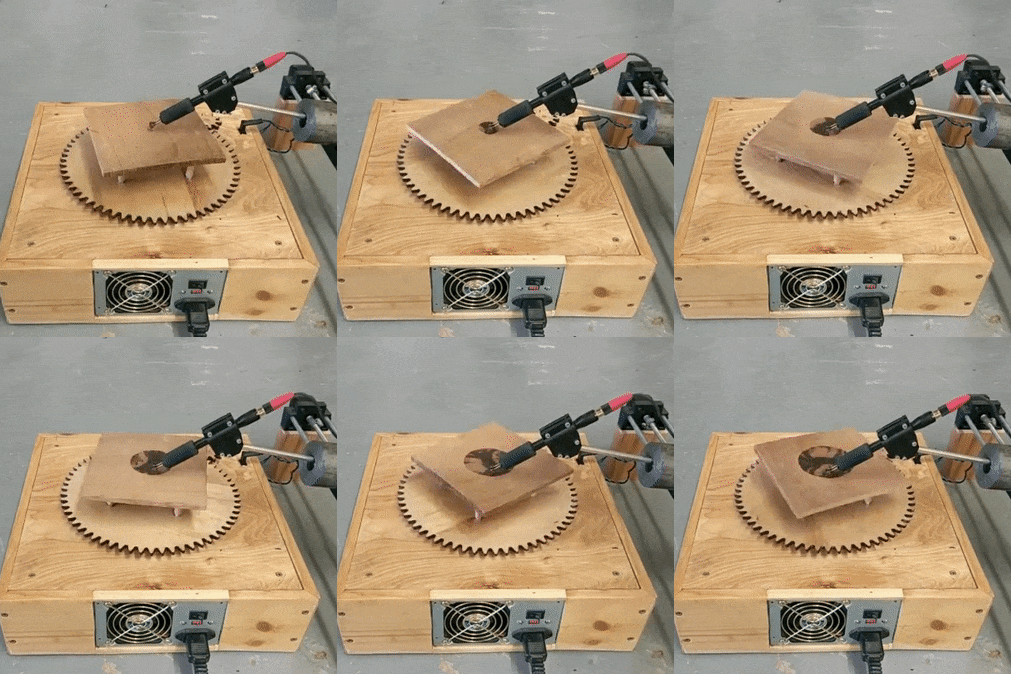
As [tuckershannon] tells the tale, this was a newbie build aided by the local hackerspace. Axis one is a rotary table of laser-cut wood gears powered by a stepper. Axis two is just a stepper and lead screw sitting on a couple of blocks of wood. A Raspberry Pi under the hood controls the motors and cycles the pyrography pen on and off as it scans across a piece of wood on the rotary table, burning a spiral pattern that makes for some interesting art. Hats off to [tuckershannon] for figuring out the math needed to adapt to the changing speed of the pen over the wood as the diameter gets bigger.

We love this build, can’t help but wonder if some clever gearing could eliminate the need for the second stepper. And perhaps an upgrade from the standard resistive wood burner to an arc lighter pyrography pen would improve resolution. Still, it’s hard to argue with results, and this is a great hack.

[via r/raspberrypi]

Thanks to [Liz] for the tip!

Wood Stove Runs On Arduino Power

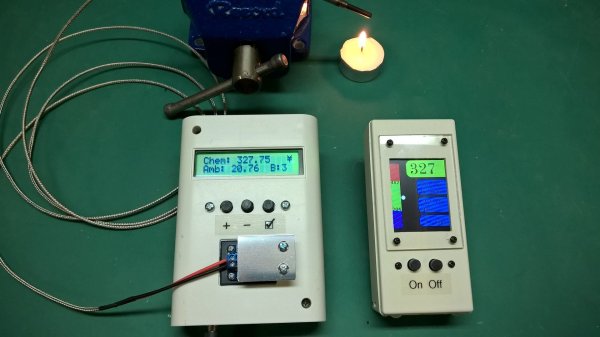
Ahh, sweet scope creep! Usually it’s the death of a nice, simple little hack. But once in a hundred times, a small hack doesn’t get buried under the extra features, but instead absorbs them in stride and blossoms into a beautiful system. [rockfishon]’s Arduino-powered wood stove controller is one of these beautiful exceptions. (OK, we’d admit that it could use a fancier faceplate.)

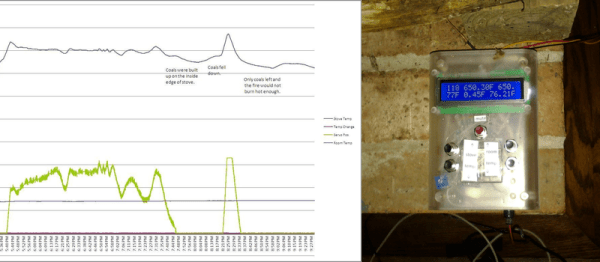
He started off simply enough, wanting to connect a thermocouple to an Arduino, read out the value, and issue an alarm when the temperature got too high. But who could stop there? Just one air-baffle servo away from a closed-loop heating control system? So [rockfishon] added a display and a few more buttons and has a system that will keep his wood-burning stove running at exactly the right temperature, even overnight when nobody’s around to tend it. As a bonus, everything is logged for later analysis.

The code is relatively straightforward, and can be found in this Gist. If you’d like to build your own, you’ll need an Arduino Mega and can then get the control board made for you at OSHPark. Judging from the comments on the Hackaday.io project page, a couple people have already tried this out. We’ve seen other wood-stove monitoring hacks before, but this is the first we’ve seen that closes the control loop. Very cool.

A Wireless Wood Stove Monitor

[Michel] has a wood stove in his basement for extra heat in the winter. While this is a nice secondary heat source, he has creosote buildup in the chimney to worry about. [Michel] knows that by carefully monitoring the temperature of the gases in the chimney, he can hit the sweet spot where his fire burns hot enough to keep the creosote under control and cool enough that it doesn’t burn down the house. To that end, he built a wireless wood stove monitor.

The first version he built involved an annoying 20 foot run between the basement and living room. Also, the thermocouple was mounted on the surface and made poor contact with the chimney. Wood Stove Monitor 2.0 uses a probe thermometer on an Exhaust Gas Temperature (EGT) thermocouple to measure the temperatures. The intel is fed to a thermocouple amplifier to provide a cold-compensation reference. This is shielded so that radiant heat from the stove doesn’t compromise the readings. An nRF24L01+ in the basement monitoring station communicates with another module sitting in the living room display so [Michel] can easily find out what’s going on downstairs. When it’s all said and done, this monitor will be part of a bigger project to monitor power all over the house.

Interested in using a wood stove to help heat your house? Why not build your own?

Making Lichtenberg Figures In Wood

Ever heard of a Lichtenberg Figure? It’s the branching electrical discharge you can sometimes see on an insulating material… That’s right — when the voltage is high enough — it’ll find a way. Using one of our favorite low-cost high voltage transformers from a microwave, [TheBackYardScientist] shows us how to make our own Lichtenberg Figures!

It’s actually pretty easy. All you need is an old microwave, some plywood, and water with baking soda mixed in. First, you’ll need to take the transformer out of the microwave — a simple hack we’ve covered many times before — you’ll need to wire it in a way that allows you to get a few thousand volts out of it.

Then by mixing baking soda in water, you can increase the conductivity — let the wood soak it up overnight, and now you’re ready to go! By attaching the leads to either side of the wood, it’s now conductive enough to allow the electricity to branch across the wood, burning awesome patterns as it goes — just take a look at the following video!

Continue reading “Making Lichtenberg Figures In Wood”

High Voltage, Wood And Resin Result In Fractal Art

Wood burning, which goes by pyrography when it’s feeling fancy, has been an art form for centuries. [PapaJ06] puts a new twist on it by using a microwave oven transformer to generate fractal patterns in wood. We’ve seen these Lichtenberg figures before, but generally as electric discharges in acrylic sheets or crystal balls using multi-mega-electron volt accelerators. [PapaJ06]’s technique is considerably simpler and well within the reach of most would-be fractal artists, relying as it does on a transformer salvaged from a $20 Craigslist microwave.

But the extra twist that really brings the wow factor to the fractal patterns burned into the wood is the addition of some phosphorescent resin to fill the valleys carved by the electric discharge. [PapaJ06] carefully prepares the wood, fills the burns with glow powder mixed with epoxy resin, and finishes with a little sanding, linseed oil and polyurethane. The contrast between the charred and intact wood, and the way the resin fills the voids really brings out the fractal nature of the Lichtenberg figures.

[PapaJ06] doesn’t really show us too much about his process, but luckily [TheBackyardScientist] recently posted a video of his process for riding the lightning. Check it out after the break.

Continue reading “High Voltage, Wood And Resin Result In Fractal Art”