Laser-Etching Photos On To Eggs

CNC machines are every maker’s dream. Capable of churning out accurate parts from CAD designs with a minimum of manual labor, they’re a great tool to have in the workshop. Alternatively, you can use them for more entertaining pursuits. [Leo]’s project is one of the latter – etching greyscale photos on to eggs.

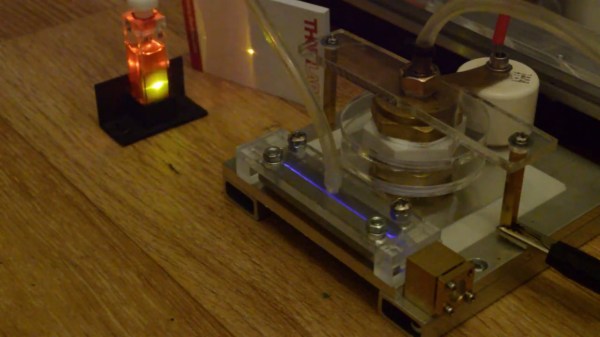
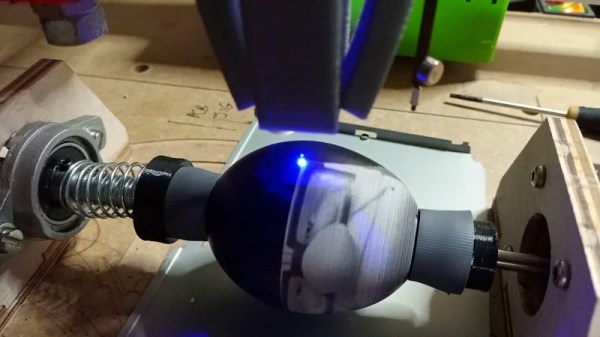
The first thing you’ll need is an egg-compatible CNC machine. The Eggbot is a popular option, else a fourth-axis on an existing machine can also do the job as in [Leo]’s case. Coupling the egg is a delicate task, for which some rubber paper rollers are salvaged from an old printer and put to work. Then, a laser needs to be fitted to the CNC head, and the egg depth mapped with a probe to ensure the entire etching is in focus. Then it’s simply a matter of loading up an image, and turning the greyscale data into the relevant G-code to burn it onto the egg.

Using eggs coated in black ink, the results [Leo] achieves are impressive. The eggs would make an amusing Easter gift, or serve as a great cheap way to teach students about CNC techniques. Obviously, eye protection is a must, and be sure to mount your laser securely to avoid any unintentional exposures. Video after the break.

Continue reading “Laser-Etching Photos On To Eggs”

Hackaday Podcast 080: Trucks On A Wire, Seeing Sounds, Flightless Drone, And TEA Laser Strike

Hackaday editors Elliot Williams and Mike Szczys flip through the index of great hacks. This week we learn of a co-existence attack on WiFi and Bluetooth radios called Spectra. The craftsmanship in a pneumatic drone is so awesome we don’t care that it doesn’t fly. Building a powerful TEA laser is partly a lesson in capacitor design. And join us in geeking out at the prospect of big rigs getting their juice from miles of overhead wires.

Take a look at the links below if you want to follow along, and as always, tell us what you think about this episode in the comments!

Take a look at the links below if you want to follow along, and as always, tell us what you think about this episode in the comments!

Direct download (60 MB or so.)

Continue reading “Hackaday Podcast 080: Trucks On A Wire, Seeing Sounds, Flightless Drone, And TEA Laser Strike”

How About A Nice Cuppa TEA Laser?

If lasers are your hobby, you face a conundrum. There are so many off-the-shelf lasers that use so many different ways of amplifying and stimulating light that the whole thing can be downright — unstimulating. Keeping things fresh therefore requires rolling your own lasers, and these DIY nitrogen TEA and dye lasers seem like a fun way to go.

These devices are the work of [Les Wright], who takes us on a somewhat lengthy but really informative tour of transversely excited atmospheric (TEA) lasers. The idea with TEA lasers is that a gas, often carbon dioxide in commercial lasers but either air or pure nitrogen in this case, is excited by a high-voltage discharge across long parallel electrodes. TEA lasers are dead easy to make — we’ve covered them a few times — but as [Les] points out, that ease of construction leads to designs that are more ad hoc than engineered.

In the video below, [Les] presents three designs that are far more robust than the typical TEA laser. His lasers use capacitors made from aluminum foil with polyethylene sheets for dielectric, sometimes with the addition of beautiful “doorknob” ceramic caps too. A spark gap serves as a very fast switch to discharge high voltage across the laser channel, formed by two closely spaced aluminum hex bars. Both the spark gap and the laser channel can be filled with low-pressure nitrogen. [Les] demonstrates the power and the speed of his lasers, which can even excite laser emissions in a plain cuvette of rhodamine dye — no mirrors needed! Although eye protection is, of course.

These TEA lasers honestly look like a ton of fun to build and play with. You might not be laser welding or levitating stuff with them, but that’s hardly the point.

Continue reading “How About A Nice Cuppa TEA Laser?”

Laser Cutting Your Way To An RGB LED Table

You’ve got the RGB keyboard, maybe even the RGB mouse. But can you really call yourself master of the technicolor LED if you don’t have an RGB table to game on? We think you already know the answer. Luckily, as [ItKindaWorks] shows in his latest project, it’s easy to build your own. Assuming you’ve got a big enough laser cutter anyway…

The construction of the table is quite straightforward. Using an 80 watt laser cutter, he puts a channel into a sheet of MDF to accept RGB LED strips, a pocket to hold a Qi wireless charger, and a hole to run all the wires out through. This is then backed with a second, solid, sheet of MDF.

Next, a piece of thin wood veneer goes into the laser cutter. In the video after the break you can see its natural tendency to roll up gave [ItKindaWorks] a little bit of trouble, but when strategically weighted down, it eventually lays out flat. He then uses the laser to blast an array of tiny holes in the veneer, through which the light from the LEDs will shine when it’s been glued over the MDF. A few strips of plastic laid over the strips serve both to diffuse the light and support the top surface.

The end result is truly gorgeous and has a very futuristic feel. Assuming you’ve got the equipment, it’s also a relatively simple concept to experiment with. It’s yet another example of the unique construction techniques possible when you add a high-powered laser to your arsenal.

Continue reading “Laser Cutting Your Way To An RGB LED Table”

500 Lasers Are Not Necessarily Better Than One, But They Look Great

If playing with but a single laser pointer is fun, then playing with 500 laser pointers must be 500 times the fun, right? So by extension, training 500 laser pointers on a single point must be the pinnacle of pointless mirth. And indeed it is.

When we first spotted this project, we thought for sure it was yet another case of lockdown-induced  boredom producing an over-the-top build. Mind you, we have no problem with that, but in this case, [nanoslavic] relates that this is actually a project from a few years back. It’s really as simple as it looks: 500 laser pointer modules arranged on a plate with a grid of holes in a 25 by 20 array. As he placed the laser modules on the board with a glob of hot glue, he carefully aimed each one to hit a single point about a meter and a half away.  There are also a handful of blue LEDs nestled into the array, because what project is complete without blue LEDs?

The modules are wired in concentric circuits and controlled by a simple bank of toggle switches. Alas, 500 converging 150-mW 5 mW lasers do not a 75-W 2.5 W laser make; when fully powered, the effect at the focal point is reported to be only a bit warm. But it looks incredible, especially through smoke. Throwing mirrors and lenses into the beam results in some interesting patterns, too.

You’ll still need to take safety seriously if you build something like this, of course, but this one is really just for show. If you’re really serious about doing some damage with lasers, check out the long list of inadvisable laser builds that [Styropyro] has accumulated — from a high-powered “lightsaber” to a 200-Watt laser bazooka.

(Terminate your beams carefully, folks. We don’t want anyone going blind.)

Continue reading “500 Lasers Are Not Necessarily Better Than One, But They Look Great”

Tidy Laser Cut Packaging For PCBs With KiCAD

A laser cutter is a useful tool to have in any workshop. While many hackers use them for their cutting abilities, it’s important to remember that they can be great as engravers, too. [Wrickert] was well aware of this when he set his to work, producing attractive packaging for his Tindie orders.

[Wrickert] sells a variety of small PCB-based devices on Tindie, and it’s nice to have something to package them up with, rather than just sending a bare board. To do this quickly and effectively, KiCAD is used to help generate the packaging from the original PCB geometry itself. The board outlines are exported as an SVG file, reopened in KiCAD, and then used to create the required cardboard parts. The laser can then also be used to engrave the cardboard too.

It’s a tidy packaging solution that requires no messy inks or printers, and can be designed in the same software as the device itself. We’ve covered this area before, talking about what it takes to go from a home project to a saleable kit. If you’re in the game, you might find [Wrickert]’s hack to be just the ticket!

Popping The Hood On The Flux Beamo Laser Cutter

While the K40 has brought affordable laser cutting to the masses, there’s no question that it took a lot of sacrifices to hit that sub-$400 price point. There’s a reason that we’ve seen so many upgrades and improvements made to the base model machine, but for the price it’s hard to complain. That being said, for users who don’t mind spending a bit more money for a more complete out-of-the-box experience, there are other options out there.

One of them is the beamo, from FLUX. [Frank Zhao] recently picked up one of these $1,900 USD laser cutters because he wasn’t thrilled with the compromises made on the K40. Specifically, he really liked the idea of the internal water cooling system. Oddly enough, something about using a garden hose and buckets of water to cool the laser seemed off-putting. Luckily for us, he’s got a technical eye and the free time necessary to do a teardown and objective analysis of his new toy.

The short version of the story is that [Frank] is not only happy with the results he’s getting, but finds the machine to be well designed and built. So if you’re looking for a rant, sorry. But what you will find is a methodical look at each subsystem of the beamo, complete with annotated pictures and the kind of technical details that Hackaday readers crave.

We especially like his attempts to identify parts which might be difficult to source in the future; it looks like the CO2 laser tube might be proprietary, but everything else looks fairly jellybean. That includes the Raspberry Pi 3B that’s running the show, and the off-the-shelf touch screen HDMI display used for the interface. [Frank] did note that FLUX was unwilling to give him the credentials to log into the Pi and poke around, but with direct access to the SD card, it’s not like that will stop anyone who wants to get in.

In a way, laser cutters are in a similar situation today to that desktop 3D printers were in a few years ago. The cheap ones cut so many corners that upgrades and fixes are almost a necessity, and building your own machine is often less expensive than buying a commercial offering with similar specs. While the beamo is still a bit too expensive for the average hobbyist, it’s good to see machines of this caliber are at least coming down out of the 5 figure range.