Falcon 9 Lamp Is Touching Down In The Living Room

Many of us have been inspired by the videos of the Falcon 9 booster, tall as an office building, riding a pillar of flame down to a pinpoint landing at Kennedy Space Center or on one of SpaceX’s floating landing pads in the ocean. It’s not often that we get to see science fiction fantasy become reality on such a short timescale, and while they might not be sold on the practicality of reusable rockets, even the most skeptical of observers have to admit it’s an incredible feat of engineering.

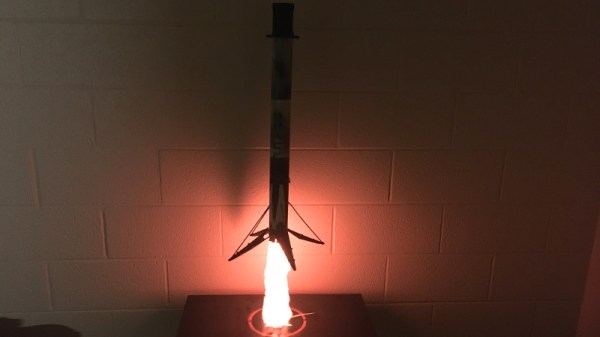
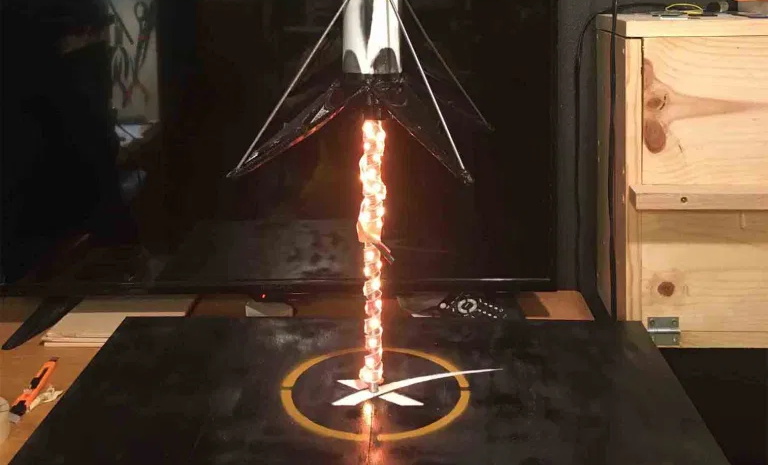
Though it can’t quite compare to the real thing, this 1:60 scale Falcon 9 lamp by [Sir Michael II] promises to bring a little of that excitement home every time you flick on the light. Combining a scratch built model of the reusable booster with some RGB LEDs, the hovering tableau recreates the tense final seconds before the towering rocket comes to a rest on its deployable landing legs. We imagine those last moments must seem like an eternity for the SpaceX engineers watching from home as well.

The LED “exhaust” without the fluff.

[Michael] walks readers through assembling the Falcon 9 model, which cleverly uses a 2 inch white PVC pipe as the fuselage. After all, why waste the time and material printing a long white cylinder when you can just buy one at the hardware store for a few bucks?

Dressed up with 3D printed details from Thingiverse user [twuelfing] and splashed with a bit of paint, it makes for a very convincing model. While the diameter of the pipe isn’t quite right for the claimed 1:60 scale, unless Elon Musk is coming over your place to hang out, we don’t think anyone will notice.

The rocket is attached to the pad with a piece of threaded steel rod, around which [Michael] has wrapped one meter of RGB LEDs controlled by an Arduino Uno. With some polyester fiber filler as a diffuser and a bit of code to get the LEDs flickering, he’s able to produce a realistic “flame” that looks to be coming from the Falcon 9’s center engine. While we admit it may not make a very good lamp in the traditional sense, it certainly gets extra points for style.

We’ve actually seen a similar trick used before to light up the engines of a LEGO Saturn V and Apollo Lunar Module. It’s amazing how realistic the effect can be, and we’d love to see it used more often. We’d also like to see more model rockets that actually levitate over their pads, but one step at a time.

Casio Computer Rebuild Puts New Wine In An Old Bottle

With a glut of vintage consumer electronics available from eBay it should be easy to relive your glory days, right? Unfortunately the march of time means that finding gear is easy but finding gear that works is not. So was the case when [Amen] acquired not one, but two used calculator/computer units hoping to end up with one working device. Instead, he went down the rabbit hole of redesigning his own electronics to drive the Casio QT-1 seen here.

Especially interesting is the prototyping process for the replacement board. [Amen] used a “BluePill” STM32 microcontroller board at its heart, and used point-to-point soldering for the rest of the circuitry on a rectangle of protoyping board. That circuit is non-trivial, needing a 23 V source to drive the original VFD from the computer, a battery-backed real-time-clock (MCP7940), and a GPIO expander to scan the keys on the keypad.

It worked great, but couldn’t be cut down to fit in the case. The solution was a PCB designed to fit the footprint of the original. The modern guts still need more firmware work and a couple of tweaks like nudging that 23 V rail a bit higher to 26 V for better brightness, but the work already warrants a maniacal cry of “It’s Alive!”.

This isn’t [Amen’s] first rodeo. Back in March we looked in on another vintage Casio refurb that sniffed out the display protocol.

The ZX Microdrive: Budget Data Storage, 1980s Style

An enduring memory for most who used the 8-bit home computers of the early 1980s is the use of cassette tapes for program storage. Only the extremely well-heeled could afford a disk drive, so if you didn’t fancy the idea of waiting an eternity for your code to load then you were out of luck. If you had a Sinclair Spectrum though, by 1983 you had another option in the form of the unique Sinclair ZX Microdrive.

This was a format developed in-house by Sinclair Research that was essentially a miniaturized version of the endless-loop tape carts which had appeared as 8-track Hi-Fi cartridges in the previous decade, and promised lightning fast load times of within a few seconds along with a relatively huge storage capacity of over 80 kB. Sinclair owners could take their place alongside the Big Boys of the home computer world, and they could do so without breaking the bank too much.

Continue reading “The ZX Microdrive: Budget Data Storage, 1980s Style”

Hackaday Podcast 085: Cable Robots Two-Ways, Cubic Raspberry Pi, Plastic Wrap Kayak, And Digging Inductors

Hackaday editors Mike Szczys and Elliot Williams take a look at all the hacks from the week that was. We think we’ve found the perfect tentacle robot, and its matching controller is also a tentacle. An unrelated project uses the same Bowden cable trick as the tentacle controller to measure deflection. If you’re more of a material-science geek, refining black sand to make your own inductors is a fascinating hack. And we wrap up the episode talking SSH keys and buses that go off road, but not in the way you might think.

Take a look at the links below if you want to follow along, and as always, tell us what you think about this episode in the comments!

Take a look at the links below if you want to follow along, and as always, tell us what you think about this episode in the comments!

Direct download (60 MB or so.)

Continue reading “Hackaday Podcast 085: Cable Robots Two-Ways, Cubic Raspberry Pi, Plastic Wrap Kayak, And Digging Inductors”

Magnum Opus Keyboardus, Or Build Ad Infinitum?

It happens to pretty much everyone who gets into keyboards. No commercial keyboard can meet all your needs, so you start building them. Use them a while, find problems, build a new keyboard to address them. Pretty soon you think you have enough user experience to design the perfect keeb — the be-all, end-all magnum opus clacker you can take to the grave. This time, it happened to [aydenvis]. We must say, the result is quite nice. But will it still be perfect in six months?

As you might expect, this board uses an Arduino Pro Micro. We can’t say for sure, but it looks like [aydenvis] created a socket with a second Pro Micro board populated only with female header. That’s definitely a cool idea in case the board fails. It also has two rotary encoders and a pair of toggle switches to switch controller and secondary designations between the PCBs.

We like the philosophy at play in this 36-key ‘board that states that prime ergonomics come when each finger must only travel one key distance from the home row. This of course requires programming layers of functionality into the firmware, which is easy enough to set up, but can be tricky to memorize. One thing that will help is the color-coded RGB underglow, which we’re going to call sandwich glow because it is emanating from the middle of a stacked pair of PCBs floating on 7 mm standoffs. We only wish we could hear how loudly those jade Kailh choc switches can clack. The board files are up on GitHub, so we may just have to make our own.

Indeed, many keebs we see use a Pro Micro or two, but here’s a tasty split that runs on a Raspberry Pi Zero W.

Via reddit

This Week In Security: AD Has Fallen, Two Factor Flaws, And Hacking Politicians

The big news this week is the huge flaw in Microsoft’s Active Directory, CVE-2020-1472 (whitepaper). Netlogon is a part of the Windows domain scheme, and is used to authenticate users without actually sending passwords over the network. Modern versions of Windows use AES-CFB8 as the cryptographic engine that powers Netlogon authentication. This peculiar mode of AES takes an initialization vector (IV) along with the key and plaintext. The weakness here is that the Microsoft implementation sets the IV to all zeros.

XKCD.com CC BY-NC 2.5

It’s worth taking a moment to cover why IVs exist, and why they are important. The basic AES encryption process has two inputs: a 128 bit (16 byte) plaintext, and a 128, 192, or 256 bit key. The same plaintext and key will result in the same ciphertext output every time. Encrypting more that 128 bits of data with this naive approach will quickly reveal a problem — It’s possible to find patterns in the output. Even worse, a clever examination of the patterns could build a decoding book. Those 16 byte patterns that occur most often would be guessed first. It would be like a giant crossword puzzle, trying to fill in the gaps.

This problem predates AES by many years, and thankfully a good solution has been around for a long time, too. Cipher Block Chaining (CBC) takes the ciphertext output of each block and mixes it (XOR) with the plaintext input of the next block before encrypting. This technique ensures the output blocks don’t correlate even when the plaintext is the same. The downside is that if one block is lost, the entire rest of the data cannot be decrypted Update: [dondarioyucatade] pointed out in the comments that it’s just the next block that is lost, not the entire stream. You may ask, what is mixed with the plaintext for the first block? There is no previous block to pull from, so what data is used to initialize the process? Yes, the name gives it away. This is an initialization vector: data used to build the initial state of a crypto scheme. Generally speaking, an IV is not secret, but it should be randomized. In the case of CBC, a non-random IV value like all zeros doesn’t entirely break the encryption scheme, but could lead to weaknesses. Continue reading “This Week In Security: AD Has Fallen, Two Factor Flaws, And Hacking Politicians”

Listening To An IPhone With AM Radio

Electronic devices can be surprisingly leaky, often spraying out information for anyone close by to receive. [Docter Cube] has found another such leak, this time with the speakers in iPhones. While repairing an old AM radio and listening to a podcast on his iPhone, he discovered that the radio was receiving audio the from his iPhone when tuned to 950-970kHz.

[Docter Cube] states that he was able to receive the audio signal up to 20 feet away. A number of people responded to the tweet with video and test results from different phones. It appears that iPhones 7 to 10 are affected, and there is at least one report for a Motorola Android phone. The amplifier circuit of the speaker appears to be the most likely culprit, with some reports saying that the volume setting had a big impact. With the short range the security risk should be minor, although we would be interested to see the results of testing with higher gain antennas. It is also likely that the emission levels still fall within FCC Part 15 limits.

Continue reading “Listening To An IPhone With AM Radio”