Remoticon 2021: Unbinare Brings A Reverse-Engineering Toolkit Into Recycling

Unbinare is a small Belgian company at the forefront of hacking e-waste into something useful, collaborating with recycling and refurbishing companies. Reverse-engineering is a novel way to approach recycling, but it’s arguably one of the most promising ways that we are not trying at scale yet. At Hackaday Remoticon 2021, Maurits Fennis talked about Unbinare’s efforts in the field and presented us with a toolkit he has recently released as a part of his work, as well as described how his background as an artist has given him insights used to formulate foundational principles of Unbinare.

Image showing an Unbinare OISTER boardUnbinare’s tools are designed to work in harmony with each other, a requirement for any productive reverse-engineering effort. OI!STER is a general-purpose salvaged MCU research board, with sockets to adapt to different TQFP chip sizes. This board is Maurits’s experience in reverse-engineering condensed into a universal tool, including a myriad of connectors for different programming/debugging interfaces. We don’t know the board’s full scope, but the pictures show an STM32 chip inside the TQFP socket, abundant everywhere except your online retailer of choice. Apart from all the ways to break out the pins, OI!STER has sockets for power and clock glitching, letting you target these two omnipresent Achilles’ heels with a tool like ChipWhisperer.

Continue reading “Remoticon 2021: Unbinare Brings A Reverse-Engineering Toolkit Into Recycling”

Three More Remoticon Speakers Complete The Lineup

You know, it’s hard to believe, but Hackaday Remoticon 2021 is just two weeks away. Every year, we work hard to make the ‘con a little better and brighter than the one before it, and this year is no exception. We’ve already got a star-studded list of keynote speakers, and our list of inspiring talks seems to get longer and more exciting every week. With todays announcement of three more speakers, that list is complete and available along with their scheduled times on the official Remoticon website.

Come and see what we’ve got in store for you on Friday, November 19th and Saturday, November 20th. Remoticon admission is absolutely free this year, unless you want a t-shirt to commemorate the event for a paltry $25. Tickets are still available — in fact, they’ll be available right up until Remoticon Day One on the 19th, but if you want a shirt you’ll need to grab one of those tickets by a week from today. Go get yours now!

Okay, let’s get on to today’s announcement of the speakers!

Continue reading “Three More Remoticon Speakers Complete The Lineup”

Hackaday Podcast 118: Apple AirTag Hacked, Infill Without Perimeters, Hair-Pulling Robots, And Unpacking The 555

Elliot’s keeb: ortho, offset, thumby.

Hackaday editors Elliot Williams and Mike Szczys gather to ooh and aah over a week of interesting hacks. This week we’re delighted to welcome special guest Kristina Panos to talk about the Inputs of Interest series she has been working on over the last couple of years. In the news is the effort to pwn the new Apple AirTags, with much success over the past week. We look at turning a screenless Wacom tablet into something more using a donor iPad, stare right into the heart of a dozen 555 die shots, and watch what happens when you only 3D print the infill and leave the perimeters out.


Take a look at the links below if you want to follow along, and as always, tell us what you think about this episode in the comments!

Direct download (~55 MB)

Places to follow Hackaday podcasts:

Continue reading “Hackaday Podcast 118: Apple AirTag Hacked, Infill Without Perimeters, Hair-Pulling Robots, And Unpacking The 555”

The Cheap Way To Glitch An STM8 Microcontroller

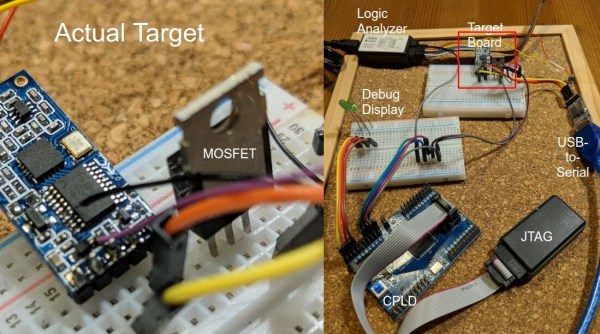
Reverse engineering or modifying a device often requires you to access the firmware stored on a microcontroller. Since companies are usually not fond of people who try to peek into their proprietary data, most commercial devices are readout protected. [rumpeltux] ran into this problem when he tried to dump the firmware on an HC-12 wireless serial communication module for yet undisclosed reasons. Hacking into the device was a challenge that he gladly accepted and in the end, he succeeded by building a low-cost setup for voltage glitching.

Voltage glitching is a form of fault injection that has, e.g., been successfully used to hack the Playstation Vita. It involves the injection of voltage spikes on the power line in order to force the bootloader to skip security checks. The hard thing is trying to find the right shape of the waveform and the best way to inject the signal.

While there are already open-source boards for fault injection like ChipWhisperer, [rumpeltux] chose to build his own setup around an FPGA. By using a cheap EPM240 board, some MOSFET, and a USB-to-Serial converter, the total costs of the glitching setup were under 20 Euros. [rumpeltux] then recorded a larger number of voltage traces on the VCC pin around the reset phase and analyzed the differences. This helped him to pinpoint the best time for injecting the signal and refine the search space. After some unsuccessful attempts to glitch the VCC and GND pins, he got lucky when using one of the voltage regulator pins instead.

Be sure not to miss Samy Kamkar’s talk at Supercon 2019 if you want to know more about hardware attacks or how to eavesdrop on people using a bag of potato chips.

Side Channel Attacks Against Mixed Signal Microcontrollers

You shouldn’t transmit encryption keys over Bluetooth, but that’s exactly what some popular wireless-enabled microcontrollers are already doing. This is the idea behind Screaming Channels, an exploit published by researchers at EUERCOM, and will be a talk at Black Hat next week. So far, the researchers have investigated side-channel attacks on Bluetooth-enabled microcontrollers, allowing them to extract tinyAES keys from up to 10 meters away in controlled environments. A PDF of the paper is available and all the relevant code is available on GitHub.

The experimental setup for this exploit consisted of a BLE Nano, a breakout board for a Nordic nRF52832 Bluetooth microcontroller, a Hack RF, a USRB N210 software defined radio from Ettus, and a few high-gain antennas and LNAs. The example attack relies on installing firmware on the BLE Nano that runs through a few loops and encrypts something with tinyAES. Through very careful analysis of the RF spectrum, the AES keys can be extracted from the ether.

Side channel attacks have received a bit more popularity over recent years. What was once limited to Three Letter Agency-level Van Eck phreaking can now be done inexpensively and in a system with devices like the ChipWhisperer.

Of course, this is only a demonstration of what is possible with side-channel attacks in a highly controlled environment with a significant amount of work gone into the firmware running on the microcontroller. This isn’t evidence that balaclava-wearing hackers are sniffing your phone from across the parking lot to get the password to your Instagram account, but it does show what is possible with relatively cheap, off-the-shelf hardware.

Screaming Channels Attack RF Security

As long as there has been radio, people have wanted to eavesdrop on radio transmissions. In many cases, it is just a hobby activity like listening to a scanner or monitoring a local repeater. But in some cases, it is spy agencies or cyberhackers. [Giovanni Camurati] and his colleagues have been working on a slightly different way to attack Bluetooth radio communications using a technique that could apply to other radio types, too. The attack relies on the ubiquitous use of mixed-signal ICs to make cheap radios like Bluetooth dongles. They call it “Screaming Channels” and — in a nutshell — it is relying on digital information leaking out on the device’s radio signal.

Does it work? The team claims to have recovered an AES-128 key from 10 meters away. The technique reminds us a bit of TEMPEST in that unintended radio transmissions provide insight into the algorithm the device applies to encrypt or decrypt data. Most (if not all) encryption techniques assume you can’t see inside the “black box.” If you can, then it’s because it is relatively easy to break the code.

Continue reading “Screaming Channels Attack RF Security”

MeatBagPnP Makes You The Automatic Pick And Place

It’s amazing how hackers are nowadays building increasingly complex hardware with SMD parts as small as grains of sand. Getting multilayer PCB’s and soldering stencils in small quantities for prototyping is easier than ever before. But Pick-and-Place — the process of taking parts and stuffing them on the PCB in preparation for soldering — is elusive, for several reasons. For one, it makes sense only if you plan to do volume production as the cost and time for just setting up the PnP machine for a small run is prohibitive. And a desktop PnP machine isn’t yet as ubiquitous as a 3D printer. Placing parts on the board is one process that still needs to be done manually. Just make sure you don’t sneeze when you’re doing it.

Of course the human is the slow part of this process. [Colin O’Flynn] wrote a python script that he calls MeatBagPnP to ease this bottleneck. It’s designed to look at a row in a parts position file generated from your EDA program and highlight on a render of the board where that part needs to be placed. The human then does what a robotic PnP would have done.

A bar code scanner is not necessary, but using one does make the process a bit quicker. When you scan a code on the part bag, the script highlights the row on the spreadsheet and puts a marker on the first instance of it on the board. After you’ve placed the part, pressing the space bar puts a marker on the next instance of the same value. The script shows it’s done after all parts of the same value are populated and you can then move on to the next part. If you don’t have a bar code scanner handy, you can highlight a row manually and it’ll tell you where to put that part. Check it out in the video below.

Of course, before you use this tool you need some prior preparation. You need a good PNG image of the board (both sides if it is double-sided) scaled so that it is the same dimensions as the target board. The parts position file generated from your EDA tool must use the lower left corner of the board as the origin. You then tell the tool the board dimensions and it scales up everything so that it can put the red markers at the designated XY positions. The script works for single and double-sided boards. For a board with just a few parts, it may not be worth the trouble of doing this, but if you are trying to manually populate a complex board with a lot of parts, using a script like this could make the process a lot less painful.

The project is still fresh and rough around the edges, so if you have comments or feedback to offer, [Colin] is listening.

[Colin]’s name ought to ring a bell — he’s the hacker who built ChipWhisperer which took 2nd Prize at The Hackaday Prize in 2014. The MeatBagPnP project is a result of having worked at building increasingly complex boards manually and trying to make the process easier. In addition to the walk-through of how the script works after the break we’ve embedded his other video from three years back when he was stuffing parts — including BGA’s — the hard way and then reflowing them in a Chinese oven with hacked firmware.

Continue reading “MeatBagPnP Makes You The Automatic Pick And Place”