Sure is nice-looking, don’t you think? That’s because there some great details at play here, like the legend-less two-tone keycaps and the neat-o locking box it sits in.
This keyboard is inspired by the Hacoa Ki-board, which uses a singles plank of wood to craft the keycaps. [Kelvin] wanted to try this technique for themselves. Evidently this won’t be the last wooden keyboard, so stay tuned for more over on Hackaday.io.
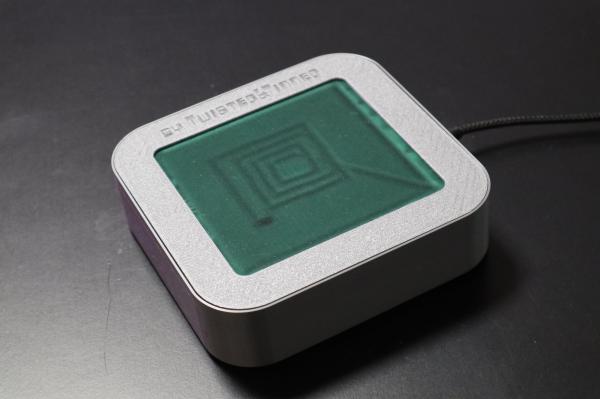
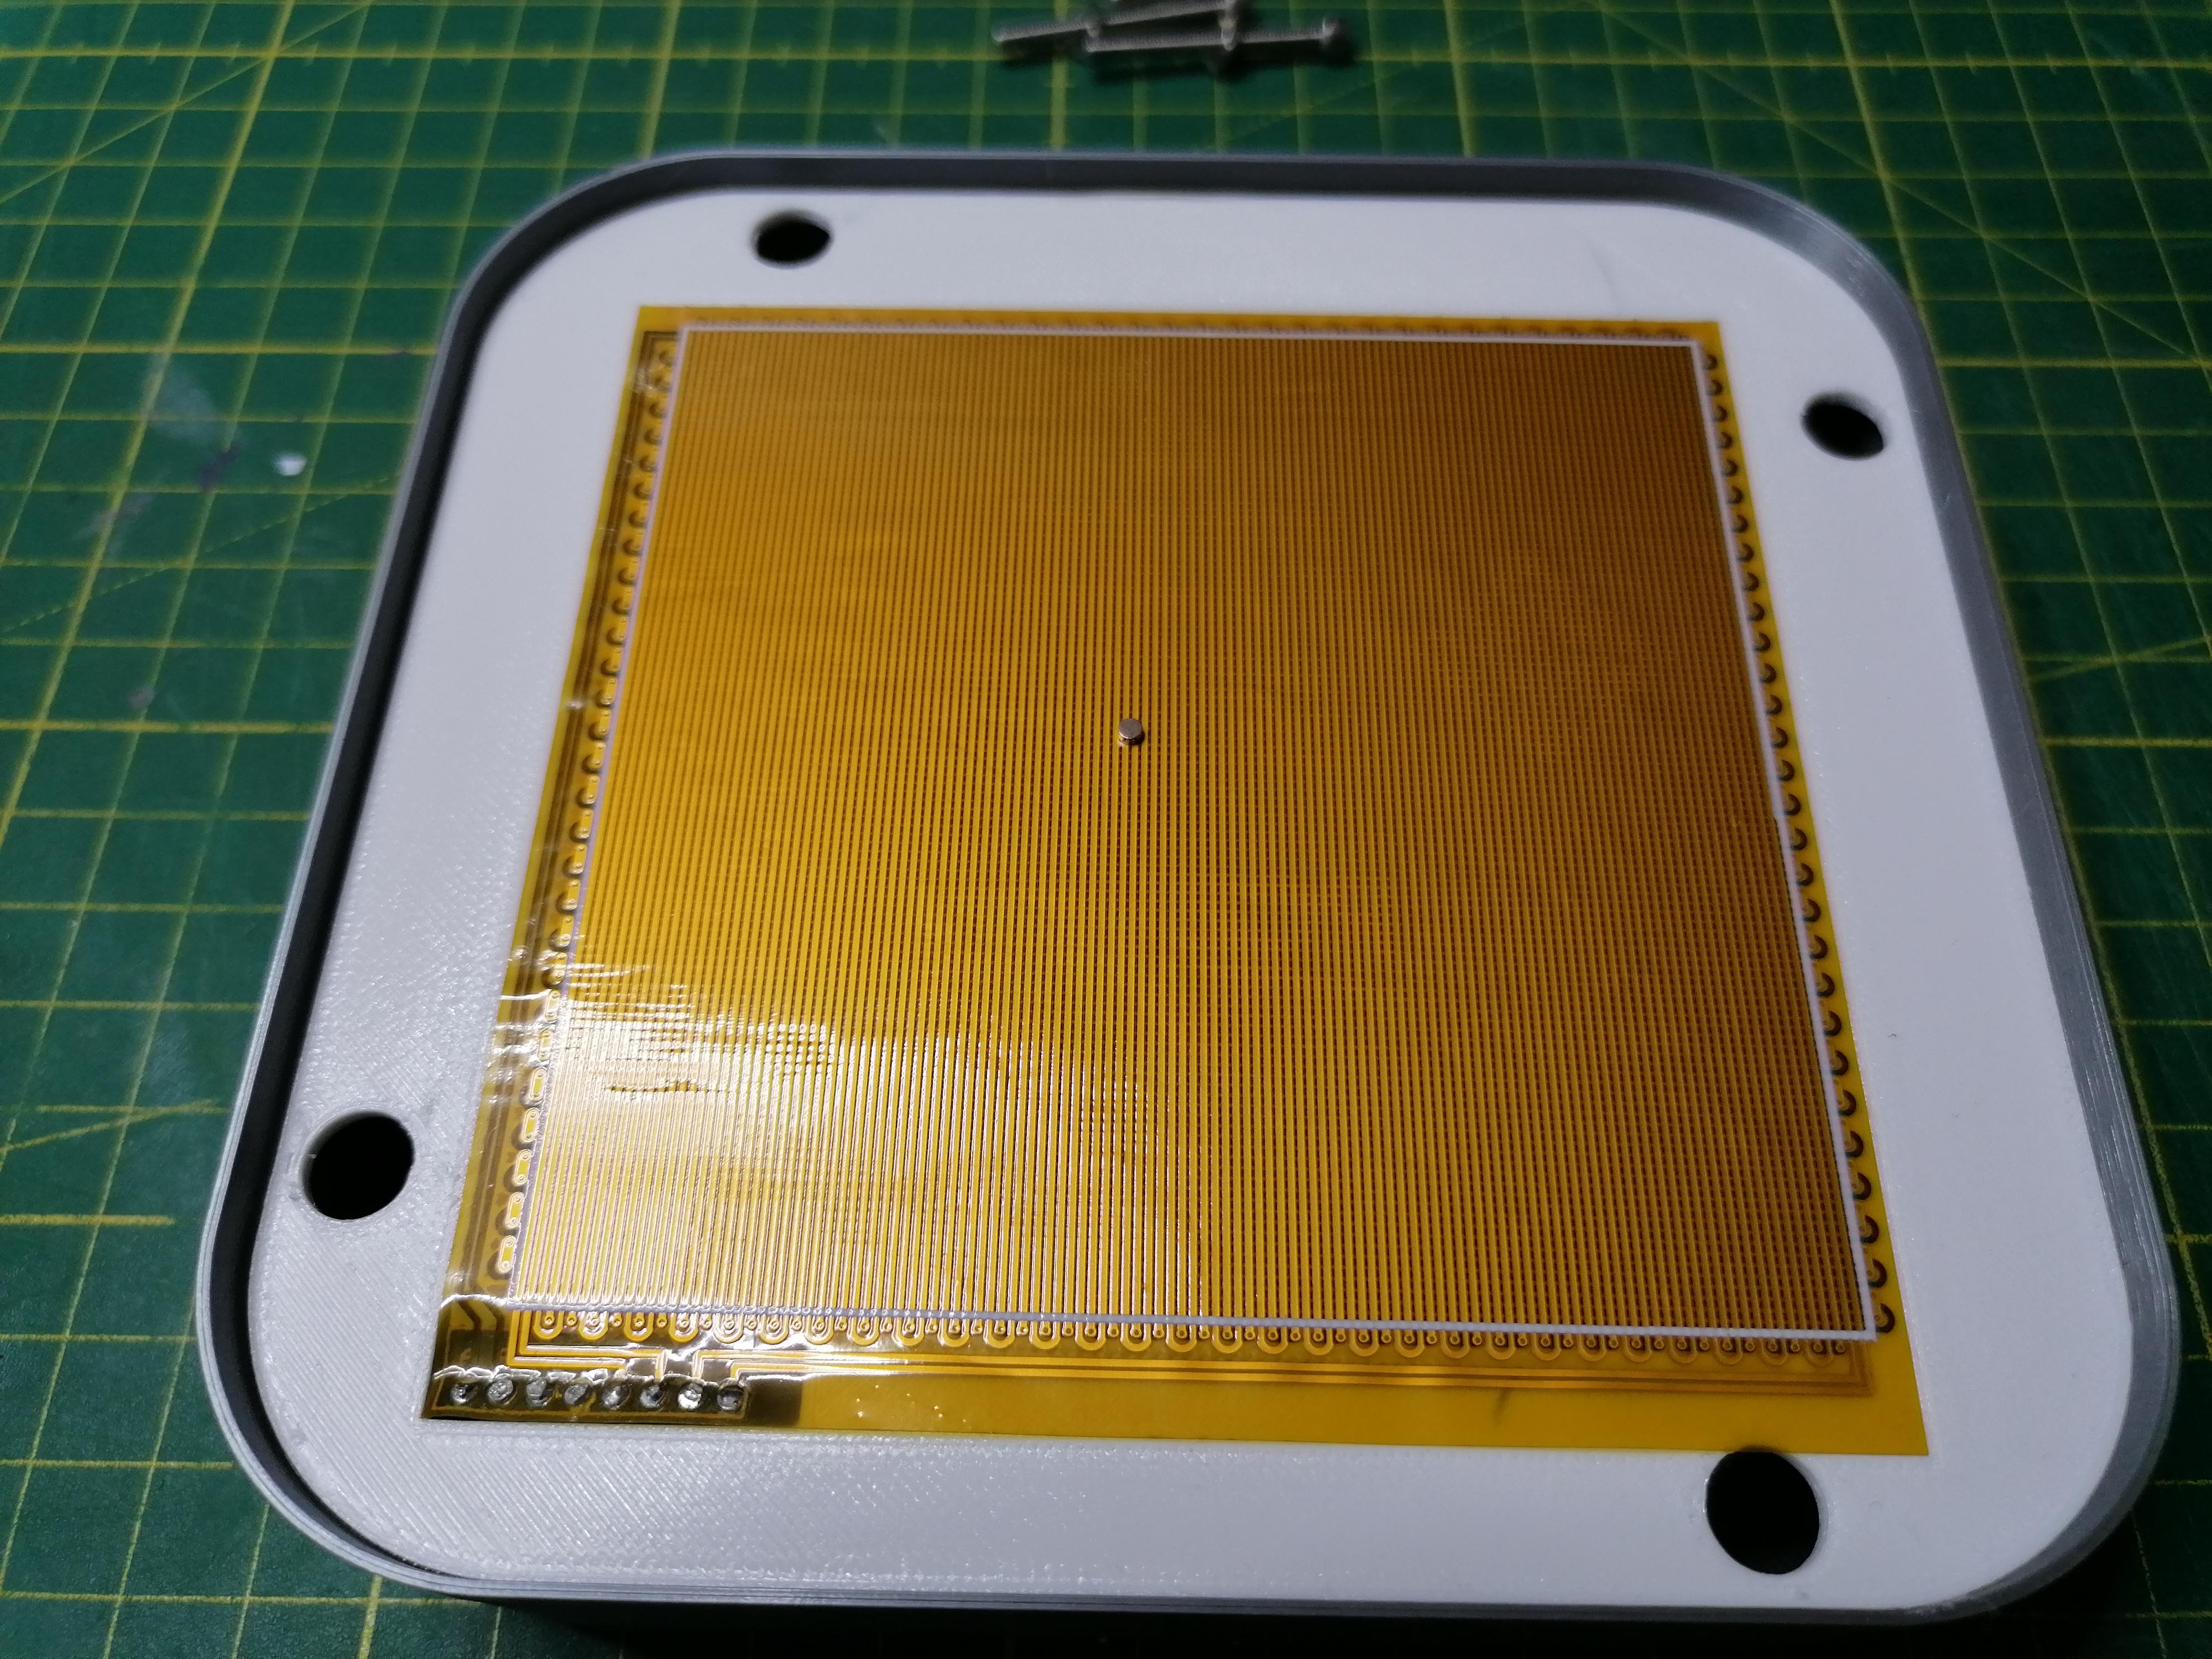
Once in a while, we see projects that could easily pass for commercial products. This is one of those projects: a (surprisingly) low-cost DIY macro pad from [Josh R] that was designed to be a cheaper alternative to the various stream decks out there. Between the carbon fiber top plate and the crystal-clear acrylic keycaps, this is quite the elegant solution.
This lovely little macro pad is built around the ESP8266, specifically the WEMOS D1 Mini V4. However, the most vital part to get right is the screen, which must be a 128 x 160 TFT display in order to line up with the 3D printed frame that divides it into fourths. Custom parts like the acrylic keycaps and the carbon fiber top plate are available on Tindie if you don’t have access to a CNC.
Operationally, Open Deck has a nice-looking GUI. Once programmed, each shortcut is capable of having three beneath it, with the fourth button reserved for Home. Be sure to check out the extremely satisfying build video after the break.
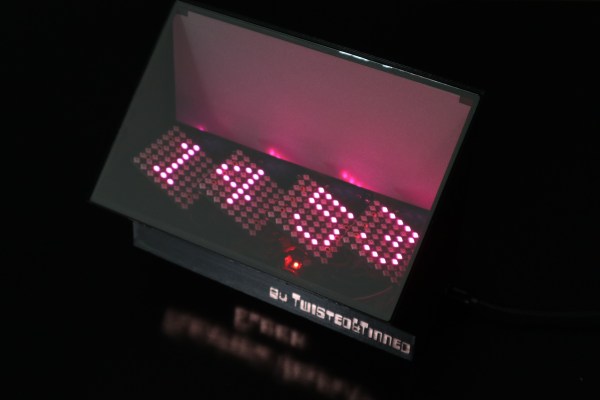
If you’ve never heard of Aerial Imaging by Retro-Reflection, or AIRR for short, you’re probably not the only one. It’s a technique developed by researchers at Utsunomiya University that uses beam splitters and retroreflective foil to create the illusion of an image floating freely in the air. Hackaday alum [Moritz v. Sivers] has been experimenting with the technique to make — what else — a clock, appropriately called the Floating Display Clock.
The most commonly available retroreflective films are typically used for things like street signs and high-visibility clothing, but also work perfectly fine for homebrew AIRR setups. [Moritz] tried several types and found that one called Oralite Superlens 3000 resulted in the best image quality. He combined it with a sheet of teleprompter glass and mounted both in their appropriate orientation in a black 3D printed enclosure.
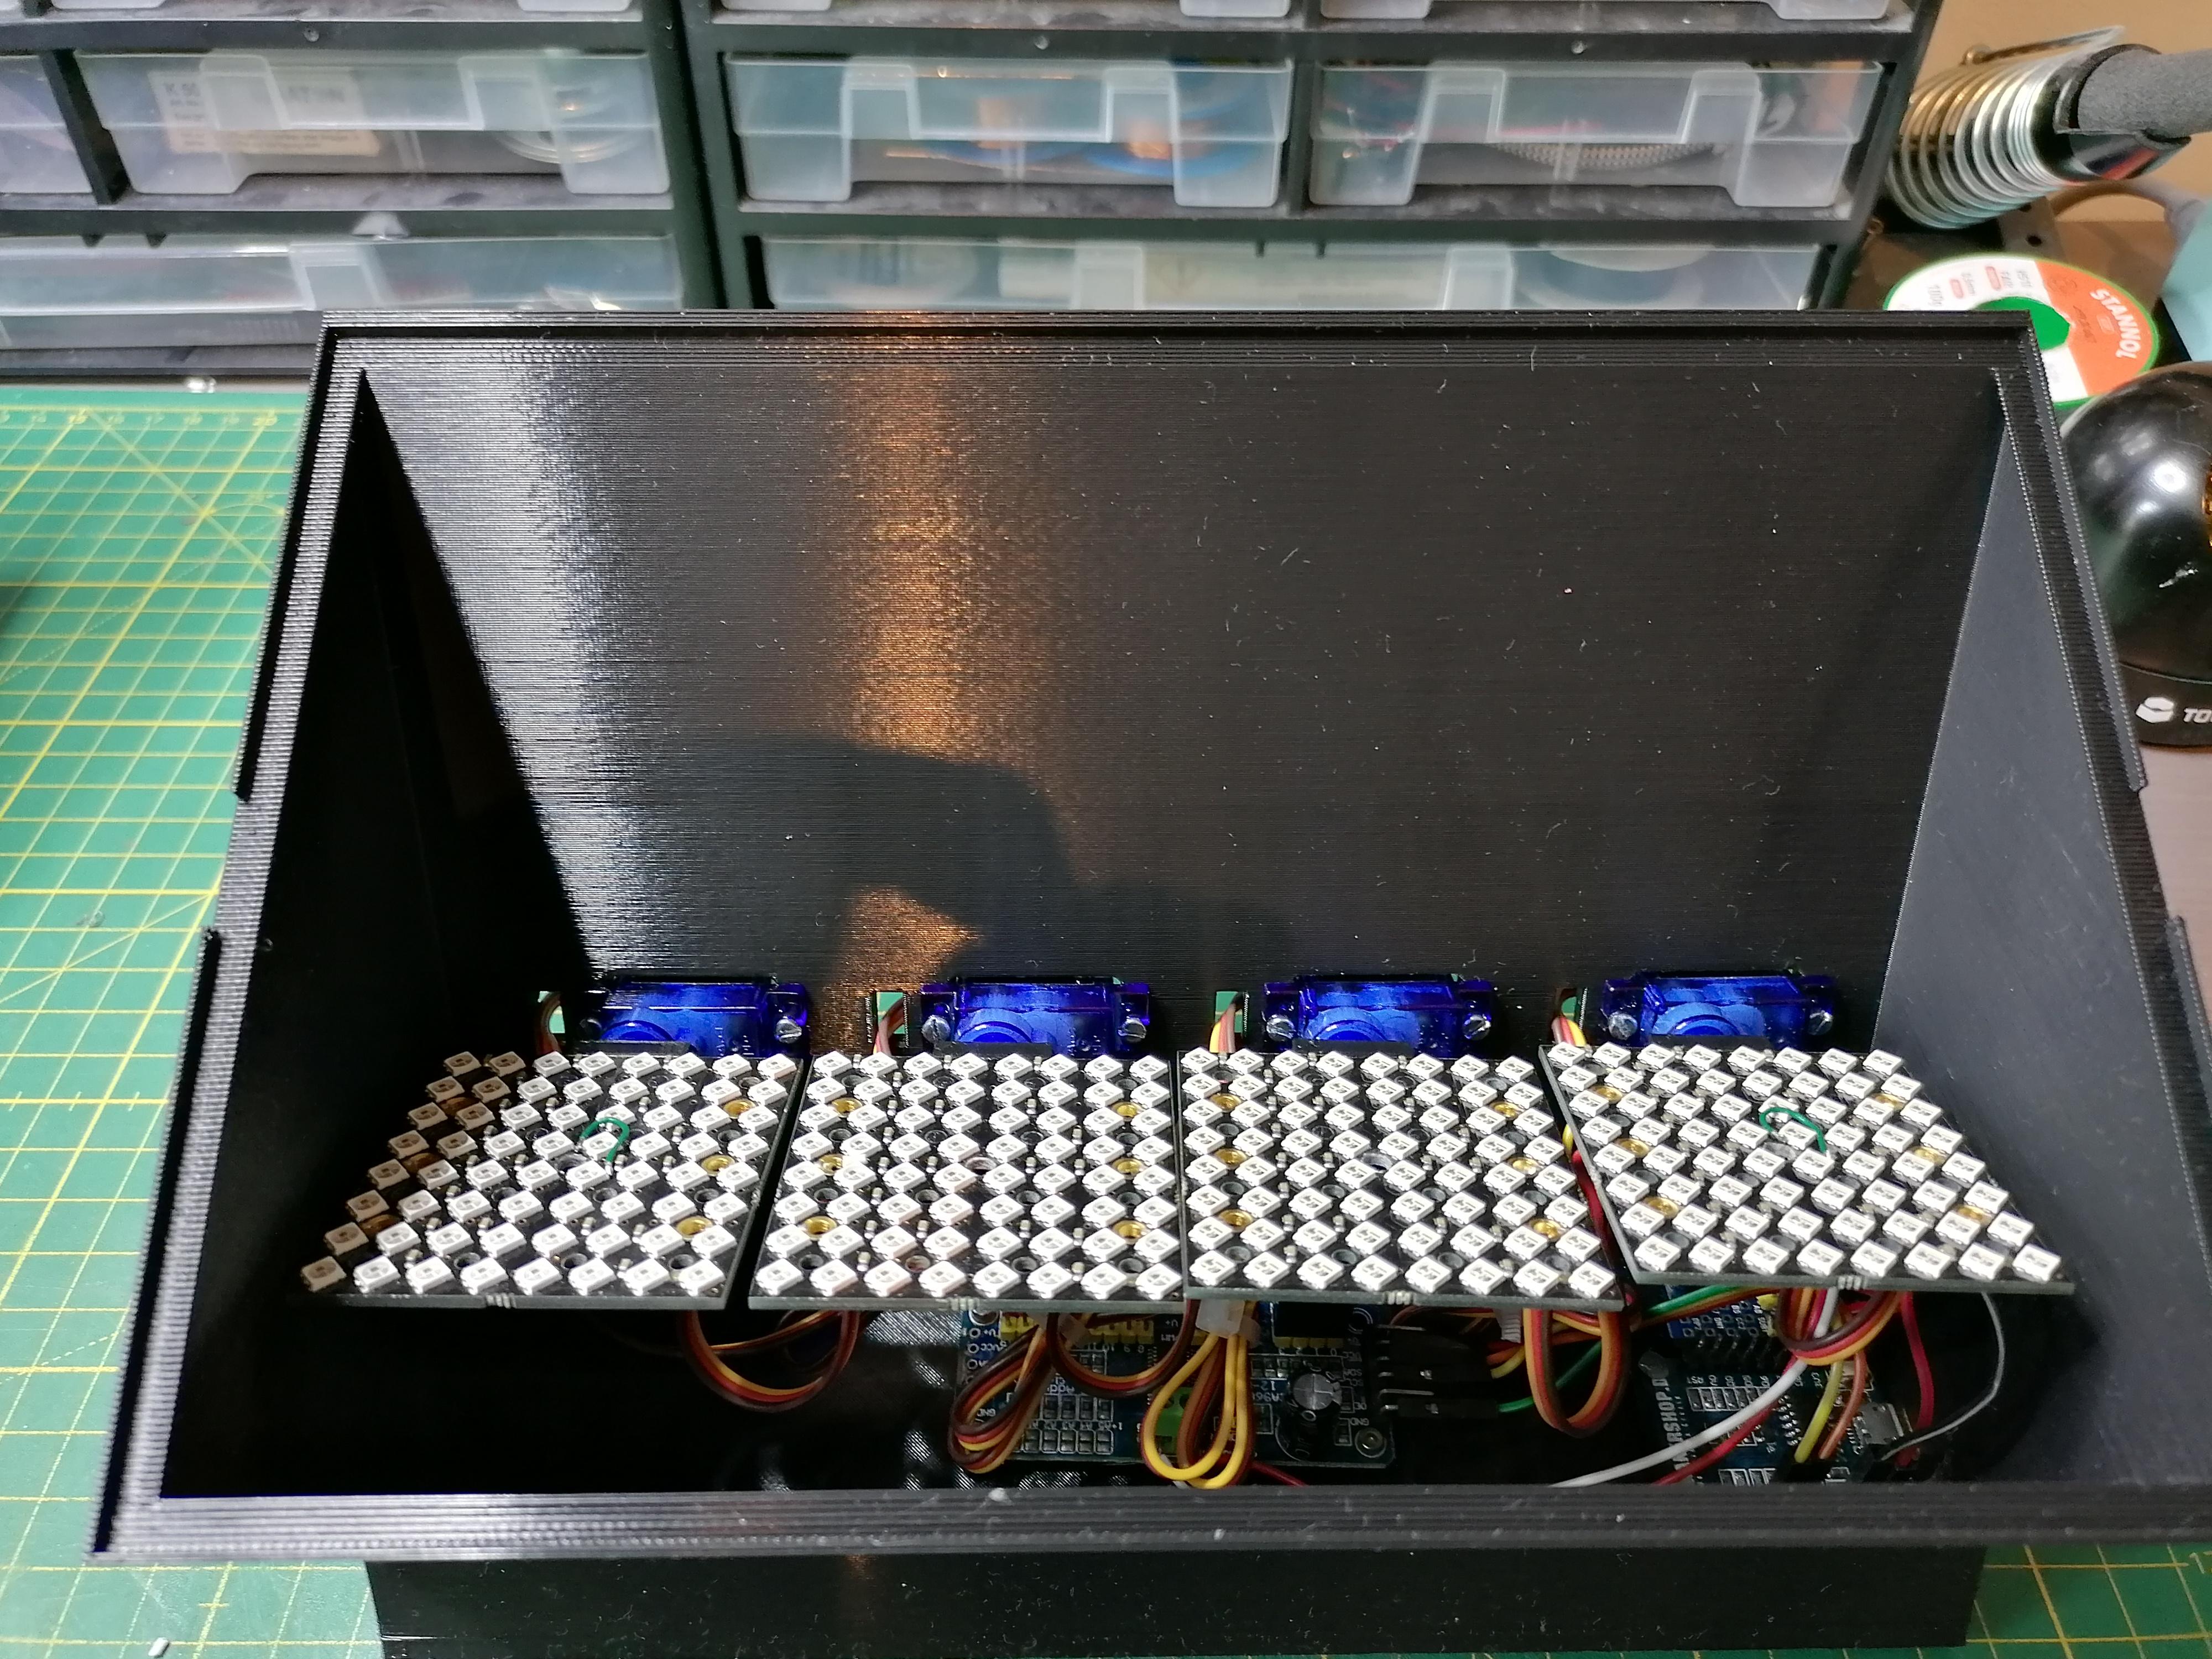
The projected image is generated by a set of 8×8 RGB LED displays, which are driven by a PCA9685 sixteen-channel servo driver board. A Wemos D1 Mini fetches the time from an NTP server and operates the display system, which includes not only the LED panels but also a set of servos that tilt each digit when it changes, giving the clock an added 3D effect that matches nicely with the odd illusion of digits floating in space.
We can imagine it’s pretty hard to capture the end result on video, and the demonstration embedded below probably doesn’t do it justice. But thanks to [Moritz]’s clear step-by-step instructions on his Instructables page, it shouldn’t be too hard to replicate his project and see for yourself what it looks like in real life.
Although this isn’t a hologram, it does look similar to the manydisplaytypes that are commonly called “holographic”. If you want to make actual holograms, that’s entirely possible, too.
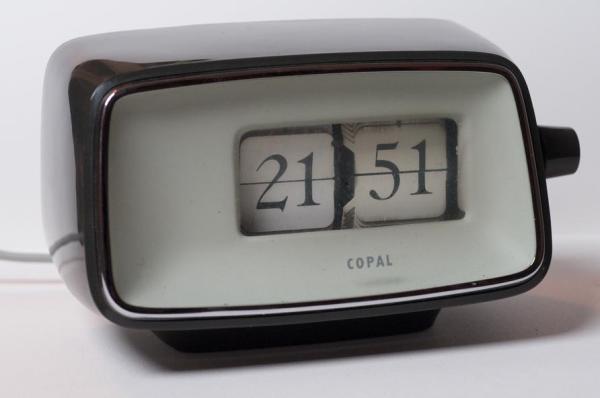
Many of the clocks we feature here on Hackaday are entirely built from scratch, or perhaps reuse an unusual display type. But sometimes, an old clock is just perfect as it is, and only needs a bit of an upgrade to help it fit into the modern world. One such example is the lovely 1960s Copal flip clock (in German, Google Translate link) that [Wolfgang Jung] has been working with — he managed to bring it squarely into the 21st century without changing its appearance one bit.
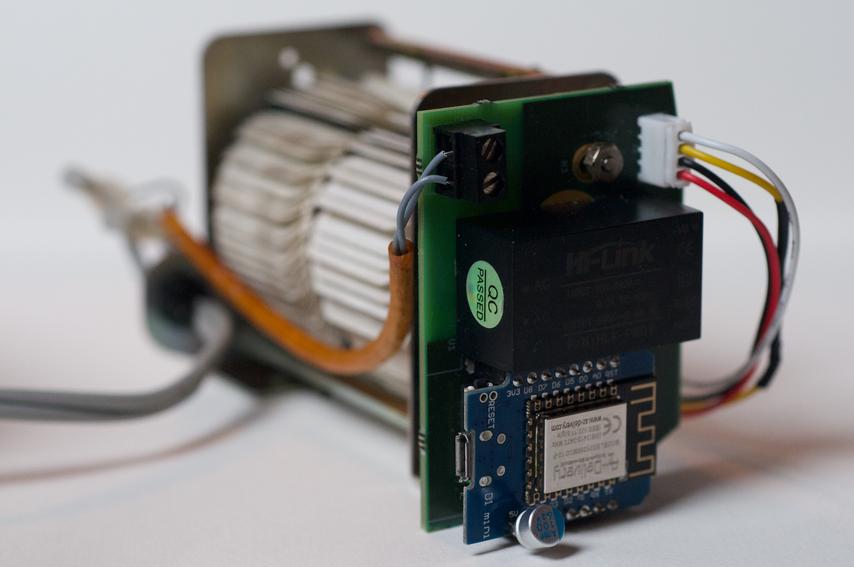
Like most flip clocks from the 60s and 70s, the Copal clock uses a small synchronous AC motor to advance the digits. Because this motor runs in step with the mains frequency, it also acts as the clock’s timing reference. However the original motor had died, and a direct replacement was impossible to find. So [Wolfgang] decided to replace it with a modern stepper motor. He designed a small PCB that fit the original housing, on which he placed a Trinamic TMC2225 stepper motor driver, a Wemos D1 Mini and a small 5 V power supply.
Thanks to its WiFi connection, the D1 can find out the correct time by contacting a Network Time Protocol (NTP) server. Displaying that time would be tricky with the original hardware though, because there is no indication of which numbers are displayed at any time. [Wolfgang] cleverly solved this problem by placing an IR proximity sensor near the lowest digit, allowing the D1 to count the number of digits that have flipped over and thereby deduce the current state of the display.
There’s plenty of fun to be had with classic flip clocks like this, and with a bit of hacking any old split-flap display should be usable for your own clock project. If none are available at your local thrift store or yard sales, you can always roll your own.
[Moritz v. Sivers] has a knack for making his own displays, which are typically based on some obscure physical effect. Magnetic viewing films, those thin plastic sheets that change color in response to a magnetic field, are his latest area of interest, as you can see in his Magnetic Kinetic Art Display.
The overall idea of the display is similar to a kinetic sand art table, in which a ball traces out shapes in a pile of sand. In [Moritz]’s project, the magnetic viewing film is the sand, and a 2 mm diameter magnet is the ball. The magnet is moved along the film by two sets of coils embedded inside a flex PCB mounted just below the film. One set of coils, on the top layer of the PCB, moves the magnet in the x direction, while a second set on the bottom layer moves it in the y direction.
The flex PCB is small, but carries lots of windings
[Moritz] used a flex PCB not because it had to be bendy, but to keep the two sets of coils as close together in the z direction as possible. This helps to avoid a big difference in strength between the two directions. To drive the coils, he used a pair of TB6612FNG stepper motor drivers, controlled by a Wemos D1 Mini.
The housing was 3D printed mostly from PLA, but with a few bits done in PETG. This was for structural rigidity as well as thermal performance — the coils can carry up to two amps and get pretty warm as a result.
The video, embedded below, shows some of the shapes that can be drawn: squares, spirals and even digits to turn the display into a clock. [Moritz] got the PCB coil idea from a project by [bobricius], and cleverly extended it into a useful product. It’s not the first time [Moritz] used magnetic viewing film to make a clock, either.
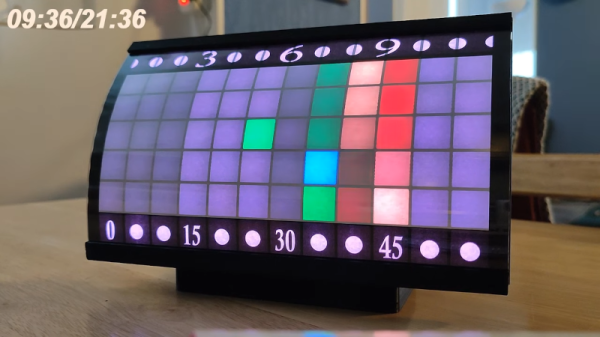
While we’re told that space-time curves, we aren’t sure that was what [andrei.erdei] was going for when he built a great-looking curved LED clock. The LEDs are courtesy of a strip of 84 WS2812 smart LEDs, the curve comes from a 3D printed part, and a Wemos D1 mini provides the brains.
Like all of our favorite clocks, this one has a unique way of displaying the time. If you find the description in the post hard to understand, the video below makes it a bit easier to wrap your head around. Note the time appears in the top left corner of the video in several cases — so you can check to see if you’re reading it correctly.
The secret sauce, of course, is the curved plastic grid that holds the LEDs. Because of the unusual shape, supports are a must and there are notes in the post about the settings used to get the best results. With 84 LEDs, the software has to be careful not to turn them to full brightness at one time, or else the clock would need a 6 amp power supply. Instead, the software limits the brightness to a little less than half of the maximum. No LED is ever white, and not all LEDs are on at once. The clock works easily, according to [andrei], with a 2 A supply. The clock has a WiFi connection where you can set things up easily.
Overall, a nice-looking project that would look at home on a science fiction movie set. We’ve seen color clocks before. If you want to economize on LEDs, we’ve seen a clock with only five!
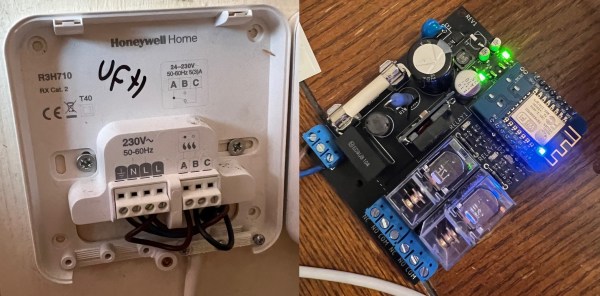
Thanks to Home Assistant, automating the various systems that run your home is easier than ever. But you still need to make a connection between those systems and your Home Assistant setup, which can be tricky if the manufacturer didn’t have this use case in mind. When [Simon] wanted to automate his home heating system, he discovered that most Home Assistant-enabled thermostats that he could find didn’t support his two separate heating zones connected to a single boiler. The easiest solution turned out to be to design his own.
The original heating system consisted of two control boxes that each had a 230 V mains connection coming in and a “request heat” control line going to the boiler. [Simon] considered replacing these with a simple off-the-shelf ESP8266 relay board and a 12 V power supply, but figured this would look messy and take up quite a bit of space. So he bought a neat DIN-rail mounted enclosure instead, and designed a custom PCB to fit inside it.
The PCB holds a Wemos D1 Mini connected to two relays that switch the two heating circuits. The D1 runs ESPhome and needs just a few lines of configuration to connect it to [Simon]’s home network. There’s no separate power supply — the 230 V line is connected directly to a 12 V DC power module mounted on the PCB, so the new system is plug-and-play compatible with the old.
Complete PCB design files are available on [Simon]’s website and GitHub page. There are several other ways to make custom thermostats for your home, with an Arduino for example. If you’re interested in repairing your own heating system, or want to optimize it even further, there’s a whole community out there to help you.

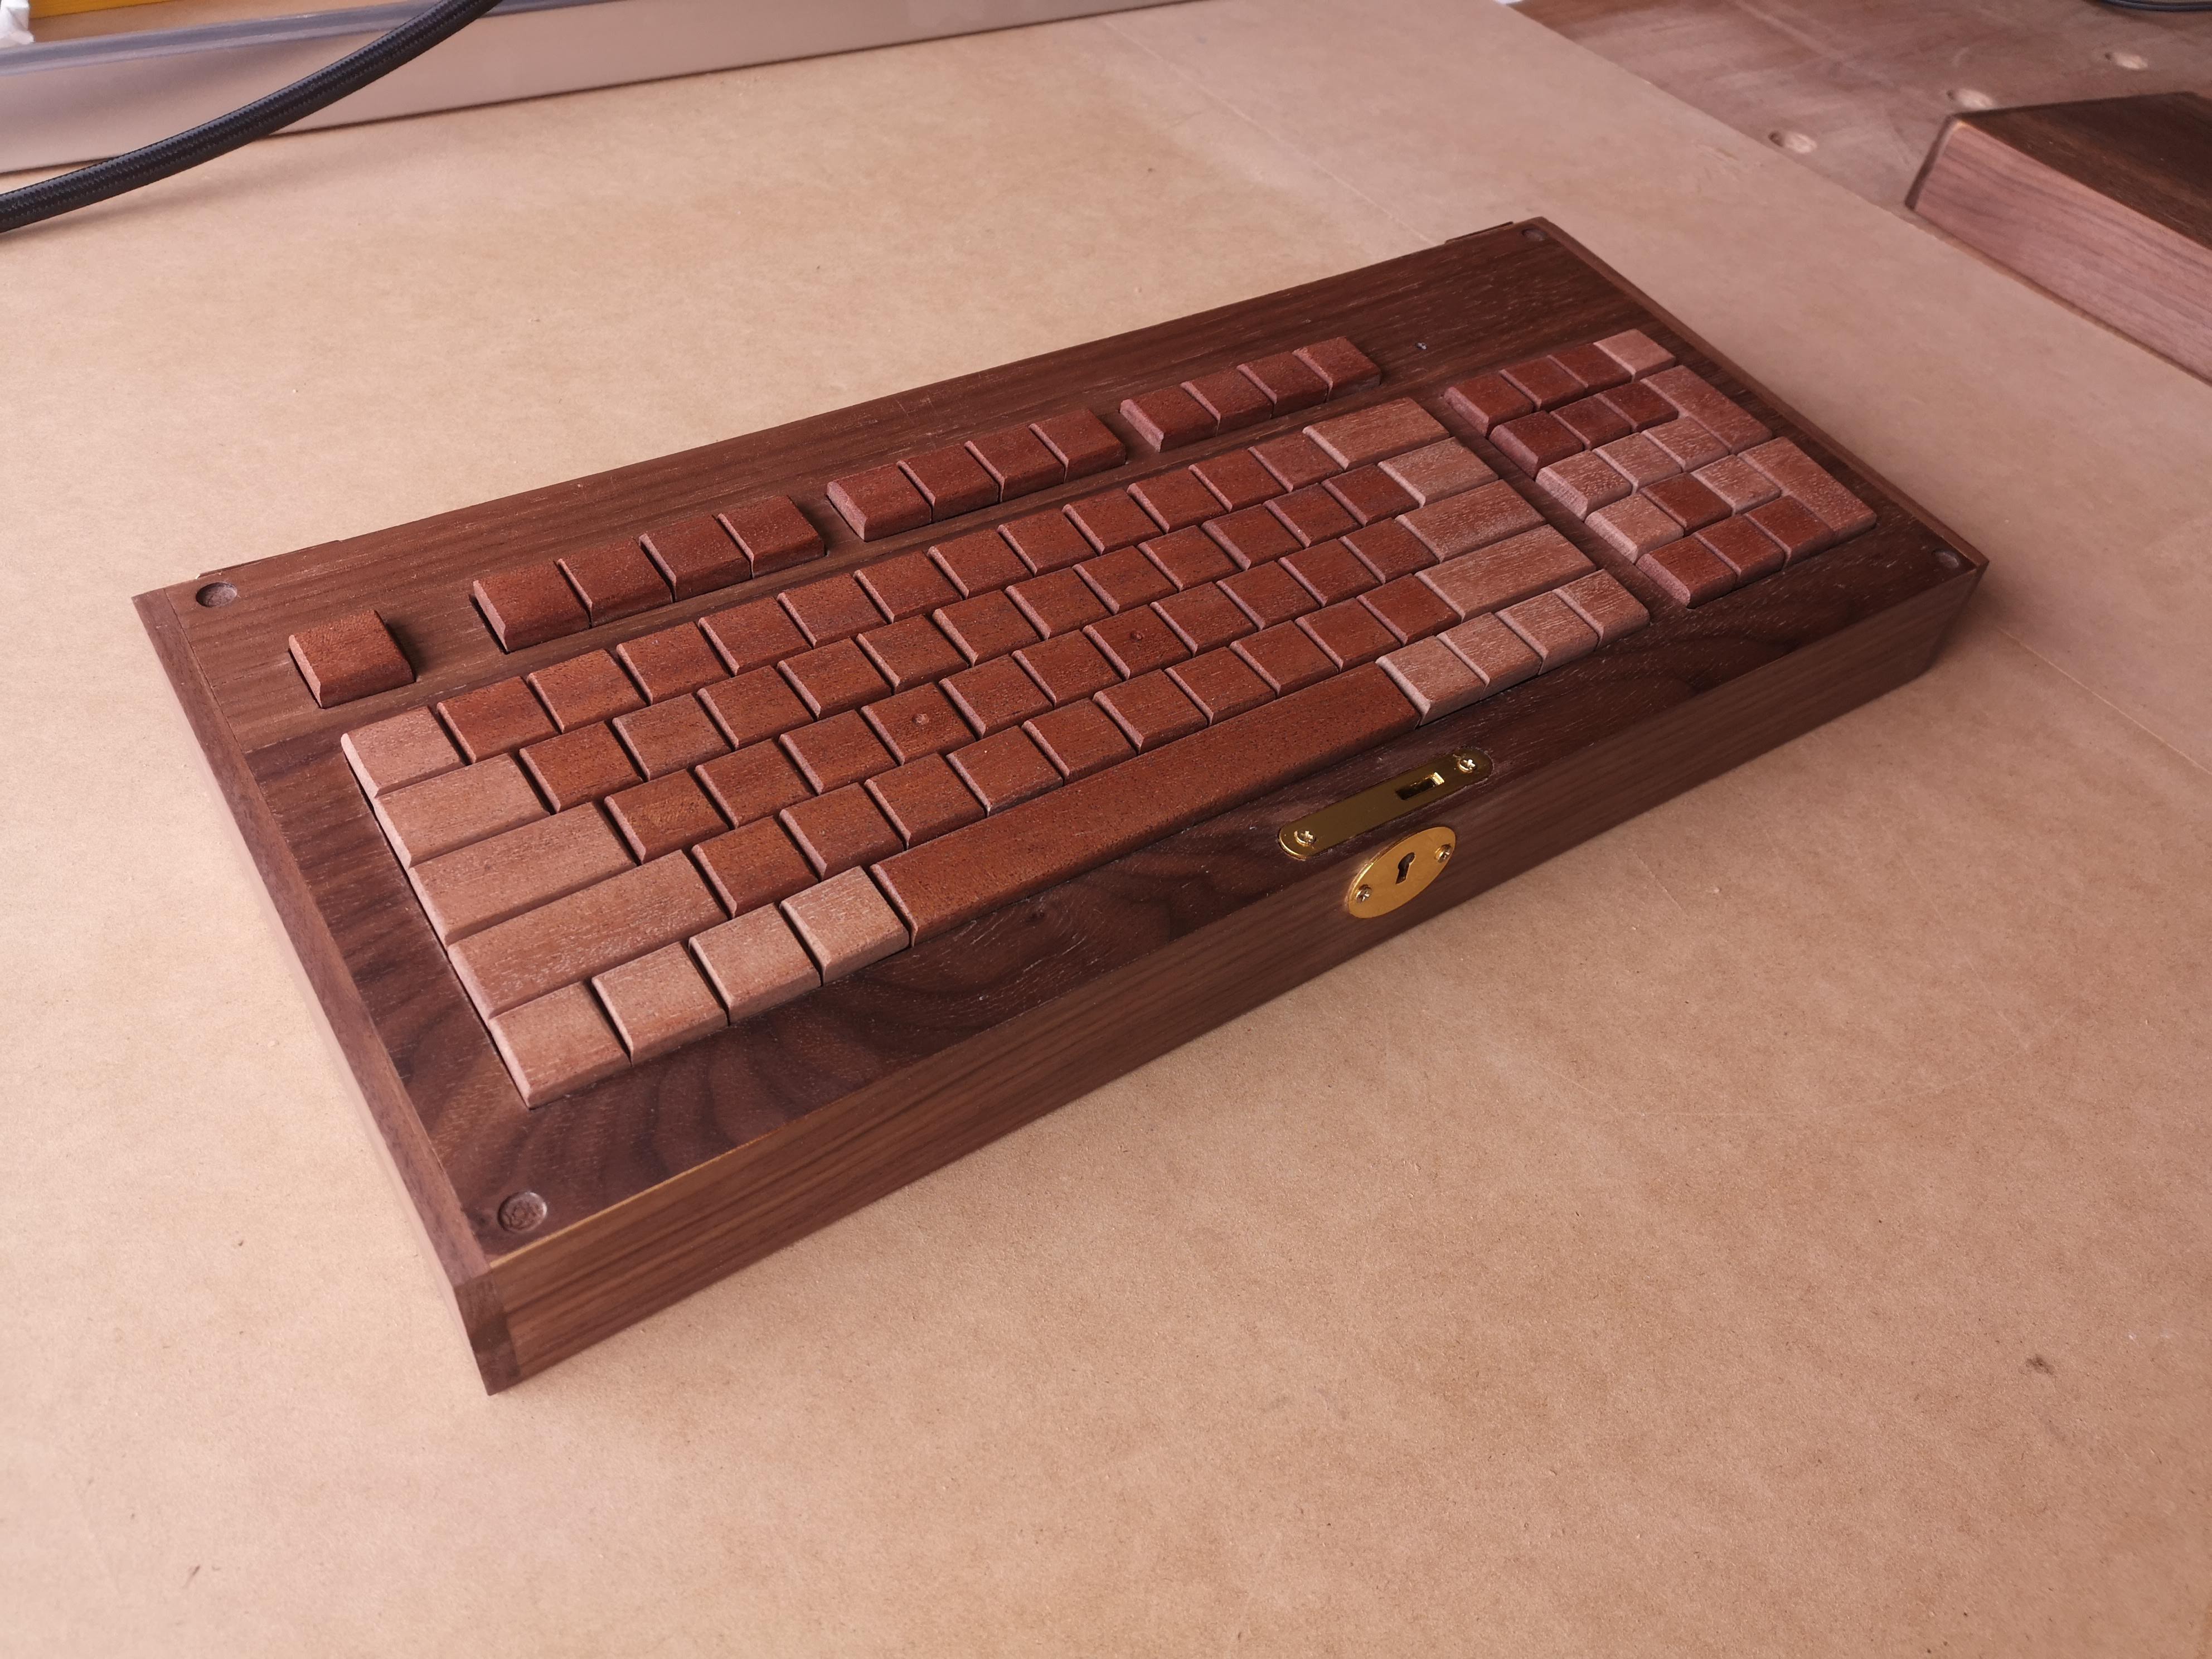 Well, unfortunately we don’t know much yet about this nice wooden keyboard from [Kelvin Chow], but maybe this inclusion will encourage [Kelvin] to post more about it.