3D Printed Buttons, Printed As A Single Unit

These nifty buttons come from [Marc Schömann], and they are intended to cover just about any kind of tact switches. The buttons, their cover, and the compliant bits that act as a spring can be 3D printed as a complete unit that requires no assembly, and can be used fresh off the print bed.

The design is still being developed, but those interested in playing with it can download the current model here. [Marc] printed this version in two colors, but that’s just to make how the buttons work easier to see. It also gave him an opportunity to test and tune the tool changer on his printer.

Tool changer, you say? Yes, indeed. The printer is the Blackbox, a open source, tool-changing 3D printer of [Marc]’s own design with its own Hackaday.io project page.

Embedded below is a video overview of the button design being prepped and printed on a Blackbox printer, with a tool change happening in the process. Tool changing is an attractive feature that many people including E3D have taken a swing at, and it’s always exciting to see it in action.

Continue reading “3D Printed Buttons, Printed As A Single Unit”

This Chiptune Player’s Got What Nintendon’t

When it comes to chiptunes, the original Nintendo Entertainment System and the Game Boy get all the accolades. The OPL synths have all the fun. But there’s another chip out there in dusty old machines that is at least as interesting with a repertoire at least as influential as the Mega Man 2 OST. It’s the YM2612, the chip in the Sega Mega Drive/Genesis.

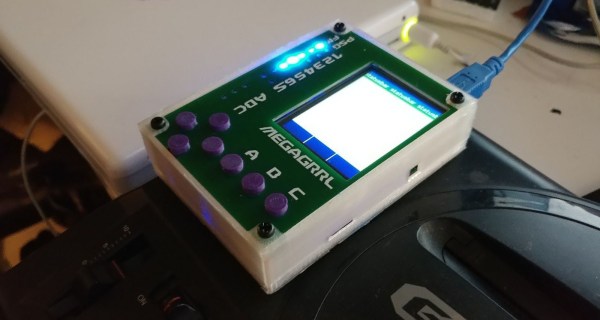
[natalie] created a portable device capable of playing back the files targeting the sound chips in this venerable machine. It’s the MegaGRRL, and it’s the iPod for the original Genesis sound tracks.

Inside the MegaGRRL is an ESP32 in the form of an ESP-WROOM-32 module. There is, of course a YM2612 chip in there, along with a headphone amplifier and a battery charger. The display is a fairly standard and cheap affair that’s 240 x 320 pixels in full color, and there are seven buttons on this device, because of course you need an A, B, and C button.

Combined with a 3D printed enclosure, the GameGRRL does exactly what it says it will: it plays all the music from old Sega games. Now, when you’re in the inevitable argument with someone over the fact that Michael Jackson wrote the Sonic 3 soundtrack, the proof is right in your pocket. Of if you want to jam out on the Toe Jam And Earl soundtrack, that’s right there too. You can check out the video demos below.

Continue reading “This Chiptune Player’s Got What Nintendon’t”

Safely Measuring Single And Three-Phase Power

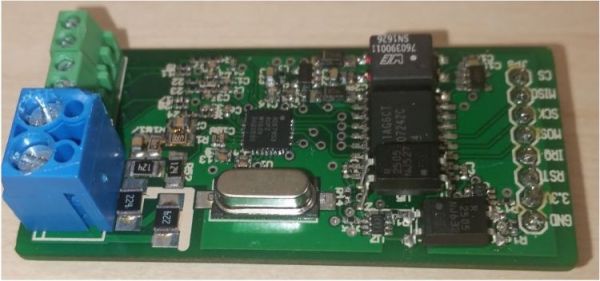
There are many reasons why one would want to measure voltage and current in a project, some applications requiring one to measure mains and even three-phase voltage to analyze the characteristics of a device under test, or in a production environment. This led [Michael Klopfer] at the University of California, Irvine along with a group of students to develop a fully isolated board to analyze both single and three-phase mains systems.

Each of these boards consists out of two sections: one is the high-voltage side, with the single phase board using the Analog Devices ADE7953 and the three-phase board the ADE9708. The other side is the low-voltage, isolated side to which the microcontroller or equivalent connects to using either SPI or I2C. Each board type comes in either SPI or I2C flavor.

Each board can be used to measure line voltage and current, and the Analog Devices IC calculates active, reactive, and apparent energy, as well as instantaneous RMS voltage and current. All of this data can then be read out using the provided software for the Arduino platform.

The goal of this project is to make it easy for anyone to reproduce their efforts, with board schematics (in Eagle format) and the aforementioned software libraries provided. Here it is somewhat unfortunate that the documentation can be somewhat incomplete, with basic information such as input and measurement ranges missing. Hopefully this will improve over the coming months as it does seem like a genuinely useful project for the community.

We’ve covered the work coming out of [Michael]’s lab before, including this great rundown on Lattice FPGAs. They’re doing machine vision, work on RISC-Vchips, and more. A stroll through the lab’s GitHub is worth your time.


An Arduino Sickbay Display Worthy Of The Enterprise

The various displays and interfaces in Star Trek, especially The Original Series, were intentionally designed to be obtuse and overly complex so they would appear futuristic to the audience. If you can figure out how Sulu was able to fly the Enterprise with an array of unlabeled buttons and rocker switches, we’d love to hear it. But one area of the ship where this abstract design aesthetic was backed off a bit was sickbay, as presumably they wanted the audience to be able to understand at a glance whether or not Kirk or Spock were going to pull through their latest brush with death (spoilers: they’re fine).

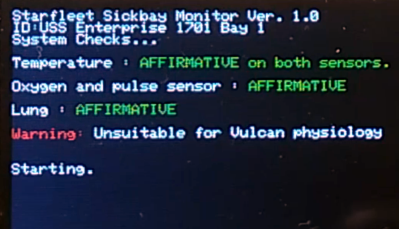
For his latest project, [XTronical] has recreated the classic displays from Dr McCoy’s sickbay with an Arduino Nano and a 2.8 inch LCD display. It even has a speaker and MP3 player module to recreate the “heartbeat” sound from the original show. The whole thing looks and sounds phenomenal, and would be a perfect desk toy for the classic Trek aficionado. But this isn’t just a toy, it’s a fully functional medical scanner.

Of course, this little gadget can’t tell you if you’ve come down with a nasty case of Rigellian fever, but it can read your vitals using a MAX30100 pulse oximeter module and DS18B20 thermometer. In fact, it actually has two DS18B20 sensors: one to measure ambient temperature, the other to measure skin temperature. With those two figures, [XTronical] says it can calculate your core body temperature. The only thing that’s made up is the blinking “Respiration” indicator, that one’s just an estimate.

So where do we go from here? This project is presented as merely the first step in building a complete prop, perhaps in the form of a medical tricorder. We’ve seen some phenomenal TOS tricorder builds over the years, and some have even used the Raspberry Pi to shoehorn a bit of functionality into them. [XTronical] says he’s working on getting the source code and a step-by-step build guide put together, so keep an eye out for that in the near future.

Continue reading “An Arduino Sickbay Display Worthy Of The Enterprise”

Bringing FPGA Development To The Masses

The Field Programmable Gate Array (FPGA) is one of the most exciting tools in the modern hacker’s arsenal. If you can master the FPGA, you can create hardware devices that not only morph and change based on your current needs, but can power through repetitive tasks at phenomenal rates. The only problem is, working with FPGAs can be a bit intimidating for newbies. One could argue that the technology is waiting on its “Arduino” moment; the introduction of a cheap development board coupled with easy to use software that brings FPGA hacking into the mainstream.
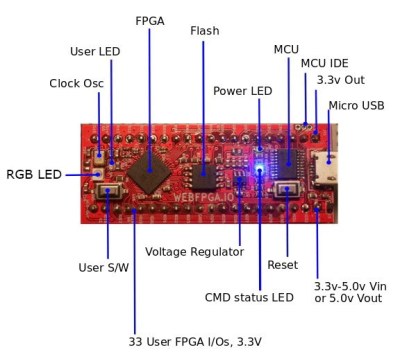
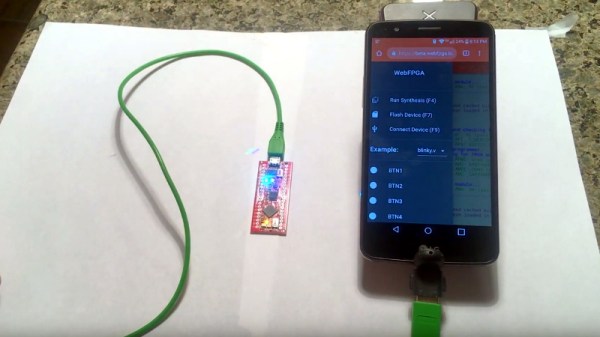
If everything goes according to plan, the wait might soon be over. [Ryan Jacobs] believes his project WebFPGA is the easiest and fastest way to get your hands dirty with this incredible technology. Outwardly the hardware could pass for an Arduino Nano clone, with a bunch of GPIO pins and a couple of LEDs on a small breadboard-friendly PCB. Certainly a no-frills presentation. It’s the software side is where things get interesting: all you need to develop for this FPGA is a modern web browser.

Currently Chrome, Opera, and Edge are supported, even if they’re running on relatively low-end computers. [Ryan] says this makes it much easier and cheaper to roll out FPGA classes in schools, as students can do everything with their existing Chromebooks. As the video after the break shows, you can even get away with using a sufficiently powerful smartphone to do some FPGA hacking on the go.

So what’s the trick? Essentially the heavy-lifting is done remotely: all of the synthesis is performed in their cloud backend, with the final bitstream delivered to the user for installation through WebUSB. If you’re more comfortable on the command line, [Ryan] says they’re currently working on tools which will allow you to perform all the necessary interactions with their cloud service without the browser.

The more critical Hackaday reader will likely be concerned about lock-in. What happens if you buy one of these development boards without a license for the service, or worse, what happens if WebFPGA goes belly-up down the road? To that end, [Ryan] makes it clear that their hardware is completely compatible with existing offline FPGA development tools such as the open source IceStorm.

We’ve seen considerable interest in low-cost FPGA development platforms, with readers perhaps recalling the excitement surrounding the fire sale of the Pano Logic thin clients. Despite efforts to make developing for these systems even easier, it’s hard to imagine the bar getting much lower than what WebFPGA is shooting for. Their Kickstarter campaign is close to crossing the finish line, and we’re very interested to see where the product goes from here.

Continue reading “Bringing FPGA Development To The Masses”

How To Turn A Chainsaw Into A Chopsaw

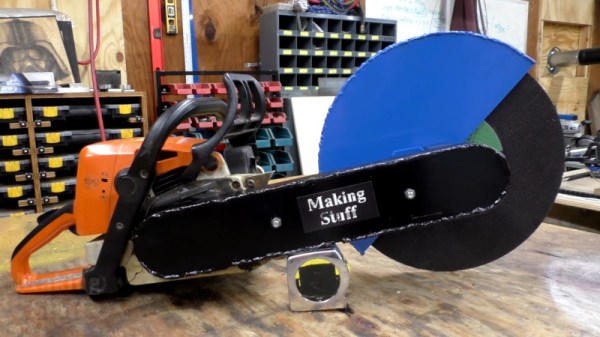
If you’re doing a lot of metal working, a chop saw is a great tool to have. It’s an easy and quick way to do a lot of neat, clean accurate cuts. [Making Stuff] wanted to do just that, but didn’t have a chop saw lying around. Instead, an old Stihl chainsaw was placed on the bench, and hacking ensued (Youtube link, embedded below).

To achieve this, it was necessary to source some parts and make some modifications to the chainsaw. The clutch bell was removed, and modified to mount a roller chain sprocket. An arm was then built, which mounted a pair of journal bearings at the far end. Another sprocket was installed at this end, along with a shaft which mounts the cutting wheel. Finally, a guard was fitted over the cutting wheel to give the build a semblance of safety.

[Making Stuff] notes that the chainsaw can readily be converted back to its standard purpose, needing only to refit the original parts and replace the modified clutch bell with a stock one. It’s a great way to get two tools out of one, and we’re sure it will prove useful in future projects.

If you’ve got a taste for wacky chop saws, check out this hard drive build. Video after the break.

Continue reading “How To Turn A Chainsaw Into A Chopsaw”

Building A Smart Speaker From Scratch

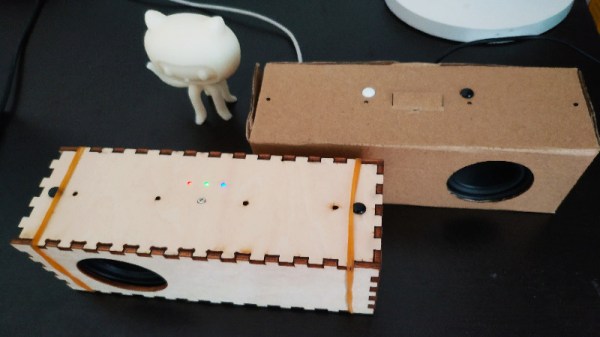
Smart speakers have proliferated since their initial launch earlier this decade. The devices combine voice recognition and assistant functionality with a foreboding sense that paying corporations for the privilege of having your conversations eavesdropped upon could come back to bite one day. For this reason, [Yihui] is attempting to build an open-source smart speaker from scratch.

The initial prototype uses a Raspberry Pi 3B and a ReSpeaker microphone array. In order to try and bring costs down, development plans include replacing these components with a custom microphone array PCB and a NanoPi board, then implementing basic touch controls to help interface with the device.

There’s already been great progress, with the build showing off some nifty features. Particularly impressive is the ability to send WiFi settings to the device using sound, along with the implementation of both online and offline speech recognition capabilities. This is useful if your internet goes down but you still want your digital pal to turn out the lights at bed time.

It’s not the first time we’ve seen a privacy-focused virtual assistant, and we hope it’s not the last. Video after the break.

Continue reading “Building A Smart Speaker From Scratch”