When Appliance Hackers Hit The Music Scene

The art-music-technology collective “Electronicos Fantasticos!” (commonly known as Nicos) is the brain child of artist/musician [Ei Wada] in Japan. They revive old, retired and out-dated electrical appliances as new “electro-magnetic musical instruments” creating not just new ways to play music, but one that also involves the listener as a musician, gradually forming an interactive orchestra. They do this by creatively using the original functions of appliances like televisions and fans, hacking them in interesting ways to produce sound. The project started in the beginning of 2015, leading to the creation of a collaborative team — Nicos Orchest-Lab — around the end of that year. They have since appeared in concerts, including a performance at “Ars Electronica”, the world’s largest media arts festival in 2019.

For us hackers, the interesting bits can be found in the repository of their Work, describing sketchy but tantalising details of the musical instruments. Here are a few of the more interesting ones, but do check out their website for more amazing instruments and a lot of entertaining videos.

CRT-TV Gamelan – A percussion instrument made from old CRT monitors. Coloured stripes projected on the screen cause changes in static-electricity picked up by the players hands, which then propagates to an electrical coil attached to their foot. This signal is then patched to a guitar amplifier.

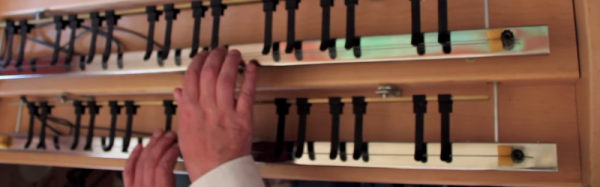
Electric Fan Harp – They take out the fan blade, and replace it with a “coded disk” containing punched holes. Then they shine a bulb from under the rotating disk, and the interrupted light is picked up by an optical receiver held by the player. Controlling the fan speed and the location of the receiver pickup, they can coax the fan to produce music – based on the idea “What if Jimi Hendrix, the god of electric guitars, played electric fans as instruments?”

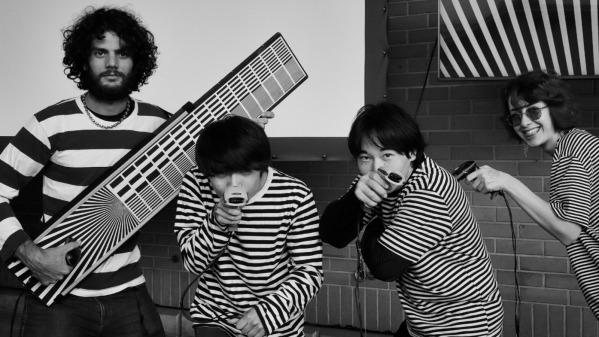
Barcoder – This one is quite simple but produces amazing results, especially when you pair up with another Barcoder musician. The output of the barcode reader is pretty much directly converted to sound – just wave the wand over printed barcode sheets. And it works amazingly well when pointed at striped shirts too. Check out the very entertaining videos of this gizmo. This led to the creation of the Barcodress – a coded dress which creates an interactive music and dance performance.


The Striped Shirtsizer

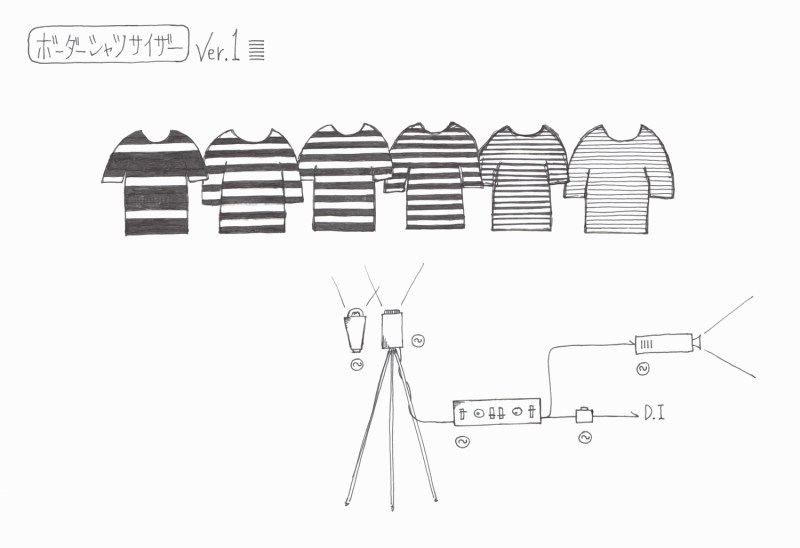
Striped Shirtsizer – This one is a great hack and a synth with a twist. A camera picks up video signals, which is then fed to the “Audio” input of an amplifier directly. In the video on the project page, [Ei Wada] explains how he accidentally discovered this effect when he wrongly plugged the “yellow” video out connector to the audio input of his guitar amplifier. At an outdoor location, a bunch of people wearing striped shirts then become an interactive musician-audience performance.

The Kankisenthizer

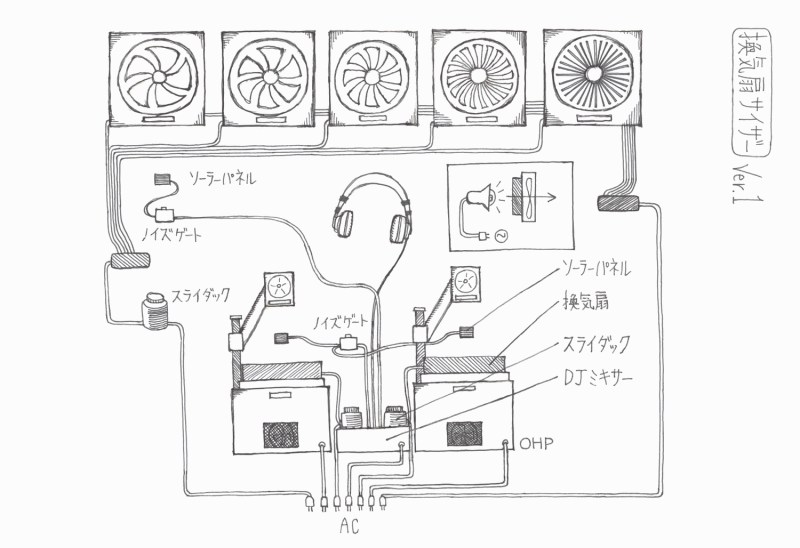
Kankisenthizer a.k.a Exhaust Fancillator  – This one consists of an array of industrial exhaust fans – although one could just as well use smaller instrument cooling fans. On one side is a bright light, and on the other a small solar cell. Light fluctuations picked up by the solar cell are then fed to the guitar amplifier. The array consists of fans with different numbers of blades. This, coupled with changing the fan speed, results in some amazing sound effects.

There’s a whole bunch more, and even though the “instructions” to replicate the instruments aren’t well documented, there’s enough for anyone who’s interested to start experimenting.

Continue reading “When Appliance Hackers Hit The Music Scene”

Stomp Button, Receive Candy

If there’s any holiday that is worth adjusting for strange times, it’s gotta be Halloween. Are you inclined to leave a bowl of candy on the porch to avoid the doorbell? If so, this is the perfect year to finally figure out some sort of metering apparatus so that greedy preteens are less likely to steal your stash in one sweep. There’s still time to make something fun like [Brankly]’s automatic candy dispenser, which we think ought to stick around for many years to come. Video is posted after the break.

Underneath that skeleton’s jack-o-lantern head is the heart of this build — an orange 5-gallon bucket that matches it perfectly. Simply step on the giant lighted arcade button, and the equally giant NEMA-23 stepper motor moves a 3D-printed turntable inside the bucket with the help of an Arduino Nano. This moves the candy toward the 3D-printed ramp and out the mouth of the jack-o-lantern, where it lands in a bowl that lights up when it hits the bottom thanks to a relay and a second Nano.

[Brankly] made clever use of IR break-beam switches, which sit underneath the two square holes in the ramp. Once candy passes over one of them, the turntable stops and rotates backward to move the candy where it can’t be reached.

Frankly, we love that [Brankly] reused the sound effects module that came with the jack-o-lantern. This build is totally open, and [Brankly] is even giving away 40 PCBs if you want to make your own. For now, you can check out the code and start printing the STLs.

If time is tight, build a spooky slide that puts six feet between you and the trick or treaters.

Continue reading “Stomp Button, Receive Candy”

Custom Bases Make LEGO Spacecraft Even Cooler

If you’re reading Hackaday, we’re willing to bet that you either own the LEGO Saturn V and Lunar Module models, or at the very least know somebody who does. Even if you thought you’d finally outgrown playing with little plastic bricks (a critical mistake, but one we’ll ignore for now), these two kits just have an undeniable appeal to them. You might never get a chance to work for NASA, but you can at least point to the Saturn V rocket hanging on your wall and say you built it yourself.

[Ben Brooks] thought these fantastic models deserved equally impressive stands, so he built “exhaust plumes” that both craft could proudly perch on. With the addition of some RGB LEDs and a Particle Photon to drive them, he added incredible lighting effects that really bring the display to life. There are also sound effects provided by an Adafruit Audio FX board, and for the Lander, an LCD display that mimics the Apollo Guidance Computer DSKY that astronauts used to safely navigate to the Moon and back.

In his write-up on Hackaday.io, [Ben] makes it clear that he was inspired by previous projects that added an illuminated column of smoke under the LEGO Saturn V, but we think his additions are more than worthy of praise. Playing real audio from the Apollo missions that’s synchronized to the light show honestly makes for a better display than we’ve seen in some museums, and he even rigged up a wireless link so that his neighbor’s kids can trigger a “launch” that they can watch from their window.

For the Lunar Module, he 3D printed an enclosure for the Photon and Adafruit quad alphanumeric display that stands in for the DSKY. There’s even lighted indicators for the 1201/1202 program alarms that popped up as Neil Armstrong and Buzz Aldrin descended to the lunar surface 50 years ago.

While many of us aren’t old enough to have our own first hand memories of the Moon landing, projects like this prove that the incredible accomplishments of the Apollo program never fail to inspire. Who knows? Those kids that are watching [Ben]’s Saturn V from next door might one day get to make the trip themselves.

Continue reading “Custom Bases Make LEGO Spacecraft Even Cooler”

An Arduino Sickbay Display Worthy Of The Enterprise

The various displays and interfaces in Star Trek, especially The Original Series, were intentionally designed to be obtuse and overly complex so they would appear futuristic to the audience. If you can figure out how Sulu was able to fly the Enterprise with an array of unlabeled buttons and rocker switches, we’d love to hear it. But one area of the ship where this abstract design aesthetic was backed off a bit was sickbay, as presumably they wanted the audience to be able to understand at a glance whether or not Kirk or Spock were going to pull through their latest brush with death (spoilers: they’re fine).

For his latest project, [XTronical] has recreated the classic displays from Dr McCoy’s sickbay with an Arduino Nano and a 2.8 inch LCD display. It even has a speaker and MP3 player module to recreate the “heartbeat” sound from the original show. The whole thing looks and sounds phenomenal, and would be a perfect desk toy for the classic Trek aficionado. But this isn’t just a toy, it’s a fully functional medical scanner.

Of course, this little gadget can’t tell you if you’ve come down with a nasty case of Rigellian fever, but it can read your vitals using a MAX30100 pulse oximeter module and DS18B20 thermometer. In fact, it actually has two DS18B20 sensors: one to measure ambient temperature, the other to measure skin temperature. With those two figures, [XTronical] says it can calculate your core body temperature. The only thing that’s made up is the blinking “Respiration” indicator, that one’s just an estimate.

So where do we go from here? This project is presented as merely the first step in building a complete prop, perhaps in the form of a medical tricorder. We’ve seen some phenomenal TOS tricorder builds over the years, and some have even used the Raspberry Pi to shoehorn a bit of functionality into them. [XTronical] says he’s working on getting the source code and a step-by-step build guide put together, so keep an eye out for that in the near future.

Continue reading “An Arduino Sickbay Display Worthy Of The Enterprise”

Talking Garbage Can Keeps Eye On Playground

Getting young kids excited about technology and engineering can be a challenge, and getting them interested in the environment isn’t exactly a walk in the park either. So any project that can get them simultaneously engaged in both is a considerable achievement, especially when they can do the work themselves and see how creating something can have a positive impact on their little corner of the world.

[Robert Hart] writes in to tell us about a project that challenged elementary school students to help make sure their peers put trash in its place. The kids came up with some predictably imaginative ideas like a robot to chase down litterers, but as us grown up hackers know all too well, budget and practicality often end up dictating the project’s final form. In the end, they came up with a talking trash can that gives words of encouragement to passerby.

The heart of the system is an Adafruit Audio FX sound board, which has been loaded up with audio clips recorded by the students. The buttons on the front of the can trigger different messages about why it’s important to make sure trash is disposed of properly, and an internal switch allows the can to thank the user for their deposit when the lid has been opened.

A PIR sensor on the front of the can detects when somebody gets close, and plays a message reminding them to make use of the trash cans provided on the playground. It’s not everyday that a child has a garbage can talk to them, so we think this is a fantastic idea for getting a kid’s attention. In keeping with the ecological friendly theme, the whole system is powered by a small solar panel which charges an internal 3.7V LiPo battery with the help of an Adafruit PowerBoost 500.

We’ve seen plenty of unusual projects here at Hackaday, but even for us, a talking garbage can is something of a rarity. Ironically though, we have seen a garbage can which can follow you around, so maybe the kids weren’t so far off with their original idea after all…

Continue reading “Talking Garbage Can Keeps Eye On Playground”

Retrotechtacular: The Trautonium Was Elemental To Electronic Music

Electrical engineer and music enthusiast [Freidrich Trautwein] was dissatisfied. He believed that the equal tempered scale of the piano limited a player’s room for expression. And so in 1930, [Trautwein] and an accomplished pianist named [Oskar Sala] began work on an electro-mechanical instrument that would bring the glissando of the string section’s fretless fingerboards to the keyboard player. [Trautwein] called his creation the Trautonium.

Sound is produced in the instrument by sawtooth frequency generators. It is then passed through filters and manipulated by the resistive string-based manuals. Frequency and intonation are varied relative to the position of the player’s finger along a length of non-conductive string and to the amount of pressure applied. This resistive string is suspended above a conductive metal strip between a pair of posts. A small voltage is applied to the posts so that when the string touches the metal strip below, the player manipulates a voltage-controlled oscillator. A series of metal tongues, also non-conductive, hover above the string. These are placed at scale intervals and can be used like keys.

This early synthesizer is capable of producing many kinds of sounds, from crisp chirps to wet, slapping sounds and everything in between. In fact, all of the sound effects in Alfred Hitchcock’s thriller The Birds were produced on a modified Trautonium by the instrument’s one and only master, [Oskar Sala]. He went on to score hundreds of films by watching them with the Trautonium at his fingertips, recording and layering his compositions into an eerie wall of sound.

Continue reading “Retrotechtacular: The Trautonium Was Elemental To Electronic Music”

Sound Effects Box

vs

At first glance, this may look like a retro styled monome, but it is actually quite different. Merging a Project64 key pad and a Voice Shield for Arduino, [Spikenzie] has made a sound effects box. Each button triggers a unique sound that is stored in the Voice Shield. Of coarse, it will be like a game of memory trying to remember what sound is where. You can see a demo video here.