Making A Robot Cleaner Even Smarter

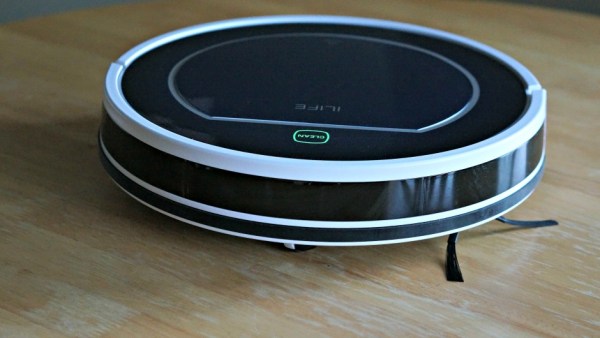
Some electric cleaners are effective and some hardly even seem to make a difference. The ILIFE V7s may be a robot cleaner, but even with its cleaning modes and anti-collision system, it still requires IR signals to complete any tasks. Tired of having to be physically in the same place as his robot cleaner, [pimuzzo] decided to take matters into his own hands and build a RESTful remote control to send IR signals from afar.

The program uses the ESP8266WebServer and IRremoteESP8266 libraries for handling HTTP requests and sending and receiving infrared signals. The remote also respond to Actions on Google for controlling the robot over a Google Assistant.

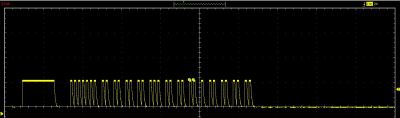
The IR signals are a bit funky – as one user highlighted, finding the IR protocol is a nontrivial task that can be accomplished by recording the IR signals from the original remote with a IR receiver and matching the marks, spaces, and carrier frequency with those of known protocol codes. [Oitzu] was able to match the timing to the NEC 32 bit protocol and find the exact codes on an oscilloscope, which simplified the translation of the codes for the remote.

Sometimes when life gives you a robot cleaner, it’s your job to make it smarter.

Humanoid Robot Has Joints That Inspire

One of the challenges with humanoid robots, besides keeping them upright, is finding compact combinations of actuators and joint mechanisms that allow for good range of smooth motion while still having good strength. To achieve that researchers from the IRIM Lab at Korea University of Technology and Education developed the LIMS2-AMBIDEX robotic humanoid upper body that uses a combination of brushless motors, pulleys and some very interesting joint mechanisms. (Video, embedded below.)

The wrist mechanism. Anyone willing to tackle a 3D printed version?

From shoulder to fingers, each arm has seven degrees of freedom which allows the robot to achieve some spectacularly smooth and realistic upper body motion. Except for the wrist rotation actuator, all the actuators are housed in the shoulders, and motion is transferred to the required joint through an array of cables and pulleys. This keeps the arm light and its inertia low, allowing the arms to move rapidly without breaking anything or toppling the entire robot.

The wrist and elbow mechanisms are especially interesting. The wrist emulates rolling contact between two spheres with only revolute joints. It also allows a drive shaft to pass down the centre of the mechanism and transfer rotating motion from one end to the other. The elbow is a rolling double jointed affair that allows true 180 degrees of rotation.

We have no idea why this took two years to end up in our YouTube feed, but we’re sure glad it finally did. Check out some of the demo videos after the break. Continue reading “Humanoid Robot Has Joints That Inspire”

MIT Mini Cheetah Made And Improved In China

We nearly passed over this tip from [xoxu] which was just a few links to some AliExpress pages. However, when we dug a bit into the pages we found something pretty surprising. Somewhere out there in the wild we…east of China there’s a company not only reverse engineering the Mini Cheetah, but improving it too.

We cover a lot of Mini Cheetah projects; it’s a small robot that can do a back-flip after all. When compared to the servo quadruped of not so many years ago it’s definitely exciting magic. Many of the projects go into detail about the control boards and motor modifications required to build a Mini Cheetah of your own. So we were especially interested to discover that this AliExpress seller has gone through the trouble of not just reverse engineering the design, but also improving on it. Claiming their motors are thinner and more dust resistant than what they’ve seen from MIT.

To be honest, we’re not sure what we’re looking at. It’s kind of cool that we live in a world where a video of a research project and some papers can turn into a $12k robot you can buy right now. Let us know what you think after the break.

Name A Hacker Camp

Many of us look forward to visiting a summer hacker camp, as an opportunity to immerse ourselves in some of the coolest and most stimulating stuff that comes out of our community. The names trip off the tongue, ToorCamp, CCCamp, EMFcamp, BornHack, and more.

There’s one major event that doesn’t trip off the tongue in the same way though, because though it’s one of the oldest in our calendar it doesn’t have the same name every time. Since the end of the 1980s the Netherlands has seen a sequence of  hacker camps with three letter names such as HAR, OHM, and SHA. Every four years these events delight and amaze us, and every four years they need a new name. Do you think you can help them pick one for 2021?

There are a few ground rules to observe, for the would-be coiner of a new moniker. The tradition is of a three-letter acronym, usually one with a meaning somewhere in technology, and so far always containing the letter H somewhere to stand for “Hack” in some form. The idea is that it should somehow encapsulate the spirit of hacker camp culture rather than simply be three words containing “Hack”. HAR for example was Hacking At Random, OHM was Observe Hack Make, and SHA was Still Hacking Anyway. So if you can dream up a TLA within those parameters, there is a group of hackers in the Netherlands who might like to hear from you. We suspect that HAD is already taken.

If you want to know more about the Netherlands camps, read our review of SHA, in 2017.

Header image: [Renze]. “Met Elkaar Hacken” means something close to “Hack together”.

Storm Cloud Lamp Brings The Weather Inside

The humble lamp is a common build for a hacker looking to express themselves creatively. Often, nature can serve as an inspiration, as was the case for [Michael Pick]’s Storm Cloud. (Video, embedded below.)

Electronically, the build is straightforward, consisting of an Arduino Uno, an MP3 shield, and a string of WS2801 LEDs. These are driven slightly differently than the more-common WS2812B type, but Adafruit libraries make it easy for even the beginner. There’s also an RF keyfob fitted for remote control of the device, and a voice synth that serves as a user interface.

The video also covers the construction of the body of the lamp. Cardboard forms are created, then covered in tape to create a rough 3D ovaloid shape. This mold is then fiberglassed to create two shells, which are later joined together with bolts. This allows the LEDs and electronics to be neatly mounted inside. Spray adhesive is then used to affix what appears to be cotton wool or polyfill stuffing to the outside to create the cloud effect.

The final result is rather aesthetically pleasing. There’s the usual soft-glowing rainbows as you’d expect, but the real highlight is storm mode, which causes flickers of lighting to scatter across the surface of the cloud. The accompanying sound effects from the MP3 shield help add to the drama.

We’ve seen other takes on a cloud lamp before, too. Video after the break.

Continue reading “Storm Cloud Lamp Brings The Weather Inside”

Beam Me Up To The PCB Space Ship

This project would fit in perfectly with #BadgeLife if someone could figure out a way to hang it from their neck. Inspired by Star Trek’s Starship Enterprise, [bobricius] decided to design and assemble a miniature space ship PCB model, complete with 40 blinking LEDs controlled by an ATtiny85.

While the design uses 0603, 0802, 3014, 4014, and 0805 LEDs, some substitutions can be made since the smallest LEDs can be difficult to solder. The light effects include a green laser, plasma coils, a deflector with scrolling blue LEDs, and the main plate and bridge for the space ship.

The LEDs are controlled by charlieplexing, a technique for driving LED arrays with relatively few I/O pins, different from traditional multiplexing. Charlieplexing allows n pins to drive n2−n LEDs, while traditional multiplexing allows n pins to drive (n/2)2 LEDs. (Here is the best explanation of Charlieplexing we’ve ever seen.)

Especially with the compiled firmware running on the MCU, the PCB model makes for an impressive display.

The only catch? Your Starship Enterprise can’t actually fly.

Continue reading “Beam Me Up To The PCB Space Ship”

Customizing Xiaomi ARM Cortex-M Firmware

This hack was revealed a while ago at DEFCON26, but it’s still a fascinating look into vulnerabilities that affect some of the most widely used IoT devices.

[Dennis Giese] figured out a way to modify ARM Cortex-M based firmware for use in customizing the functionality of devices or removing access to the vendor. Obviously, there are more malicious activities that can be done with this type of hack, as with any exploits of firmware, but they are (also) obviously not condoned.

The talk goes into the structure of Xiaomi ecosystem and products before going into a step-by-step approach to binary patching the firmware. The first step was to acquire the firmware, either by dumping SPI flash memory (using JTAG, SWD, or desoldered Flash pins) or intercepting traffic during a firmware update and downloading the firmware. There’s also a possibility of downloading the firmware using a URL, although this can be more difficult to find.

The firmware can then be parsed, which first requires the format to be converted from a proprietary format to and ELF file. This conversion makes it easier to load into IDA pro, and gives information on the segments of the firmware and its entry point. Python tools luckily exist for converting binary files to ELF, which simplifies the task.

After loading the ELF file into the disassembler, you’ll want to find the key memory area, denoted by “TAG_MAC”, “TAG_DID”, and “TAG_KEY” in the example firmware (for storing the MAC address, device ID, and key). In order to prepare the firmware for Nexmon – a software that supported C-based firmware binary patching for ARM Cortex-A and ARM Cortex-M binaries – you’ll need to partition some space in the memory for patches and know the function names and signatures for the firmware.

The latter is done by doing a difference comparison in the disassembler between an unknown executable and the example executable.

With the necessary information gathered, you can now use Nexmon to make your modifications. The fact that this can be done for smart devices at home means that smart devices you acquire – especially those partitioned by others – may contain malicious code, so take care when handling used devices.

Continue reading “Customizing Xiaomi ARM Cortex-M Firmware”