Instant Camera With This Year’s Hottest Dithering Technique

Digital cameras are great, because you can take thousands of pictures without running out of film. But there’s something to be said for having a tangible image you can hold in your hand. The Polaroid cameras of yesteryear were great for this, but now they’re hard to find and the price per photograph is ludicrously expensive.

dither
Dithering allows the camera to print a much better image.

Over the past few years, a few people have sought a way to create printed photographs at a lower cost. One of the best ways to do this is to find something much cheaper than Polaroid film — like thermal paper.

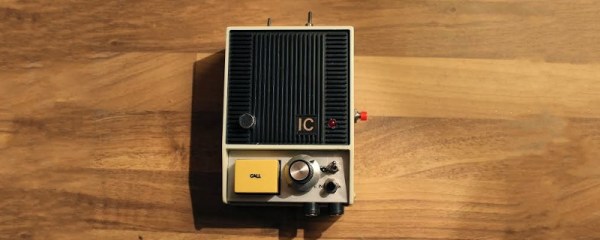
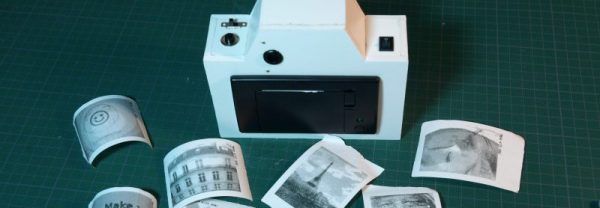
[Fabien-Chouteau]’s thermal printing camera isn’t the first — you’ve got the Gameboy Camera/Printer and a few others to thank for that. But it’s a great example of the form. The camera combines an Adafruit thermal receipt printer with an OpenMV camera, both easily sourced, if not exactly cheap. It even adds a ST7735 LCD for live display of the camera’s image, just like consumer-grade cameras!

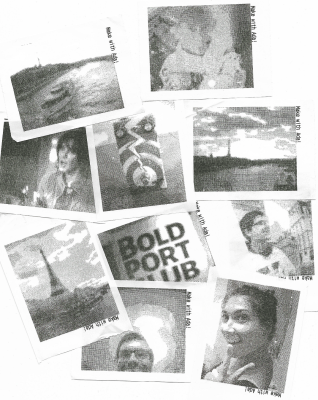
It’s not just a slapped together kludge of parts bin components, however. While the thermal printer is only capable of printing black or white pixels, its resolution is much higher than the image from the camera. This allows the camera to use a 3×3 block of printed pixels to represent a single pixel from the camera, and with some fancy dithering techniques, can emulate shades of grey quite effectively. It’s tricks like this that really add polish to a project, and make a big difference to the picture quality at the end of the day.

It’s not the first thermal printer camera we’ve seen – [Ch00f]’s woodgrain instant camera build highlighted the issues of careful camera selection when pursuing this type of build.

Video after the break.

Continue reading “Instant Camera With This Year’s Hottest Dithering Technique”

Dead-Bug Logic Probe In A Magic Marker

Logic probes are simple but handy tools that can be had for a couple of bucks. They may not be the sexiest pieces of test gear, nor the most versatile, but they have their place, and building your own logic probe is a great way to understand the tool’s strength and weaknesses.

[Jxnblk]’s take on the logic probe is based on a circuit by [Tony van Roon]. The design hearkens back to a simpler time and is based on components that would have been easy to pick up at any Radio Shack once upon a time. The logic section is centered on the venerable 7400 quad 2-input NAND gate in the classic 14-pin DIP format. The gates light separate LEDs for high and low logic levels, and a 555 timer chip in a one-shot configuration acts as a pulse stretcher to catch transients. The DIP packages lend themselves to quick and dirty “dead bug” construction, and the whole thing fits nicely into a discarded marking pen.

dead-bug-logic-probe-in-marker-body

It’s a simple build and a nice form factor for a useful tool, but for an even slimmer package like an old syringe you’ll probably have to go with SMD components. And when you graduate from the simple logic probe, you might want to check out the capabilities of this smart probe.

Lo-Fi Greeting Card Sampler

We’re all familiar with record-your-own-message greeting cards. Generally they’re little more than a cute gimmick for a friend’s birthday, but [dögenigt] saw that these cards had more potential.

After sourcing a couple of cheap modules from eBay, the first order of business was to replace the watch batteries with a DC power supply. Following the art of circuit bending, he then set about probing contacts on the board. Looking to control the pitch of the recorded message, [dögenigt] found two pads that when touched, changed the speed of playback. Wiring these two points to the ears of a potentiometer allowed the pitch to be varied continously. Not yet satisfied, [dögenigt] wanted to enable looped playback, and found a pin that went low when the message was finished playing. Wiring this back to the play button allowed the recording to loop continuously.

[dögenigt] now has a neat little sampler on his hands for less than $10 in parts. To top it off, he housed it all in a sweet 70s intercom enclosure, using the Call button to activate recording, and even made it light sensitive with an LDR.

We’ve seen a few interesting circuit bends over the years – check out this digitally bent Roland TR-626 or this classic hacked Furby.

Check out the video under the break.

Continue reading “Lo-Fi Greeting Card Sampler”

Power For An Amstrad Spectrum

If you were an American child of the early 1980s then perhaps you were the owner of a Commodore 64, an Apple II, or maybe a TRS-80. On the other side of the Atlantic in the UK the American machines were on the market, but they mostly lost out in the hearts and minds of eager youngsters to a home-grown crop of 8-bit micros. Computer-obsessed British kids really wanted Acorn’s BBC Micro, but their parents were more likely to buy them the much cheaper Sinclair ZX Spectrum.

Sinclair Research was fronted by the serial electronic entrepreneur [Clive Sinclair], whose love of miniaturization and ingenious cost-cutting design sometimes stretched the abilities of his products to the limit. As the 8-bit boom faded later in the decade the company faltered, its computer range being snapped up by his great rival in British consumer electronics, [Alan Sugar]’s Amstrad.

The Amstrad Spectrums replaced the rubber and then shaky plastic keys of the Sinclair-era machines with something considerably more decent, added joystick ports and a choice of a built-in cassette deck or one of those odd 3″ floppy disk drives for which Amstrad seemed to be to only significant customer. For that they needed a more capable power supply offering a selection of rails, and it is this unit that concerns us today. [Drygol] had a friend with an Amstrad-made Sinclair 128K Spectrum +2 with a broken power supply. His solution was to wire in a supply retrieved from a small form factor PC that had all the requisite lines, and for safety he encased it in an improbably huge piece of heat shrink tubing.

Wiring a PSU to a DIN plug for a retro computer is not an exceptional piece of work in itself even if it’s tidily done and nice to see older hardware brought back to life. What makes this piece worth a look instead is the teardown of what is a slightly unusual footnote to the 8-bit home computer story. We’re shown the familiar Z80 and support chips with the Spectrum edge connector and modulator on a through-hole board with a piece of cutting edge tech for a 1980s home computer, a single SMD chip unusually mounted nestled in a hole cut in the board.

Amstrad eventually stopped making Spectrums in the early 1990s, having also tried the Sinclair name on a spectacularly awful PC-compatible home computer. [Clive Sinclair] continued to release electronic products over the following decades, including a portable computer, the last of his trademark miniature radio receivers, and an electric bicycle accessory. Amstrad continue to make computers to this day, and [Alan Sugar] has achieved fame of a different sort as host of the UK version of The Apprentice. He has not yet become Prime Minister.

We’ve featured another Amstrad Spectrum +2 losing its tape deck for a slimmer machine. On that note, the Spectrum wasn’t Amstrad’s only entry in the 8-bit market, and we’ve also shown you a compact clone of their CPC464. As for [Drygol], he’s featured here several times. His mass-restoration of Commodore 64s for instance, or bringing a broken Atari ST back from the dead.

Interactive ESP8266 Development With PunyForth

Forth is one of those interesting languages that has a cult-like following. If you’ve never looked into it, its strength is that it is dead simple to put on most CPUs, yet it is very powerful and productive. There are two main principles that make this possible. First, parsing is easy because any sequence of non-space characters makes up a legitimate Forth word. So while words like “double” and “solve” are legal Forth words, so is “#$#” if that’s what you want to define.

The other thing that makes Forth both simple and powerful is that it is stack-based. If you are used to a slide rule or an HP calculator, it is very natural to think of “5+2*3” as “5 2 3 * +” but it is also very simple for the computer to interpret.

[Zeroflag] created PunyForth–a Forth-like language for the ESP8266. You can also run PunyForth for cross development purposes on Linux (including the Raspberry Pi). The system isn’t quite proper Forth, but it is close enough that if you know Forth, you’ll have no trouble.

Continue reading “Interactive ESP8266 Development With PunyForth”

Adding Drone Instrumentation With No Additional Parts

Soon the skies will be filled with drones, or so the conventional wisdom goes, and these flying droids will deliver pizza, mail, packages, and medical supplies right to one of the taller trees in our backyards. To date, advanced fixed-wing UAVs and toy quadcopters have proven themselves to be exceptionally dumb; they have no idea what their airspeed is, and no, ground speed measured by GPS will not keep you in the air.

The sensors to measure airspeed and angle of attack can be adapted to small drones, but [gallinazo] has a better idea: why not estimate these figures using sensors a drone already has? He’s measuring synthetic airspeed, something that would have already saved a few hundred lives if it were implemented passenger airliners.

Small drones are able to take a few measurements of their surroundings using standard accelerometers, magnetometers, and of course recording the position of the throttle and control surfaces. All of these variables are related to airspeed – at a constant throttle setting, with no movement of the control surfaces, an aircraft will eventually settle at a stable airspeed.

The trick, though, is to tie all of these variables together to produce a number related to the airspeed of the drone. This is done with a Python script implementing a radial basis function and eating all the memory on [gallinazo]’s desktop. This Python script is effectively a black box that turns the throttle position, bank angle, elevator position, and pitch rate into an airspeed.

Does this black box work? Judging by the graphs comparing synthetic airspeed to measured airspeed, this is amazing work. [gallinazo]’s airspeed estimator accurately and reliably matches the measured airspeed. It does this with zero extra parts on the airframe.

All of the code required to implement this synthetic airspeed indicator is available on GitHub, and could conceivably be implemented in a small RC plane after all the variables are pre-computed. Awesome work that pushes the state of the art forward quite a bit.


Convert That Cheap Laser Engraver To 100% Open-Source Toolchain

laserweb-on-cheap-laser-squareLaserWeb is open-source laser cutter and engraver software, and [JordsWoodShop] made a video tutorial (embedded below) on how to convert a cheap laser engraver to use it. The laser engraver used in the video is one of those economical acrylic-and-extruded-rail setups with a solid state laser emitter available from a variety of Chinese sellers (protective eyewear and any sort of ventilation or shielding conspicuously not included) but LaserWeb can work with just about any hardware, larger CO2 lasers included.

LaserWeb is important because most laser engravers and cutters have proprietary software. The smaller engravers like the one pictured above use a variety of things, and people experienced with larger CO2 laser cutters may be familiar with a piece of software called LaserCut — a combination CAD program and laser control that is serviceable, but closed (my copy even requires a USB security dongle, eww.)

LaserWeb allows laser engravers and cutters to be more like what most of us expect from our tools: a fully open-source toolchain. For example, to start using LaserWeb on one of those affordable 40 W blue-box Chinese laser cutters the only real hardware change needed is to replace the motion controller with an open source controller like a SmoothieBoard. The rest is just setting up the software and enjoying the added features.

Continue reading “Convert That Cheap Laser Engraver To 100% Open-Source Toolchain”