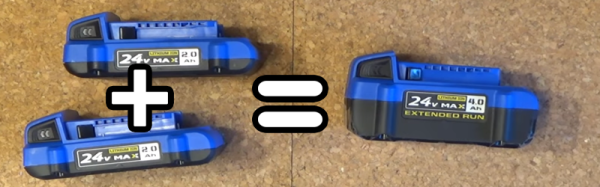
Maintenance, Emissions, And Privacy: The OBD Story

The 90s were a pivotal time in world history, and 1996 was no different. You might have spent the year glued to the TV playing Super Mario 64, or perhaps you were busy campaigning for Bill Clinton or Bob Dole, or maybe you were so depressed that Princess Diana and Prince Charles divorced that you spent the whole year locked in your room, a prisoner of your own existential nihilism. Whatever you did, though, it’s likely that one major event passed you by without a thought: The standardization of on-board vehicle diagnostics (in the US), otherwise known as OBD-II.

In the 1970s, vehicles (in some western countries, at least) were subject to ever-increasing restrictions on emissions. Most companies began switching from carburetors to efficient fuel injection systems, but even that wouldn’t be enough for the new standards. Cars began to carry rudimentary computer systems to manage and control the influx of valves, meters, and sensors that became the new norm. And, as one would guess, every car company had their own standard for managing and monitoring these computer systems. Eventually they would settle on the OBD system that we have today.

Continue reading “Maintenance, Emissions, And Privacy: The OBD Story”

The Cyborg Artist – Tattoo Machine Arm Prosthesis

[JC Sheitan Tenet] lost his right arm when he was 10 years old. As most of us, he was right-handed, so the challenges he had to face by not having an arm become even harder.

Have you ever tried to perform mundane tasks with your non-dominant hand? If you’re right-handed, have you ever tried to feed yourself with your left? Or if you’re left-handed, how well can you write with your right? For some people, using both hands comes naturally, but if you’re anything like me, your non-dominant hand is just about useless.

The thing is, he wanted to be a tattoo artist. And he wasn’t giving up. Even facing the added difficulty of not finding a tattoo artist that wanted to take him as an apprentice, he did not gave up. So he became a tattoo artist, using only his left arm. That is, until some months ago, when he met [Jean-Louis Gonzal], a bio-mechanical artist with an engineer background, at a tattoo convention. After seeing [Gonzal] work, he just asked if it was possible to modify a prosthesis and attach a tattoo machine to it.

The Cyborg Artist is born. The tattoo machine in the prosthesis can move 360 degrees for a wide range of movements. [JC Sheitan Tenet] uses it to help with colours, shadows and abstract forms in general. It’s a bad-ass steam punk prosthesis and it’s not just for show, he actually works with it (although not exclusively) . This, it seems, is only the beginning, since the first version of prototype worked so well, the second version is already being planned by [JC] and [Gonzal]. We can’t wait to see what they’ll come up with, maybe a mix between current version and a tattoo robotic arm or a brain controlled needle?

Check it out in the video:

Continue reading “The Cyborg Artist – Tattoo Machine Arm Prosthesis”

From IKEA Lamp To Robot Arm

We’re used to projects that take everyday household objects and modify or enhance them into new and exciting forms that their original designers never intended. A particular theme in this endeavour comes from the IKEA hacking community, who take the products of the Swedish furniture store and use them for the basis of their work.

A particularly inventive piece of IKEA hacking is a project from [anastas.car], a low-cost 3D-printed robot arm based on Ikea Tertial lamp. The lamp in question is a relatively inexpensive spring-balanced desk lamp that when looked at in another light has all the metalwork ready-cut for a 5 degrees of freedom robot arm when combined with 3D-printed servo holders for five servos at its joints. The resulting design has all files available on Thingiverse, and judging by the video we’ve posted below the break makes for a rather effective arm.

Continue reading “From IKEA Lamp To Robot Arm”

A Ten Turn Pot, For Not A Lot

If you have a traditional regulated power supply that you want to make adjustable, you’ll have somewhere in the circuit a feedback line driven by a potential divider across the output. That divider will probably incorporate a variable resistor, which you’ll adjust to select your desired voltage.

The problem with using a standard pot to adjust something like a power supply is that a large voltage range is spread across a relatively small angle. The tiniest movement of the shaft results in too large a voltage change for real fine-tuning, so clearly a better means of adjustment is called for. And in many cases that need is satisfied with a ten-turn potentiometer, simply a pot with a 10 to 1 reduction drive built-in.

[Dardo] had just this problem, and since 10-turn pots are expensive to buy and expensive to ship to his part of the world he built his own instead of buying one.

Continue reading “A Ten Turn Pot, For Not A Lot”

Laser-Cut Gingerbread Trailer Home

Ah, the holiday gingerbread house. A traditional — if tedious — treat; tasking to create, delicious to dismantle, so why not try applying some maker skills to making the job of building it easier? [William Osman] decided to try two unorthodox approaches to the gingerbread construct; first, he opted to build a gingerbread mobile home. Secondly, he cut the pieces out with a laser cutter.

After the tumultuous task of baking the gingerbread sheets, [Osman] modeled the trailer in SolidWorks and set to work cutting it out on his home-built, 80W laser cutter. Twice. Be sure to double check the home position on any laser cutting you do, lest you ruin your materials. Also — though this might be especially difficult when modelling food in any CAD programs — be sure to account for the thickness of your materials, otherwise you’ll end up with a lot of trimming on your hands. At least gingerbread cuts easily.

Hot glue and royal frosting secured the pieces together — as well as some improvisation of the final details — making for a picture perfect holiday scene — from a certain point of view.

Continue reading “Laser-Cut Gingerbread Trailer Home”

Getting The Amiga 500 Online

If you were lucky enough to have a Commodore Amiga or one of its competitor 16-bit home computers around the end of the 1980s, it’s probable that you were doing all the computing tasks that most other people discovered a few years later when they bought their first 486 or Pentium. So in the mid 1990s when all your friends were exclaiming at Paint Shop Pro or their Soundblaster cards you’d have had an air of smugness. Multitasking? Old hat! Digital audio? Been there! Graphics manipulation? Done that!

There was one task from that era you almost certainly wouldn’t have done on your Amiga though, and that was connect it to the Internet. The Internet was certainly a thing back in the late 1980s, but for mere mortals it was one of those unattainable marvels, like a supercomputer with a padded seat round it, or a Jaguar XJ220 supercar.

Later Amigas received Internet abilities, and Amiga enthusiasts will no doubt be on hand to extol their virtues. But the machine most people will think of as the archetype, the Amiga 500, lacks the power to run most of the software required to do it. If your 500 with its tasteful blue and orange desktop colour scheme is languishing though, never fear. [Shot97] has produced a guide to getting it online.

It’s important to understand that an Amiga 500 is never going to run a copy of Chrome or play a YouTube video. And he makes the point that any web browsers that might have surfaced for hardware of this class delivered a painful browsing experience. So instead he concentrates on getting the 500 online for something closer to the online scene of the day, connecting to BBSs. To that end he takes us through setting up a PC with  Hayes modem emulator, and connecting it to the Amiga via a null modem cable. On the Amiga is a copy of the A-Talk terminal emulator, and as far as the Amiga is concerned it is on a dial-up Internet connection.

The PC in this case looks pretty ancient, and we can’t help wondering whether a Raspberry Pi or even an ESP8266 module could be put in its place given the appropriate software. But he has undeniably got his A500 online, and shown a way that you can too if you still have one lurking in the cupboard. He has also produced a video which we’ve put below the break, but be warned, as it’s nearly an hour long.

Continue reading “Getting The Amiga 500 Online”

Old fashioned polygraph

Retro-Style DIY Polygraph: Believe It Or Not

A polygraph is commonly known as a lie detector but it’s really just a machine with a number of sensors that measure things like heart rate, breathing rate, galvanic skin response and blood pressure while you’re being asked questions. Sessions can be three hours long and the results are examined by a trained polygraph examiner who decides if a measured reaction is due to deception or something else entirely. Modern polygraphs feed data into a computer which analyses the data in real-time.

Cornell University students [Joyce Cao] and [Daria Efimov] decided to try their hand at a more old fashioned polygraph that measures heart and breathing rates and charts the resulting traces on a moving strip of paper as well as a color TFT display. They had planned on measuring perspiration too but didn’t have time. To measure heart rate, electrodes were attached to the test subject’s wrists. To measure breathing they connected a stretch sensor in the form of a conductive rubber cord around three inches long to a shoelace and wrapped this around the test subject’s abdomen.

While the output doesn’t go into a computer for mathematical analysis, it does go to a PIC32 for processing and for controlling the servos for drawing the traces on the paper as well as displaying on the TFT. The circuit between the breathing sensor and the PIC32 is fairly simple, but the output of the heart rate electrodes needed amplification. For that they came up with a circuit based off another project that had a differential amplifier and two op-amps for filtering.

Since parts of the circuit are attached to the body they made some effort to prevent any chance of electrocution. They used 12 volts, did not connect the test subject to power supply chassis ground, and tested the heart rate electrodes with a function generator first. They also included DC isolation circuitry in the form of some resistors and capacitors between the heart rate electrodes and the amplifier circuit. You can see these circuits, as well as a demonstration in the video below. The heart rate output looks a little erratic, no surprise given that the body produces a lot of noise, but the breathing trace looks very clear.

Continue reading “Retro-Style DIY Polygraph: Believe It Or Not”