A ceiling-mounted model of the Solar System

Ceiling-Mounted Orrery Is An Excercise In Simplicity

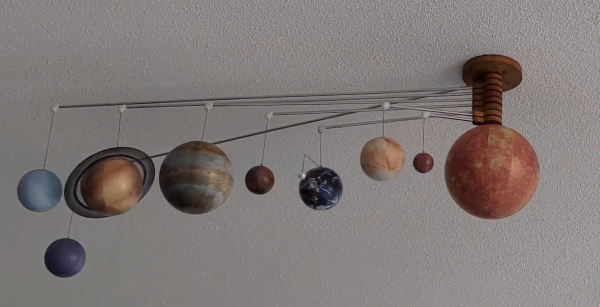
Ever since humans figured out that planets move along predetermined paths in the heavens, they have tried to make models that can accurately predict their motion. Watchmakers and astronomers worked together to create orreries: mechanical contraptions that illustrate the positions of all planets and the way they move over time through complex gear systems. [Illusionmanager] continues the orrery tradition but uses a different approach: he built a beautiful ceiling-mounted model of our Solar System without a gearing system.

The mechanism that makes his Solar System tick is deceptively simple. All planets can move freely along their orbit’s axis except Mercury, which is moved along its orbit by a motor hidden inside the Sun. Once Mercury has completed a full revolution, a pin attached to its arm will begin pushing Venus along with it. After Venus has completed a full circle, its own pin will pick up Earth, and so on all the way to Neptune. Neptune is then advanced to its correct location as reported by NASA, after which Mercury’s motion is reversed and the whole procedure is repeated in the opposite direction to position Uranus.

Cycling through the entire Solar System in this way takes a long time, which is why the planets’ positions are only updated once a day at midnight. An ESP32, also hidden inside the Sun, connects to the internet to retrieve the correct positions for the day and drives the motor. The planet models, sourced from a museum shop, are hanging from thin aluminium tubes attached to wooden mounts made with a desktop CNC machine.

[Illusionmanager] made a detailed Instructables page showing the process of making a miniature version of the mechanism using just laser-cut wooden parts, as an update to a version we featured earlier. We really like the simplicity of this design, which stands in stark contrast to the huge gear trains used in more traditional orreries.

Continue reading “Ceiling-Mounted Orrery Is An Excercise In Simplicity”

Measuring Planck’s Constant (Again)

There are many well-known physical constants, but it always interests us when someone can approximately measure them using equipment you probably have. We could pretend it is because we want to help kids do science projects, but who are we really kidding? It is just the cool factor. [Stoppi] shows us several neat ways to measure Planck’s constant (German language, Google Translate link) using things like LEDs, solar cells, and common test equipment. If you don’t want to translate the web page, you can also see the setup and the math behind it in the video below.

If complex math triggers you, this might not be the video for you. The particular test in the video does require a very low current measurement, but that’s not very hard to arrange these days. There are actually several methods covered in the post, and one of them uses one of those familiar “component testers” that has an Atmel CPU, a socket, and an LCD. These can measure the forward current of LEDs, and if you know the wavelength of the LED, you can determine the constant. There’s even a custom device that integrates several LEDs to do the job.

Continue reading “Measuring Planck’s Constant (Again)”

Making A Kid-Scale Apollo 11 Lunar Lander

If you’d like to see what goes into making a 1/3-scale Apollo 11 Lunar Module, [Plasanator]’s photos and build details will show off how he constructed one for a kid’s event that was a hit!

The photo gallery gives plenty of ideas about how one would approach a project like this, and readers will surely appreciate the use of an old frying pan as a concrete mold to create the lander’s “feet”. Later, a little paint makes the frying pan become a pseudo-antenna mounted on the lander’s exterior.

Inside, the lander has a control panel with a lot of arcade-style buttons and LED lighting. It’s pretty simple stuff, but livens things up a lot. Bright red lighting for the engine combined with a couple of slow strobe lights really makes it come alive in the dark. The gold foil? Emergency thermal blankets wrapped around the frame.

We happen to have the perfect chaser for this kid-scale lunar module: the Apollo 11 moon landing, recreated with animatronics and LEGO.

Continue reading “Making A Kid-Scale Apollo 11 Lunar Lander”

Hackaday Podcast 230: Space Science, Superconductors, Supercaps, And Central Air

This week, Editor-in-Chief Elliot Williams and Managing Editor Tom Nardi start things off by tackling a pair of science stories, one that may or may not change the world, and the other that hopes to help us understand the very fabric of the universe. Afterwards they get to the important stuff: the evolution of Game Boy Camera hacking, the finer points of 3D print orientation, and mixing up electrically conductive concrete at home. From there the conversation shifts to a couple of 486 Turbo buttons, a quick yoke recipe, and a very handsome open source vacuum pickup tool. Stick around until the end to hear about the folly of humanoid robots, and the latest operating system to get the Jenny List treatment.

Check out the links below if you want to follow along, and as always, tell us what you think about this episode in the comments!

Or download it yourself in fantastic MP3 format!

Continue reading “Hackaday Podcast 230: Space Science, Superconductors, Supercaps, And Central Air”

Giant 3D Printer Can Print Life-Sized Human Statues

We’ve seen a few makers 3D scan themselves, and use those to print their own action figures or statuettes. Some have gone so far as building life-sized statues composed of many 3D printed parts. [Ivan Miranda] is no regular maker though, and his custom 3D printer is big enough that he can print himself a life-sized statue in one go.

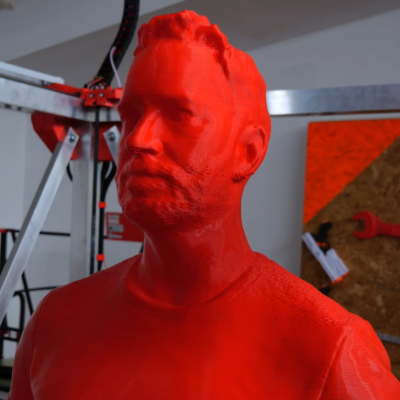
The printer is a gargantuan thing, using an aluminium frame and a familiar Cartesian layout. It boasts a build volume of 1110 mm x 1110 mm x 2005 mm, making it more than big enough to print human-sized statues. Dogs, cats, and some great apes may be possible, too.

Many of the components are 3D printed, including the various braces and adapters that hold the frame together. The build uses NEMA 23 stepper motors, with Duet3D hardware running the show. Notably, it uses V-wheels for the Z-axis, as linear rails would be prohibitively expensive at the sizes required.

[Ivan] shows off the printer by having it produce a statue of his body at 1:1 scale. It’s not a perfect print, with some layer shifts and an awkward moments where the filament supply was interrupted. It took 108 hours in total, with 76 hours of that being actual print time, and is made up of 4375 layers. Despite its flaws, its an incredibly impressive way to demonstrate the capabilities of the machine.

Eager to build such a printer for yourself? [Ivan] will sell you the design files for a reasonable fee.

[Ivan]’s giant printer was once a large tabletop affair; just look how far it’s come. He’s even come up with a system for using smaller printers to create large-scale construction kits, too. We can’t wait to see what mad project he comes up with next. Video after the break.

Continue reading “Giant 3D Printer Can Print Life-Sized Human Statues”

Watch Those 1% Resistors

Decades ago, electronic components were not as easy to acquire as they are today. Sure, you could get some things at Radio Shack. But you might not have many choices, and the price would be on the high side. TV repair components were another option, but, again, big bucks. Some places sold surplus parts, which could be cheap. These often came from manufacturing runs where a company bought 10,000 components and made 8,000 products. But today, you can order parts inexpensively and get them on your doorstep in a day or, sometimes, even less. Are these inexpensive parts really any good? [Denki Otaku] likes to find out. In a recent video, he checks out some Amazon-supplied 1% resistors to find out how good they are. You can watch his results below.

Continue reading “Watch Those 1% Resistors”

3D Printed Machine Shows How Braiding Is Done

If there’s something more fascinating than watching cleverly engineered industrial machines do their work, we don’t know what it could be. And at the top of that list has to be the machines that do braiding. You’ve probably seen them, with spools of thread or wire dancing under and around each other in an endless ballet that somehow manages to weave a perfect braid. It’s kind of magical.

For those who haven’t seen such a thing, now’s your chance, with this twelve-spool braiding machine. The building methods that [Fraens] used — mainly 3D printing and laser-cut acrylic — make the workings on this machine plain, even to those of us who never learned to manually braid even three strands. It’s far easier to understand by watching the video below than by trying to describe it, but basically, each vertical supply spool runs along a continuous track around a central point by a series of six meshed gears, passing under each other as they progress around the carousel and forming the braid.

There are a ton of details that go into making this work. Chief among them is the thread tensioning mechanism, which is a lever arm and spring-loaded axle that lives at the very center of each spool. The gears that form the inside-outside tracks are quite clever too, as are the worm-gear-driven takeup reel and output tensioner. We also appreciated the gate used to load the spool carriers into the track.

We can recall a couple of braiding machines before, including this one made entirely from Lego Technics.

Continue reading “3D Printed Machine Shows How Braiding Is Done”