Modding The Monoprice MP Mini Printer

Two weeks after my review of the MP Select Mini 3D printer, Monoprice’s own website has said this printer has been out of stock, in stock, and out of stock again several times. This almost unimaginably cheap 3D printer is proving to be exceptionally popular, and is in my opinion, a game-changing machine for the entire world of 3D printing.

With the popularity of this cheap printer that’s more than halfway decent, there are bound to be improvements. Those of us who have any experience with 3D printers aren’t going to be satisfied with a machine with any shortcomings, especially if it means we can print enhancements and mods for our printers.

Below are the best mods currently available for this exceptional printer. Obvious problems with the printer are corrected, and it’s made a little more robust. There are mods to add a glass build plate, and a few people are even messing around with the firmware on this machine. Consider this volume one of the MP Mini hacks; with a cheap printer that’s actually good, there are bound to be more improvements.

Continue reading “Modding The Monoprice MP Mini Printer”

Last Chance To Get In On The Citizen Scientist Challenge

The last week of the Citizen Scientist challenge round is drawing a close. Here’s what you need to know to enter your project, and to give it the best chance at making the top twenty. You need to do this by Monday morning, July 11th, to be in the running.

What is Citizen Scientist?

Sitizen ScientistCitizen Scientist is part of the Hackaday Prize. This round challenges you to make meaningful scientific study more approachable for everyone. Examples include projects that let people build their own lab equipment, sensor modules that can be distributed (or bootstrapped) for widespread data collection like weather stations and pollution monitors, or a new way of studying the world around us. The important thing is your explanation of the project. Show off your idea for making us all Citizen Scientists.

Right now we have a few hundred entries in this challenge round. Twenty of them will be selected to win $1000 and move on to the final round for consideration in the top five prizes: $150,000, $25,000, $10,000, $10,000, and $5,000.

This round ends on Monday morning, so make sure to enter your project now. Starting a new entry is easy but you may also enter a project that you have already document, or one that was submitted to an earlier round of the Hackaday Prize. In all cases, use the “Submit Project to” menu on the left sidebar of your project.

What Your Project Needs to Succeed

four-project-logsAn entry boils down to an idea, a picture, documentation, and four project logs.

You want to show that you are progressing toward a fully working prototype. We suggest that you start with a quick overview of the topic you chose for your entry. How does your project move Citizen Science forward? What led you to the idea, and what kind of impact do you hope it will have.

Don’t forget the build logs! One requirement of your entry is to have at least four build logs. At the minimum, pull out four different aspects of your design process and make them logs. To the right you can see a screenshot from the top of a project page. The log count is there and it needs to be at least 4.

A picture is worth a thousand words. You need at least one image, and we suggest that you put it in the image gallery — use the “Edit Project” button on the top right of your project page for this. It’s best to include some kind of system diagram that shows all parts of the overall project. If you have pictures of an actual prototype make sure to include those, as well as any other schematics, renders, CAD drawings, etc.

Upcoming Challenge Rounds

Don’t have something the fits with Citizen Scientist? Don’t worry, there are still two more rounds coming. On Monday July 11th we will begin the Automation challenge round. The name says it all; any and all automation projects will make great entries. The final challenge round, Assistive Technologies, begins August 22nd and seeks great ideas to make people’s lives better though technology that overcomes difficulties of body and mind.

No need to wait until those dates. Start your project now and you will be able to enter it into those challenges once they officially begin.

The HackadayPrize2016 is Sponsored by:

Incredible Luminosity In A Portable Package

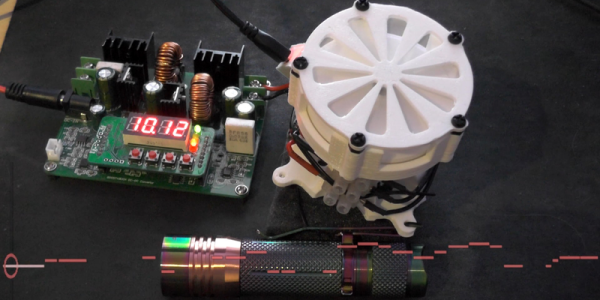
If you’ve ever wanted to bring the brightest day into the blackest night, this flashlight shall give you sight. With a 100W LED array powered by up to 32V, this thing is exceedingly bright — it clocks in at about 9000 lumens! But the best part is that all every little detail of the build was documented along the way so that we can tag along for the ride.

The all-aluminium case houses the LEDs and their heat sink, voltage regulator and display, the AD and DC adapter and converter boards and their connectors, and fans to ensure adequate ventilation. It’s powered by a custom-assembled 6400 mAh 11.1V lipo battery or DC 20V 10Amp power supply via XLR for rugged, locking connection. The battery pack connection was vacuum formed for quick-swapping, and the pack itself will sound off an alert if any of the three batteries inside the pack run out of power. A nifty added feature is the ability to check the remaining charge — especially useful if you’re looking to bring this uncommonly powerful flashlight along on camping trips or other excursions.

Continue reading “Incredible Luminosity In A Portable Package”

Tearing Into Delta Sigma ADC’s

It’s not surprising that Analog to Digital Converters (ADC’s) now employ several techniques to accomplish higher speeds and resolutions than their simpler counterparts. Enter the Delta-Sigma (Δ∑) ADC which combines a couple of techniques including oversampling, noise shaping and digital filtering. That’s not to say that you need several chips to accomplish this, these days single chip Delta-Sigma ADCs and very small and available for a few dollars. Sometimes they are called Sigma-Delta (∑Δ) just to confuse things, a measure I applaud as there aren’t enough sources of confusion in the engineering world already.

I’m making this a two-parter. I will be talking about some theory and show the builds that demonstrate Delta-Sigma properties and when you might want to use them.

Continue reading “Tearing Into Delta Sigma ADC’s”

The Champagne Of Light Bulbs

We’re all used to making our own lighting projects. Triac dimmers, LEDs, Neopixels, EL wire, there is a huge array of lighting components and technologies at our fingertips. But how many of us have made our own lighting rather than buying off-the-shelf? [Confined Maker] set out to do just that by creating an incandescent light bulb from scratch, and since he’s obviously a hacker with a bit of class he did it in an empty Dom Perignon champagne bottle.

It might seem a daunting project, but as he shows us in the video below the break, it turns out to be surprisingly straightforward with no exotic tooling required. He starts by winding a fine coil of thin tungsten wire round a dowel to act as his filament, before bringing a pair of enameled copper wires through holes drilled in the base of the bottle and out of the neck. The ends of these wires are then spliced to his filament and secured with conductive epoxy before the whole assembly is carefully slid back into the bottle. The holes are caulked with silicone, and the bottle is then carefully charged with argon. Argon is heavier-than-air, so he can do this on the bench with nothing more than a bicycle tube inflator and a drinking straw. The bottle is then sealed with a cork and more silicone, and his bulb is ready.

The first power-up with 120V mains power sees a puff of smoke inside the bottle as a coating on the tungsten is vapourised, but after that the bulb does its job well. He’s concerned about his epoxy melting, and the filament has moved to one side of the bottle so he’s not sure about the lifetime he can expect, but to make a working light bulb with such basic equipment is still an impressive accomplishment. His video below the break is eleven and a half minutes long, but well worth watching every minute.

Continue reading “The Champagne Of Light Bulbs”

Dumbing Down A Smart Switch

Internet of Everything is the way to go for home automation these days. ITEAD makes an ESP-8266 switch that IoT-ifies your appliances. If you still have an ancient, 433 MHz style radio switch system, they even make one that does WiFi and 433 MHz. But if you’re too cheap to shell out for the dual-mode version, you can always add a $1 433 MHz radio yourself. Or at least, that’s what [Tinkerman] did.

IMG_20160522_163814x_thumbnailAside from the teardown and reverse-engineering of the WiFi-enabled switch, [Tinkerman] also flashed custom firmware into the switch’s ESP-8266, and worked it all into his existing home Node-RED framework. Now he’s got more possible ways to turn on his living-room lights than any person could possibly hope for!

If you want to get into this whole WiFi-based home automation game, you could do worse than to have a look at the series we ran on MQTT just a little while ago. Seeing [Tinkerman]’s Node-RED demo makes us think that we’ll have to give that a look for our home system as well.

Hackaday Prize Entry: Open Source FFT Spectrum Analyzer

Every machine has its own way of communicating with its operator. Some send status emails, some illuminate, but most of them vibrate and make noise. If it hums happily, that’s usually a good sign, but if it complains loudly, maintenance is overdue. [Ariel Quezada] wants to make sense of machine vibrations and draw conclusions about their overall mechanical condition from them. With his project, a 3-axis Open Source FFT Spectrum Analyzer he is not only entering the Hackaday Prize 2016 but also the highly contested field of acoustic defect recognition.

open_fft_machineFor the hardware side of the spectrum analyzer, [Ariel] equipped an Arduino Nano with an ADXL335 accelerometer, which is able to pick up vibrations within a frequency range of 0 to 1600 Hz on the X and Y axis. A film container, equipped with a strong magnet for easy installation, serves as an enclosure for the sensor. The firmware [Ariel] wrote is an efficient piece of code that samples the analog signals from the accelerometer in a free running loop at about 5000 Hz. It streams the digitized waveforms to a host computer over the serial port, where they are captured and stored by a Python script for further processing.

From there, another Python script filters the captured waveform, applies a window function, calculates the Fourier transform and plots the spectrum into a graph. With the analyzer up and running, [Ariel] went on testing the device on a large bearing of an arbitrary rotating machine he had access to. A series of tests that involved adding eccentric weights to the rotating shaft shows that the analyzer already makes it possible to discriminate between different grades of imbalance.

The HackadayPrize2016 is Sponsored by: