Over the decades there have been many denominations coined to classify computer systems, usually when they got used in different fields or technological improvements caused significant shifts. While the very first electronic computers were very limited and often not programmable, they would soon morph into something that we’d recognize today as a computer, starting with World War 2’s Colossus and ENIAC, which saw use with cryptanalysis and military weapons programs, respectively.
The first commercial digital electronic computer wouldn’t appear until 1951, however, in the form of the Ferranti Mark 1. These 4.5 ton systems mostly found their way to universities and kin, where they’d find welcome use in engineering, architecture and scientific calculations. This became the focus of new computer systems, effectively the equivalent of a scientific calculator. Until the invention of the transistor, the idea of a computer being anything but a hulking, room-sized monstrosity was preposterous.
A few decades later, more computer power could be crammed into less space than ever before including ever higher density storage. Computers were even found in toys, and amidst a whirlwind of mini-, micro-, super-, home-, minisuper- and mainframe computer systems, one could be excused for asking the question: what even is a supercomputer?
Do you like high-detail 3D models intended for resin printing, but wish you could more easily print them on a filament-based FDM printer? Good news, because [Jacob] of Painted4Combat shared a tool he created to make 3D models meant for resin printers — the kind popular with tabletop gamers — easier to port to FDM. It comes in the form of a Blender add-on called Resin2FDM. Intrigued, but wary of your own lack of experience with Blender? No problem, because he also made a video that walks you through the whole thing step-by-step.
Resin2FDM separates the model from the support structure, then converts the support structure to be FDM-friendly.
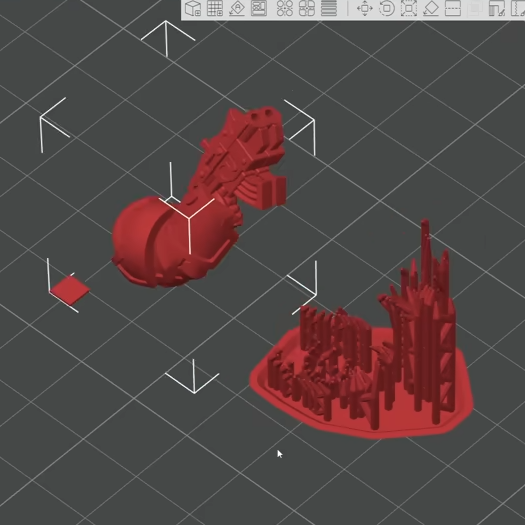
3D models intended for resin printing aren’t actually any different, format-wise, from models intended for FDM printers. The differences all come down to the features of the model and how well the printer can execute them. Resin printing is very different from FDM, so printing a model on the “wrong” type of printer will often have disappointing results. Let’s look at why that is, to better understand what makes [Jacob]’s tool so useful.
Rafts and a forest of thin tree-like supports are common in resin printing. In the tabletop gaming scene, many models come pre-supported for convenience. A fair bit of work goes into optimizing the orientation of everything for best printed results, but the benefits don’t carry directly over to FDM.
For one thing, supports for resin prints are usually too small for an FDM printer to properly execute — they tend to be very thin and very tall, which is probably the least favorable shape for FDM printing. In addition, contact points where each support tapers down to a small point that connects to the model are especially troublesome; FDM slicer software will often simply consider those features too small to bother trying to print. Supports that work on a resin printer tend to be too small or too weak to be effective on FDM, even with a 0.2 mm nozzle.
To solve this, [Jacob]’s tool allows one to separate the model itself from the support structure. Once that is done, the tool further allows one to tweak the nest of supports, thickening them up just enough to successfully print on an FDM printer, while leaving the main model unchanged. The result is a support structure that prints well via FDM, allowing the model itself to come out nicely, with a minimum of alterations to the original.
Resin2FDM is available in two versions, the Lite version is free and an advanced version with more features is available to [Jacob]’s Patreon subscribers. The video (embedded below) covers everything from installation to use, and includes some general tips for best results. Check it out if you’re interested in how [Jacob] solved this problem, and keep it in mind for the next time you run across a pre-supported model intended for resin printing that you wish you could print with FDM.
Glasses for the blind might sound like an odd idea, given the traditional purpose of glasses and the issue of vision impairment. However, eighth-grade student [Akhil Nagori] built these glasses with an alternate purpose in mind. They’re not really for seeing. Instead, they’re outfitted with hardware to capture text and read it aloud.
Yes, we’re talking about real-time text-to-audio transcription, built into a head-worn format. The hardware is pretty straightforward: a Raspberry Pi Zero 2W runs off a battery and is outfitted with the usual first-party camera. The camera is mounted on a set of eyeglass frames so that it points at whatever the wearer might be “looking” at. At the push of a button, the camera captures an image, and then passes it to an API which does the optical character recognition. The text can then be passed to a speech synthesizer so it can be read aloud to the wearer.
It’s funny to think about how advanced this project really is. Jump back to the dawn of the microcomputer era, and such a device would have been a total flight of fancy—something a researcher might make a PhD and career out of. Indeed, OCR and speech synthesis alone were challenge enough. Today, you can stand on the shoulders of giants and include such mighty capability in a homebrewed device that cost less than $50 to assemble. It’s a neat project, too, and one that we’re sure taught [Akhil] many valuable skills along the way.
Laser microphones have been around since the Cold War. Back in those days, they were a favorite tool of the KGB – allowing spies to listen in on what was being said in a room from a safe distance. This project by [SomethingAbtScience] resurrects that concept with a DIY build that any hacker worth their soldering iron can whip up on a modest budget. And let’s face it, few things are cooler than turning a distant window into a microphone.
At its core this hack shines a laser on a window, detects the reflected light, and picks up subtle vibrations caused by conversations inside the room. [SomethingAbtScience] uses an ordinary red laser (visible, because YouTube rules) and repurposes an amplifier circuit ripped from an old mic, swapping the capsule for a photodiode. The build is elegant in its simplicity, but what really makes it shine is the attention to detail: adding a polarizing filter to cut ambient noise and 3D printing a stabilized sensor mount. The output is still a bit noisy, but with some fine tuning – and perhaps a second sensor for differential analysis – there’s potential for crystal-clear audio reconstruction. Just don’t expect it to pass MI6 quality control.
While you probably won’t be spying on diplomats anytime soon, this project is a fascinating glimpse into a bygone era of physical surveillance. It’s also a reminder of how much can be accomplished with a laser pointer, some ingenuity, and the curiosity to see how far a signal can travel.
Here’s the thing about coding. When you’re working on embedded projects, it’s quite easy to run into hardware limitations, and quite suddenly, too. You find yourself desperately trying to find a way to speed things up, only… there are no clock cycles to spare. It’s at this point that you might reach for the magic of direct memory access (DMA). [Larry] is here to advocate for its use.
DMA isn’t just for the embedded world; it was once a big deal on computers, too. It’s just rarer these days due to security concerns and all that. Whichever platform you’re on, though, it’s a valuable tool to have in your arsenal. As [Larry] explains, DMA is a great way to move data from memory location to memory location, or from memory to peripherals and back, without involving the CPU. Basically, a special subsystem handles trucking data from A to B while the CPU gets on with whatever other calculations it had to do. It’s often a little more complicated in practice, but that’s what [Larry] takes pleasure in explaining.
Indeed, back before I was a Hackaday writer, I was no stranger to DMA techniques myself—and I got my project published here! I put it to good use in speeding up an LCD library for the Arduino Due. It was the perfect application for DMA—my main code could handle updating the graphics buffer as needed, while the DMA subsystem handled trucking the buffer out to the LCD quicksmart.
If you’re struggling with updating a screen or LED strings, or you need to do something fancy with sound, DMA might just be the ticket. Meanwhile, if you’ve got your own speedy DMA tricks up your sleeve, don’t hesitate to let us know!
Electricity can be a pretty handy tool when it stays within the bounds of its wiring. It’s largely responsible for our modern world and its applications are endless. When it’s not running in wires or electronics though, things can get much more complicated even for things that seem simple on the surface. For example, measuring moisture in soil seems straightforward, but corrosion presents immediate problems. To combat the problems with measuring things in the natural world with electricity, [David] built this capacitive soil moisture sensor which also has the benefit of using an extremely small amount of energy to operate.
The sensor is based on an STM32 microcontroller, in this case one specifically optimized for low-power applications. The other low-power key to this build is the small seven-segment e-ink display. The segments are oriented as horizontal lines, making this a great indicator for measuring a varying gradient of any type. The microcontroller only wakes up every 15 minutes, takes a measurement, and then updates the display before going back to sleep.
To solve the problem resistive moisture sensors have where they’re directly in contact with damp conditions and rapidly corrode, [David] is using a capacitive sensor instead which measures a changing capacitance as moisture changes. This allows the contacts to be much more isolated from the environment. The sensor has been up and running for a few months now with the coin cell driving the system still going strong and the house plants still alive and properly watered. Of course if you’re looking to take your houseplant game to the next level you could always build a hydroponics system which automates not only the watering of plants but everything else as well.
It’s 2025, and you’re still probably pressing modifier keys on your keyboard like a… regular person. But it doesn’t have to be this way! You could use foot pedals instead, as [Jan Herman] demonstrates.
Now, if you’re a diehard embedded engineer, you might be contemplating your favorite USB HID interface chip and how best to whip up a custom PCB for the job. But it doesn’t have to be that complicated! Instead, [Jan] goes for an old school hack—he simply ripped the guts out of an cheap USB keyboard. From there, he wired up a few of the matrix pads to 3.5 mm jack connectors, and put the whole lot in a little metal project box. Then, he hooked up a few foot pedal switches with 3.5 mm plugs to complete the project.
[Jan] has it set up so he can plug foot pedals in to whichever keys he needs at a given moment. For example, he can plug a foot pedal in to act as SPACE, ESC, CTRL, ENTER, SHIFT, ALT, or left or right arrow. It’s a neat way to make the project quickly reconfigurable for different productivity tasks. Plus, you can see what each pedal does at a glance, just based on how it’s plugged in.