For their final project in embedded microcontroller class, [Aaheli, Jun, and Naomi] turned their focus toward assistive technology and created an Electronic Travel Aid (ETA) for the visually impaired that uses haptic feedback to report the presence of obstacles.
We have seen a few of these types of devices in the past, and they almost always use ultrasonic sensors to gauge distance. Not so with this ETA; it uses six VL53L0X time-of-flight (ToF) sensors mounted at slightly different angles from each other, which provides a wide sensing map. It is capable of detecting objects in a one-meter-wide swath at a range of one meter from the sensors.
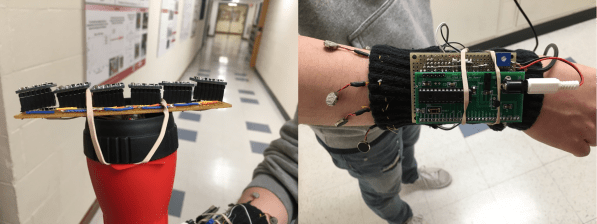
The device consists of two parts, a wayfinding wand and a feedback module. The six ToF sensors are strapped across the end of a flashlight body and wired to an Arduino Mini inside the body. The Mini receives the sensor data over UART and sends it to the requisite PIC32, which is attached to a sleeve on the user’s forearm. The PIC decodes these UART signals into PWM and lights up six corresponding vibrating disc motors that dangle from the sleeve and form a sensory cuff bracelet around the upper forearm.
We like the use of ToF over ultrasonic for wayfinding. Whether ToF is faster or not, the footprint is much smaller, so its more practical for discreet assistive wearables. Plus, you know, lasers. You can see how well it works in the demo video after the break.
This device is intended to augment the traditional white cane, not replace it. This virtual cane we saw a few years ago is another story.