Giant Keyboard Is Just Our Type

We like big keyboards and we cannot lie, and we’ve seen some pretty big keyboards over the years. But this one — this one is probably the biggest working board that anyone has ever seen. [RKade] and [Kristine] set out to make the world’s largest keyboard by Guinness standards – and at 16 feet long, you would think they would be a shoe-in for the world record. More on that later.

As you might have figured out, what’s happening here is that each giant key actuates what we hope is a Cherry-brand lever switch that is wired to the pads of a normal-sized keyboard PCB. Once they designed the layout, they determined that there were absolutely no existing commercial containers that, when inverted, would fit the desired dimensions, so they figured out that it would take 350 pieces of cardboard to make 70 5-sided keycaps and got to work.

Aside from the general awesomeness of this thing, we really like the custom buttons, which are mostly made of PVC components, 3D printed parts, and a bungee cord for the return spring.

[RKade] encountered a few problems with the frame build — mostly warped boards and shrunken holes where each of the 70 keys mount. After the thing was all wired up (cleverly, we might add, with Ethernet cable pairs), [RKade] rebuilt the entire frame out of three-layers of particle board.

By the way, Guinness rejected the application, citing that it must be an exact replica of an existing keyboard, and it must be built to commercial/professional standards. They also contradict themselves, returning no search results for biggest keyboard, but offer upon starting a world record application that there is a record-holding keyboard on file after all, and it is 8 ft (2.4 m) long. It’s not the concrete Russian keyboard, which is non-functional, but we wonder if it might be the Razer from CES 2018 that uses Kailh Big Switches.

Once the keyboard was up and running, [RKade] and [Kristine] duke it out over a game of Typing Attack, where the loser has to type all the lyrics to “Never Gonna Give You Up” on the giant keyboard. Check it out after the break.

Continue reading “Giant Keyboard Is Just Our Type”

A Raspberry Pi Handheld Computer You Might Want To Use

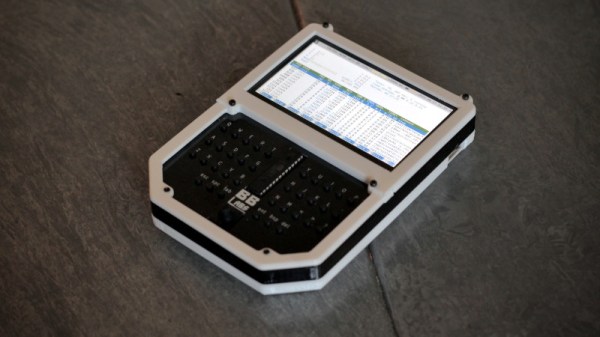
Amid the many wonderful form factors being explored by the makers of cyberdecks, there’s one that’s emerged which harks back to an earlier generation of portable computers: the handheld pad with a keyboard. These units are typically around the size of a hardback book, with the upper half being a screen and the lower a keyboard. The latest to come our way is from [Richard Sutherland], and it’s a very tidy pad computer indeed.

Inside the well-designed layered 3D printed case is the frequently-chosen Raspberry Pi 4, along with a PiSugar power supply board and 5,000 mAH battery and a 4.3″ touchscreen display. The keyboard has seen a lot of care and attention, featuring high-quality tactile switches that follow the Miryoku keyboard layout. He says it’s a thumb-typing keyboard, but anyone looking for more can either adapt the design to their liking or simply plug in an external board when faster typing is needed.

We like the pad computer trend as it offers useful computing power in a far more convenient format than a laptop, and we think this is a particularly nice one. It would be nice to see where people take this design, and who knows, we might give one a try for writing some Hackaday articles. If you’d like to see more pad computer goodness, we recently showed you one built in the shell of a classic Amstrad.

Introducing FISSURE: A Toolbox For The RF Hacker

No matter what the job at hand is, if you’re going to tackle it, you’re going to need the right kit of tools. And if your job includes making sense out of any of the signals in the virtual soup of RF energy we all live in, then you’re going to need something like the FISSURE RF framework.

Exactly what FISSURE is is pretty clear from its acronym, which stands for Frequency Independent SDR-Based Signal Understanding and Reverse Engineering. This is all pretty new — it looks like [Chris Poore] presented a talk at DEFCON a few weeks back about using FISSURE to analyze powerline communications between semi-trucks and their trailers, and they’ve got a talk scheduled for next month’s GNU Radio Conference as well. We’ve been looking through all the material we can find on FISSURE, and it appears to be an RF hacker’s dream come true. They’ve got a few examples on Twitter, like brute-forcing an old garage door opener with a security code set by a ten-position DIP switch, and sending tire pressure monitoring system (TPMS) signals to a car. They also mention some of the framework’s capabilities on the GitHub README; we’re especially interested in packet crafting for various protocols. The video below has some more examples of what FISSURE can do.

It looks like FISSURE could be a lot of fun, and very handy for your RF analysis and reverse engineering work. If you’ve been using Universal Radio Hacker like we have, this looks similar, only more so. We’ll be downloading it soon and giving it a try, so be on the lookout for a hands-on report.

Continue reading “Introducing FISSURE: A Toolbox For The RF Hacker”

DIY Video Transmitter Turned WiFi Jammer

The proliferation of FPV drones has brought a flood of cheap wireless video tech. After flying and crashing a cheap FPV drone for a bit, [GreatScott] decided to try his hand at building his own video transmitter, which turned out to be a lot harder than expected.

While digital technology has caught up to the FPV world, a lot of systems still use analog video, especially for drone racing. The video quality isn’t great, but it has the advantage of very low latency. The technology is very similar to the old analog TV broadcasts, but mainly uses the 5.8 GHz license-free bands. It is essentially analog video signal, frequency modulated onto a 5.8 GHz carrier signal transmitted through an appropriately sized antenna.

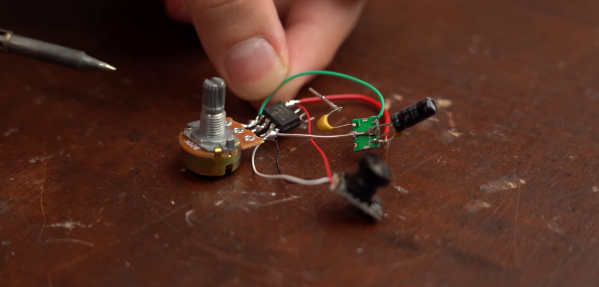
After a brief failed experiment with a simple circuit built from discrete components, [GreatScott] turned his attention to voltage-controlled oscillators (VCO). He bought a couple of 5.8 GHz VCOs from Aliexpress, and created and used a simple opamp circuit to boost the FPV camera video signal to the required input level for the VCO. This failed to produce any identifiable image on his video receiver goggles. In an attempt to confirm that the VCOs produced the desired frequency, he ordered a similar 2.4 GHz VCOs and built a short range (20 cm) WiFi jammer. With a signal generator to create a simple input signal, and confirmed that it interfered with his laptop’s WiFi connection.

After more experimentation with other VCOs, the closest [GreatScott] came to success was a barely identifiable image transmitted using a Maxim 2.4 GHz VCO. If you have any ideas on what is missing in the VTX circuit, drop them in the comments below.

Building RF circuits that interfere with the legitimate signal around you, or broadcasting out of band, is generally not a great idea, and could earn you an unpleasant visit from the authorities. If you want to build your own digital video transmission, take a look at the Wifibroadcast project.

Continue reading “DIY Video Transmitter Turned WiFi Jammer”

A Guide To 3D Printing Model Aircraft Wings

The exact airfoil shape of a wing has a massive effect on the performance and efficiency of an aircraft and will be selected based on the intended flight envelope. If you’re moving beyond foam board wings, 3D printing is an excellent way to create an accurate airfoil, and [Tom Stanton] provides us with an excellent guide to modeling wing sections for easy printing.

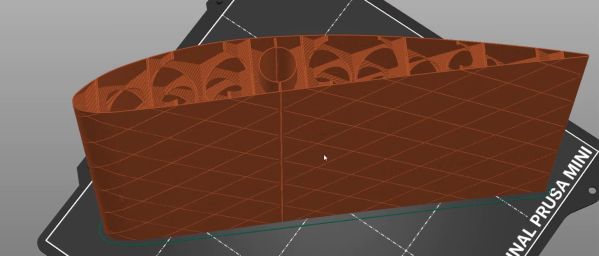
[Tom] used the process demonstrated in the video after the break to create the wing for his latest VTOL RC aircraft. It was printed with lightweight PLA, which can ooze badly when it stops extruding. To get around this, he designed the wings and their internal ribs to be printed in one continuously extruded line.

He wanted a wing that would allow a smooth transition from hover to forward flight, and used the Airfoil Tools website to find and download the appropriate airfoil profile. After importing the profile into Fusion 360, he created internal ribs in a diagonal grid pattern, with lightening holes running along the length of the wing. A cylinder runs along the core of the wing to fit a carbon fiber wing spar. The ribs are first treated as a separate body in CAD and split into four quadrants. When these quadrants combine with the outer shell, it allows the slicer to treat the entire print as a continuous external perimeter line using “vase mode“.

These steps might seem simple, but it took about 3 weeks of experimentation to find a process that works. It’s primarily intended for straight wings with a continuous profile, but it should be adaptable to tapered/swept wings too. A well-designed airframe is essential when pushing aircraft to the edge of efficiency, like solar-powered plane to fly overnight.

Continue reading “A Guide To 3D Printing Model Aircraft Wings”

Machine Learning Gives Cats One More Way To Control Their Humans

For those who choose to let their cats live a more or less free-range life, there are usually two choices. One, you can adopt the role of servant and run for the door whenever the cat wants to get back inside from their latest bird-murdering jaunt. Or two, install a cat door and let them come and go as they please, sometimes with a “present” for you in their mouth. Heads you win, tails you lose.

There’s another way, though: just let the cat ask to be let back in. That’s the approach that [Tennis Smith] took with this machine-learning kitty doorbell. It’s based on a Raspberry Pi 4, which lives inside the house, and a USB microphone that’s outside the front door. The Pi uses Tensorflow Lite to classify the sounds it picks up outside, and when one of those sounds fits the model of a cat’s meow, a message is dispatched to AWS Lambda. From there a text message is sent to alert [Tennis] that the cat is ready to come back in.

There’s a ton of useful information included in the repo for this project, including step-by-step instructions for getting Amazon Web Services working on the Pi. If you’re a dog person, fear not: changing from meows to barks is as simple as tweaking a single line of code. And if you’d rather not be at the beck and call of a cat but still want to avoid the evidence of a prey event on your carpet, machine learning can help with that too.

[via Tom’s Hardware]

Simple Breadboard SDR For Shortwave

One of the best ways to learn about radios is to build your own, even in the age of cheap SDR dongles. [Aniss Oulhaci] demonstrates this with a simple HF SDR receiver built on a breadboard.

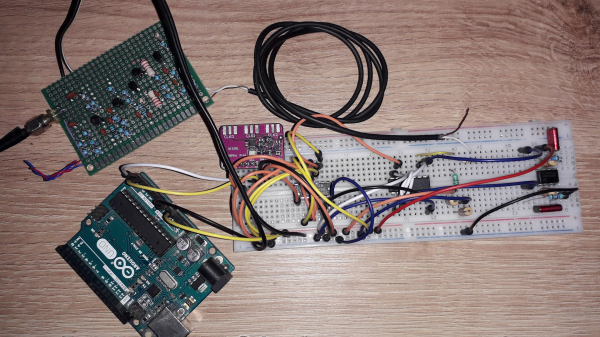
The receiver takes the form of a simplified Tayloe detector. An RF preamp circuit amplifies the signal from a shortwave antenna and feeds it into a 74HC4066D analog switch, which acts as a switching mixer. It mixes the input signal with the local oscillator’s I and Q signals to produce the intermediate frequency signals. The local oscillator consists of a SI5351 clock generator with a 74HC74D flip-flop to generate the I and Q pair. The signals pass through a low pass filter stage and get amplified by an LM358 op amp, resulting in the IQ signal pair being fed to a computer’s stereo sound card.

An Arduino is used to control the SI5351 clock generator, which in turn is controlled by the same program created for the SDR Shield. With the audio signal fed to HDSDR, [Aniss] was able to pick up a shortwave radio broadcaster.

While this is by no means a high-performance receiver, building an SDR on a breadboard is still a great weekend project, with plenty of potential for further experimentation.

Continue reading “Simple Breadboard SDR For Shortwave”