Super Cheap Super Simple DRO

If you have an old manual lathe, mill, or even a drill press, a digital readout (DRO) is a very handy tool to have. A DRO gives you a readout of how far you’ve cut, milled, or drilled into a piece of work without having to stoop to caveman levels and look down at a dial. Here’s a stupidly cheap DRO for all your machine tools. It should only cost five bucks or so, and if you need it, you already have the tools to manufacture it.

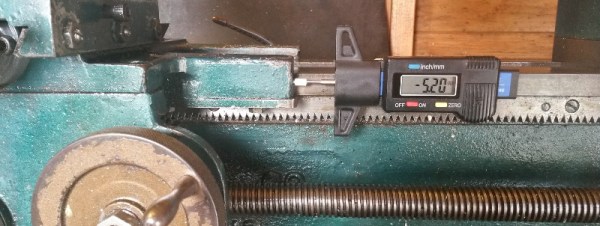
This build is inspired by an earlier build using the same single component – a digital tread depth gauge. This digital tread depth gauge is commonly found in countries that don’t use the US penny as currency to measure the depth of tread on a tire. The throw isn’t that large – only about 27mm – but with a few modifications it can fit on any machine tool.

The modifications include a small bit of metal glued to the back and four tiny neodymium magnets.  For the ‘tool head’ of this DRO, only a tiny plastic collar and another deo magnet are needed.

This digital tire depth gauge looks like – and probably is – the same mechanism found in those super cheap calipers from the far east. In theory, it should be possible to extend this modification to those digital calipers, making for a simple DRO with a much larger throw.

Thanks [Ben] for sending this one in.

Onde Magnetique Will Wow And Flutter Your Ears

[Scott Campbell] built a cassette-based synthesizer that sounds exactly like everything you’ve heard before. The sound generation comes straight off cassettes, but the brainbox of this synth varies the volume and pitch. It’s called the Onde Magnetique, and it is what you would get if you combined a Mellotron and Ondes Martenot.

The key component for the Onde Magnetique is a Sony cassette recorder that conveniently and inexplicably comes with a ‘tape speed input’ mini jack. By varying the voltage sent to this input jack, the speed of the tape, and thus the pitch of the sound being played, is changed. Build a box with a touch-sensitive button for volume, and a few tact switches for different speeds, and you have an electromechanical bastard child of a Mellotron and an Ondes Martenot.

By itself, the Onde Magnetique produces no sound – it only controls the pitch and volume of whatever is on the cassette. [Scott] produced a few single-note cassettes for his instrument, with ‘voice patches’ including a flute, choir, and a synth. With the CV and Gate input, these sounds can be sequenced with outboard gear, producing the wonderful sounds heard in the video after the break.

Continue reading “Onde Magnetique Will Wow And Flutter Your Ears”

The Most Expensive VR Experiment You’ll See All Week

There isn’t a lot of detail to be found behind this short demo of robot-based physical feedback for VR, but the video (embedded below) demonstrates things well. It’s an experiment in generating force feedback for virtual objects using a Baxter robot and the HTC Vive. When the user presses against a wooden block in VR, the robot presses back which simulates the mass of the virtual object. Force feedback is one of these areas in which research is ongoing, and in a variety of different directions.

Like so many other things in life, nothing beats the real thing for actual physical feedback. Also, there’s something great about giving a $25,000 robot the job of impersonating a few simple wooden blocks in VR, just so you can strap on a VR rig and basically give a robot a realistic-feeling fist bump.

Continue reading “The Most Expensive VR Experiment You’ll See All Week”

VertiGo Robot Drives Up Walls

This collaboration between ETH and the Disney empire’s research arm is a ultra-light robot that can roll across horizontal surfaces and also transition and climb walls.

The robot has four wheels with one steerable set, but its secret sauce is the two propellers gimbaled on its back. Using these propellers it can move itself across the ground, but also, when approaching a wall, provide enough thrust to overcome the gravity vector.

Naturally, the lighter the robot, the less force will be needed to keep it on the wall. That’s why the frame is made from carbon fiber corrugated sandwich panels. The motors, batteries, and controllers are all also light and small.

We liked how the robot was, apparently, using its propellers to provide additional stability even while on the ground. There is a video after the break, and more information can also be found on the Disney Research webpage.

Continue reading “VertiGo Robot Drives Up Walls”

3D Printed Electric Unicycle

Actually riding around at 30 km/h on a 3D printed means of transportation is pretty gnarly, if not foolhardy. So we were actually pleased when we dug deeper and discovered that [E-Mat]’s unicycle build is actually just a very nice cover and battery holder.

We say “just”, but a 3D-printed design takes a couple of cheap parts (the wheel and pedals) from the Far East and turns them into a very finished-looking finished product. Custom bits like this fulfill the 3D printing dream — nobody’s making it, so you make it yourself. And make it look pro.

It turns out that other people have noticed this motor/controller/pedal combo as well. Here’s some documentation to get you started.

It’s funny. Just four years ago, self-balancing powered unicycles were the realm of the insane hacker. Then came some hacker improvements, and now we’re at the point where you can mail-order all the parts and 3D print yourself a fancy enclosure.

Continue reading “3D Printed Electric Unicycle”

Hackaday Prize Entry: Let Your Muscles Do The Work

Electromyography is a technique used to study and record the electrical signals generated when a muscle contracts. It’s used for medical diagnosis, rehab, kinesiological studies, and is the preferred method of control for robotic prosthetics and exoskeletons. There are a few companies out there with myoelectric products, and the use case for those products is flipping the slides on a PowerPoint presentation. Lucky for us, this project in the Hackaday Prize isn’t encumbered by such trivialities. It’s an open, expandable platform to turn muscle contractions into anything.

As you would expect, reading the electrical signals from muscles requires a little more technical expertise than plugging a cable into an Arduino. This project has opamps in spades, and is more than sensitive enough to serve as a useful sensor platform. Already this project is being used to monitor bruxism – inadvertent clenching or grinding of the jaw – and the results are great.

While it’s doubtful this device will ever be used in a medical context, it is a great little board to add muscle control to a robot arm, or build a very cool suit of power armor. All in all, a very cool entry for The Hackaday Prize.

Encrypted USB Bootloader For AVRs

It probably doesn’t matter much for the hacker who sleeps with a bag of various microcontroller flash programmers under the pillow, but for an end-user to apply a firmware upgrade, convenience is king. These days that means using USB, and there are a few good AVR USB bootloaders out there.

But [Dmitry Grinberg] wanted more: the ability to encrypt the ROM images and verify that they haven’t been tampered with or otherwise messed up in transit. Combined with the USB requirement, that meant writing his own bootloader and PC-side tools. His bootloader will take unencrypted uploads if it doesn’t have a password, but if it’s compiled with a key, it will only accept (correctly) encrypted hex files.

Since the bootloader, including the USB firmware, is on the hefty side at 3.3 kB, [Dmitry] included hooks to re-use the bootloader’s USB code from within the target application. So if you were going to use V-USB in your program anyway, it doesn’t actually take up that much extra space. It’s a cute trick, but it ties the bootloader and user program together in a way that gives us the willies, without specifically knowing why. Perhaps we can debate this in the comments.

If you need an AVR USB bootloader, but you don’t need the encryption, we like Micronucleus. But if you need to deliver updates to users without them being able to modify (or screw up) the code in the middle, give [Dmitry]’s setup a try.