Hacking An Android Laptop To Run Linux

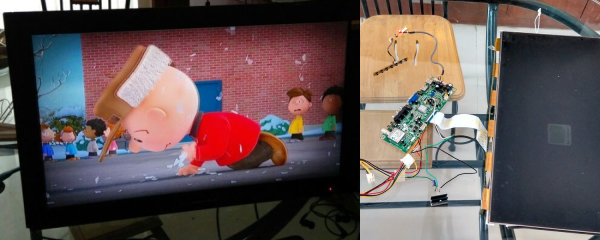
A few years ago, someone at Lenovo realized they could take an Android tablet, add a keyboard, and sell a cheap netbook that’s slightly more useful than a YouTube and Facebook machine. Since then, Lenovo has stopped making the A10 notebook and has moved on to manufacturing Chromebooks. That doesn’t mean this little Laptop doesn’t have some life left in it: it still has a Cortex A9 Quad core CPU, is reasonably priced on the ‘defective’ market, and can now run a full-blown Linux.

When the A10 notebook was released, there was a statement going around saying it was impossible to install Linux on it. For [Steffen] that was a challenge. He cracked open this netbook and took a look around the Flash chips. There were two tiny pads that could be shorted to put the device in recovery mode, and the entire thing can be booted from a USB stick.

[Steffen] ran into a problem while putting a new kernel on the netbook: there was a null pointer reference in some device during boot. The usual way of diagnosing this problem is to look at the console to see what device failed. This netbook doesn’t have a UART, though, and [Steffen] had to use an FTDI chip and set the console to USB to see why this device failed.

Just about everything on this tiny laptop works right now, with a few problems with WiFi, webcam, and standby mode – all normal stuff for a putting Linux on a random machine. It’s worth it, though: the quad-core ARM is a very good chip, and [Steffen] is running x86 apps with qemu. Not bad for something that can be found very, very cheap.

Two New Dev Boards That Won’t Make Your Wallet Hurt-So-Good

If you’ve been keeping up with the hobbyist FPGA community, you’ll recognize the DE0 Nano as “that small form-factor FPGA” with a deep history of projects from Oldland cpu cores to synthesizable Parallax Propeller processors. After more than four years in the field though, it’s about time for a reboot.

Its successor, the DE0 Nano SoC, is a complete redesign from multiples perspectives while doing it’s best to preserve the bite-size form factor and price that made the first model so appealing. First, the dev board boasts a Cyclone V with 40,000 logical elements (up from the DE0’s 22K) and an integrated dual-core Arm Cortex A9 Processor. The PCB layout also brings us  3.3V Arduino shield compatibility via female headers, 1 Gig of external DDR3 SDRAM and gigabit ethernet support via two onboard ASICs to handle the protocol. The folks at Terasic also seem to be tipping their hats towards the “Duino-Pi” hobbyist community, given that they’ve kindly provided both Linux and Arduino images to get you started a few steps above your classic finite-state machines and everyday combinational logic.

And while the new SoC model sports a slightly larger form factor at 68.59mm x 96mm (as opposed to the original’s 49mm x 75.2mm), we’d say it’s a small price to pay in footprint for a whirlwind of new possibilities on the logic level. The board hits online shelves now at a respectable $100.

Next, as a heads-up, the aforementioned Arduino Zero finally makes it’s release on June 15. If you’ve ever considered taking the leap from an 8-bit to a 32-bit processor without having to hassle through the setup of an ARM toolchain, now might be a great time to get started.

via [the Arduino Blog]

MX3D Printing a Bridge

6-Axis Robot Arm 3D Prints A Metal Bridge

Do you remember the MX3D metal printing robot? It’s now capable of 3D printing a metal bridge. Here’s the news release, but it’s in Dutch (translated).

Over one year ago we covered the beginning of the MX3D project, which was a rather ambitious foray into 3D printing in metal with a industrial six-axis ABB robot arm. They had previously done a version using resin (MX3D Resin Printer), but then upgraded the system to use a heavy duty welding machine to deposit various metals.

One year later, they’ve tuned it even more. To show it off they printed a free form standing bridge that people can actually walk across.

Continue reading “6-Axis Robot Arm 3D Prints A Metal Bridge”

Review: Stickvise Needs A Place On Your Bench

Stickvise is a simple device for a simple problem. It holds a work piece while you work on it. Most obviously this means a PCB for soldering, but there’s a twist of versatility that will make it work for a wide range of needs. Being someone who has often used the roll-of-solder-to-hold-a-circuit-board-down trick, only to upset the apple cart when I run out solder, this is a great little tool to have within arm’s reach. For those that already have a PCB vise, how often do you need more than one? How rarely do you need something that large? And if you’re lucky enough to have a microscope for soldering this is a perfect fixture for moving a board to and from without adjusting the focus.

Details of the Design

Simplicity. This is three pieces of aluminum bar-stock, some steel rod, nylon jaws, two springs, and some fasteners. It all works extremely well. To load up a new circuit board I loosen the wing nut and squeeze the clamp shut. Hand tightening the nut doesn’t take much force and it hasn’t slipped for me at all despite moving it around the bench for several days. Once set, the board can be taken out and flipped over easily thanks to the springs.

The extensibility here is key. As it stands, the nylon jaws have a V-groove to hold a board. If you need to support much taller boards you can always put some standoffs between the aluminum and the nylon jaws.

stickvise-custom-jawsBetter yet is the ability to design jaws for your own needs. [Alex Rich], Stickvise’s creator, already has a number of STL files available so that you may print out your own. The “fingers” on the custom jaw shown here interlock with the ones on the opposite side. But my favorite is an articulated set of “third-hand” style jaws based off of the PCB probe jig [Anool] covered back in May. There are even plans to make a parametric STL file so that printing larger or taller jaws doesn’t require a CAD modeling session.

If the range of the vise is too narrow you can simply replace the center bar with a longer one (source yourself or purchase from [Alex]) — the fixed aluminum end is secured with a set screw. This can even be used as a type of stretcher by reversing the spring jaw. I couldn’t think of an application in my own shop for this but you never know.

Stickvise Roots

stickvise-hackaday-approvedIf you have an eagle eye you’ll have noticed the Jolly Wrencher with “Hackaday Approved” next to it on the Stickvise. When [Alex Rich] started refining his original design he posted about it as a project on Hackaday.io. It didn’t take long to grab our attention and, after tossing around the idea a bit we approached [Alex] about his plans for manufacturing and how Hackaday might figure into that. I love seeing hardware come to life like this; it puts an artisanal spin on the things I choose to have in my lab.

Conclusion

stickvise-angled

It’s so simple you could build it, but for me the production quality is well worth buying it instead. It’s simple and durable, with the ability to be specialized for a number of different purposes. I wish I had had it when populating the board I’ve been showing off in these pictures (the LayerOne Badge from this year). If you do any work with circuit boards at the bench the Stickvise is a solid entry on your must-have-tools list.

Update: Battlezone On Vector Display Step-by-Step

When we ran the story of Battlezone played on tube displays earlier this week there were immediately questions about recreating the hack. At the time the software wasn’t available, and there is also a bit of hardware hacking necessary to get the audio working. You asked and [Eric] from Tubetime delivered. He’s posted a pair of articles that show how to get an STM32F4 Discovery board to play the classic game, along with instructions to build the firmware.

The hardware hack in this case is untangling the pinout used on the discovery board. It seems that one of the lines needed to get sound working for this hack is tied to one of the two DACs. If you read the original coverage you’ll remember that both of the DACs are used to drive X and Y on the vector display. The image above shows a cut trace on the bottom of the board. You’ll then need to route that signal to an alternate pin by soldering a jumper wire from the chip to a resistor on the board.

This (as well as one other alteration that bridges two of the chip pins) is a great example of work you should be unafraid to do on your own dev boards. We’ve had to do it with the Launchpad boards to get at the functionality we needed. We’d like to hear your own epic stories of abusing dev boards to do your bidding. Let us know in the comments.

Wifibroadcast Makes WiFi FPV Video More Like Analog

Normal WiFi is not what you want to send video from your quadcopter back to the first-person-view (FPV) goggles strapped on your head, because it’s designed for 100% correct, two-way transmission of data between just two radios. Transmission of analog video signals, on the other hand, is lossy, one-way, and one-to-many, which is why the longer-range FPV flights all tend to use old-school analog video transmission.

When you’re near the edge of your radios’ range, you care much more about getting any image in a timely fashion than about getting the entire video sequence correctly after a delay. While WiFi is retransmitting packets and your video is buffering, your quadcopter is crashing, and you don’t need every video frame to be perfect in order to get an idea of how to save it. And finally, it’s just a lot easier to optimize both ends of a one-way transmission system than it is to build antennas that must receive and transmit symmetrically.

And that’s why [Befinitiv] wrote wifibroadcast: to give his WiFi FPV video system some of the virtues of analog broadcast.

Continue reading “Wifibroadcast Makes WiFi FPV Video More Like Analog”

Hackaday Prize Entry: A Two Component Temperature Sensor

Here’s a design challenge for you: make a temperature sensor for any computer. If you’re an exceptionally clever smart ass, you’ll probably write some code to report the CPU temps. Others who take the exercise seriously will probably build something with a 1-wire temp sensor, a microcontroller, and all the hardware required to do that.

[Michael] had a better idea. He did it with just two components. One of those components is a USB connector.

The only reason is project could be created is a rather new part from Microchip, the PIC16F1455. This microcontroller doesn’t require a crystal, can do USB without any additional parts, and has an integrated temperature sensor. [Michael] whipped up a project to set up a USB CDC serial device, read the temperature with the ADC (thanks to a very helpful app note), and sends the temperature to a computer once a second.

Despite being built out of only two components, this could actually be a useful device. The PIC is a USB serial device, and this can be used with any computer made in the past 15 or so years. It would hardly take any code at all to read the temperature with another program, and it’s a very inexpensive build. We have to give style points for soldering a microcontroller directly to a USB connector, too.


The 2015 Hackaday Prize is sponsored by: