Tearing Down A PS3 Blu Ray Drive

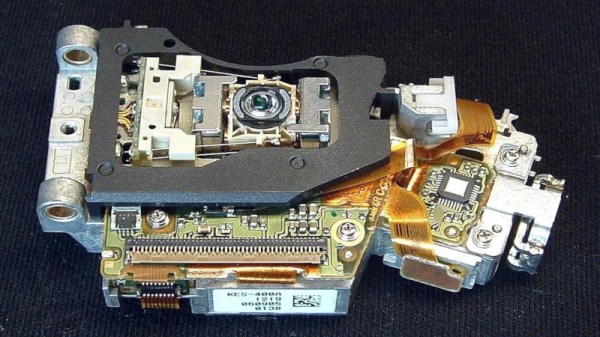
Optical drives are somewhat passe in 2019, with most laptops and desktops no longer shipping with the hardware installed. The power of the cloud has begun to eliminate the need for physical media, but that doesn’t mean the technology is any less marvellous. [Leslie Wright] and [Samuel Goldwater] took a deep dive into what makes the PS3’s optical drive tick, back in the heyday of the Blu Ray era.

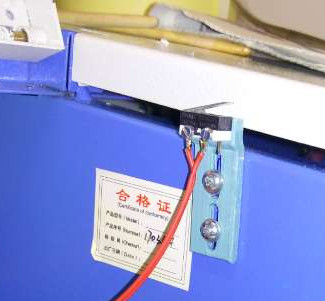
The teardown starts by examining the layout of the assembly, and the parts involved. This is followed by a deep dive into an exploration of the triple-laser diode itself, There are tips on how to safely extract the delicate parts, which are highly sensitive to electrostatic discharge, as well as exhaustive specifications and measurements of performance. There’s even a break down of the optical package, too, including a patent search to shed more light on the complicated inner workings of the hardware.

And if this lures you to dig deeper into Sam’s Laser FAQ, prepare to spend the rest of the week.

We’ve seen other optical teardowns before, too – like this look inside a stereo microscope. It’s quite technical stuff, and may fly over the heads over the optically inexperienced. However, for those in the know, it’s a great look at the technology used in a mass-produced console.

Hacking A Cheap Laser Rangefinder

When a new piece of technology comes out, the price is generally so high that it keeps away everyone but the die hard early adopters. But with time the prices inch down enough that more people are willing to buy, which then drives the prices down even more, until eventually the economies of scale really kick in and the thing is so cheap that it’s almost an impulse buy. Linux SBCs, Blu-ray lasers, 3D printers; you name it and the hacker community has probably benefited from the fact that it’s not just the hacker community that’s interested anymore.

Which is exactly what’s started to happen with laser rangefinders. Once almost exclusively a military technology, you can now pick a basic “laser tape measure” for less than $40 USD from the normal overseas suppliers. Unfortunately, as [iliasam] found, they aren’t particularly well suited other tasks. For one there’s no official way of getting the data out of the thing, but the other problem is that the sample rate is less than one per second. Believing the hardware itself was promising enough, he set out to reverse engineer and replace the firmware running on one of these cheap laser rangefinders (Google Translate from Russian).

His blog post is an absolute wealth of information on how these devices operate, and a must read for anyone interested in reverse engineering. But the short version is that he figured out a way to reprogram the STM32F100C8T6 microcontroller used in the device, and develop his own firmware that addresses the usability concerns of this otherwise very promising gadget.

With some minor hoop jumping, the laser tape measure PCB can be hooked up to an ST-Link programmer, and the firmware provided by [iliasam] can be used to enable an easy to use serial interface. Perfect for pairing with an Arduino or Raspberry Pi to get fast and accurate range data without breaking the bank.

It probably won’t surprise you to see this isn’t the first time [iliasam] has gotten down and dirty with a laser rangefinder. This extremely impressive build from last year allowed for incredibly accurate 3D scans of his room, and before that he created his own rangefinder from scratch.

Continue reading “Hacking A Cheap Laser Rangefinder”

Laser Cutter Alignment Mod Skips Beam Combiner

A lot of the DIY laser engravers and cutters we cover here on Hackaday are made with laser diodes salvaged from Blu-ray drives and projectors, which are visible lasers in the 400 – 450nm range (appearing as violet or blue). Unfortunately there is an upper limit in terms of power on visible diode lasers, most builds max out at 5W or so. If you need more power than that, you’ll likely find yourself looking at gas laser cutters like the K40. While the K40 is a great starting point if you’re looking to get into “real” lasers, it’s a very different beast from the homebrew builds using visible lasers.

With a gas laser the beam itself is invisible, making it much more difficult to align or do test runs. One solution is to add a visible laser to the K40 which can be used to verify alignment, but making sure it’s traveling down the same path as the primary laser usually requires an expensive beam combiner. Looking to avoid this cost, [gafu] wanted to see if it was possible to simply move the visible laser into the path of the primary beam mechanically.

An adjustable microswitch detects when the lid has been opened.

In the setup that [gafu] has come up with, a cheap laser module (the type from a handheld laser pointer) is moved into the path of the primary laser on an arm that’s actuated by a simple hobby servo. To prevent the primary and visible lasers from firing at the same time, an Arduino is used to control the servo given the current state of the K40’s lid. If the lid of the K40 is open, the primary laser is shutoff and the visible laser is rotated into position so the operator can see where the primary laser’s beam would be hitting. Once the lid is closed, the visible laser rotates out of the way and the primary is powered back up.

Running the cutting or engraving job with the lid of the K40 machine open now let’s [gafu] watch a “dry run” of the entire operation with the visible laser before finally committing to blasting the target with the full power beam.

We’ve covered many hacks and modifications for everyone’s favorite entry-level CO2 laser cutter. From replacing the controller to making it bigger, K40 owners certainly seem like a creative bunch.

Photochromic Eggs: Not For Breakfast

Photochromic paint is pretty nifty – under exposure to light of the right wavelength, it’ll change colour. This gives it all kinds of applications for temporary displays.  [Jiri Zemanek] decided to apply photochromic paint to an egg, utilising it to create stroboscopic patterns with the help of a laser.

Patterns for the egg are generated in MATLAB. A Discovery STM32 board acts as a controller, looking after the laser scanner and a stepper motor which rotates the egg. A phototransistor is used to sync the position of the laser and the egg as it rotates.

The photochromic paint used in this project is activated by UV light. To energize the paint, [Jiri] harvested a violet laser from a Blu-ray player, fitting it to a scanning assembly from a laser printer. Instead of scanning the laser across an imaging drum, it is instead scanned vertically on a rotating egg. Patterns can then be drawn on the egg, which fade over time as the paint gives up its stored energy.

[Jiri] exploits this by writing a variety of patterns onto the egg, which then animate in a manner similar to a zoetrope – when visualised under strobing light, the patterns appear to move. There are also a few holiday messages shown for Easter, making the egg all the more appropriate as a billboard.

If you like the idea of drawing on eggs but are put off by their non-uniform geometry, check out the Egg-bot. Video below the break.

Continue reading “Photochromic Eggs: Not For Breakfast”

Custom Media Center Maintains Look Of 70s Audio Components

Slotting a modern media center into an old stereo usually means adding Bluetooth and a Raspberry Pi to an amp or receiver, and maybe adding a few discrete connectors on the back panel. But this media center for a late-70s Braun hi-fi (translated) goes many steps beyond that — it fabricates a component that never existed.

The article is in German, and the Google translation is a little spotty, but it’s pretty clear what [Sebastian Schwarzmeier] is going for here. The Braun Studio Line of audio components was pretty sleek, and to avoid disturbing the lines of his stack, he decided to create a completely new component and dub it the “M301.”

The gutted chassis of an existing but defunct A301 amplifier became the new home for a Mac Mini, Blu-Ray drive, and external hard drive. An HDMI port added to the back panel blends in with the original connectors seamlessly. But the breathtaking bit is a custom replacement hood that looks like what the Braun designers would have come up with if “media center” had been a term in the 70s.

From the brushed aluminum finish, to the controls, to the logo and lettering, everything about the component that never was shows an attention to detail that really impresses. But if you prefer racks of servers to racks of audio gear, this media center built into a server chassis is sure to please too.

Thanks to [Sascho] and [NoApple4Me] for the nearly simultaneous tips on this one.

Starfish Cat, Bowling Ball Bot, And Stargate All Claim Prizes

We saw a huge outpouring of builds for the the Hackaday Sci-Fi Contest and it’s now time to reveal the winners. With 84 great themed projects submitted, the judges had a tough task to pull out the most impressive both in terms of creativity and execution.

Here are our four winners. Two come from the Stargate universe. One is a cuddly yet horrifying character of unknown origin but unarguably Sci-Fi. The other is the best use of a bowling ball we’ve seen so far.

Grand Prize

The grand prize goes to [Jerome Kelty] with Animatronic Stargate Helmet. [Jerome] has built a replica prop that looks like it just came out of a Hollywood shop. It’s almost a shame that this helmet won’t be worn on film – though it certainly could be. If you remember the film and the television show, these helmets have quite a bit of articulation. The head can pan and tilt. The eyes glow, as well as have irises which expand and contract. The “wings” also open and close in a particular way.

[Jerome] built the mechanics for this helmet. He used radio control servos to move the head, with the help of some hardware from ServoCity. Most of the metalwork was built in his own shop. Everything is controlled from a standard R/C transmitter, much like the original show. [Jerome] is taking home a Rigol DS1054Z 4 Channel 50 MHz scope.

First Prize

First prize goes to [Christine] with
Starfish Cat: Your Lovecraftian Furby-like Friend. Starfish Cat is one of those odd projects that finds itself right on the edge of the uncanny valley. We are equal parts intrigued and creeped out by this… thing. The bottom is all starfish, with a rubber base poured into a 3D printed mold. The top though, is more cat-like, with soft fur and ears. 5 claws hide under the fur, ready to grab you.

Starfish Cat detects body heat with 5 bottom mounted PIR sensors. The sensors are read by the particle photon which acts as its brain. When heat is detected, Starfish Cat activates its claws, and also blows or sucks air through its… uh… mouth hole.  [Christine] is taking home a Monoprice Maker Select Mini 3D printer.

Click past the break to see the rest of the winners

Continue reading “Starfish Cat, Bowling Ball Bot, And Stargate All Claim Prizes”

Hackaday’s Sci-Fi Contest Hits Warp Speed

Hackers’ perspiration may go into soldering, coding, and building. For many of us, the inspiration for these projects comes from science fiction. The books, movies, TV shows, short stories, and comics we all grew up on, and continue to devour to this day. We’re paying homage to all these great Sci-Fi stories with our latest contest.

The Sci-Fi Contest isn’t about the most efficient way of building a 555 circuit or the tightest code. This one is about celebrating science fiction in the best way we know how — building awesome projects. This is Hackaday, so you’re going to have to use some form of working electronics in your entry. Beyond that, it’s up to you. Bring us your Overwatch cosplays, your Trek Tricorders, your Star Wars pod racers.

This isn’t our first Sci-Fi contest. In fact, Sci-Fi was one of Hackaday.io’s first contests way back in 2014.
3 years and over 100,000 new hackers later, it’s time to take a fresh look at what you all have been up to. Projects that were entered in the first Sci-Fi contest are eligible, but you need to create a new project page and do some new work.

Check the rules for the full details. Once you’ve published a project use the drop-down menu on the left sidebar to enter it in the Hackaday Sci-Fi Contest.

Prizes

Great work reaps great rewards. Here’s what we’ve got for this contest:

  • Grand Prize is a Rigol DS1054Z 4 Channel 50 MHz scope.
  • First Prize is a Monoprice Maker Select Mini 3D printer
  • Second Prize is a complete Blu-Ray box of Star Trek: The Next Generation
  • Third Prize is Lego’s latest rendition of the Millennium Falcon.

The deadline is Monday, March 6, 2017, 09:00 pm PST (+8 UTC), so don’t waste time! Warm up your soldering irons, spin up your warp drives, and create something awesome!