Spinach Photo Prints

Some people like spinach in their salads. Others would prefer it if it never gets near their fork. Still, other folks, like [Almudena Romero], use it for printing pictures, and they’re the folks we’ll focus on today.

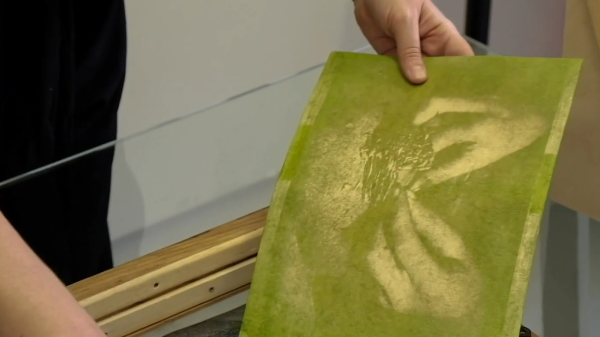
Anthotypes are positive images made from plant dyes that fade from light exposure. Imagine you stain your shirt at a picnic and leave it in the sun with a fork covering part of the stain. When you come back, the stain not sheltered by cutlery is gone, but now you have a permanent fork shape logo made from aunt Bev’s BBQ sauce. The science behind this type of printmaking is beautifully covered in the video below the break. You see, some plant dyes are not suitable for light bleaching, and fewer still if you are not patient since stains like blueberry can take a month in the sun.

The video shows how to make your own plant dye, which has possibilities outside of anthotype printing. Since the dye fades in sunlight, it can be a temporary paint, or you could use samples all over your garden to find which parts get lots of sunlight since the most exposed swatches will be faded the most. Think of a low-tech UV meter with logging, but it runs on spinach.

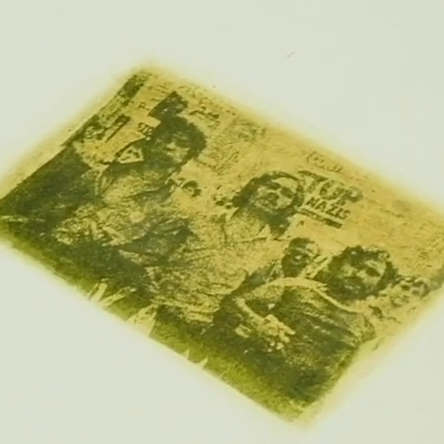
If the science doesn’t intrigue you, the artistic possibilities are equally cool. All the pictures have a one-of-a-kind, wabi-sabi flare. You take your favorite photo, make it monochrome, print it on a transparent plastic sheet, and the ink will shield the dye and expose the rest. We just gave you a tip about finding the sunniest spot outdoors, so get staining.

Anthotype printing shares some similarities with etch-resist in circuit board printing processes, but maybe someone can remix spinach prints with laser exposure!

Continue reading “Spinach Photo Prints”

DVD Optics Power This Scanning Laser Microscope

We’ve all likely seen the amazing images possible with a scanning electron microscope. An SEM can yield remarkably detailed 3D images of the tiniest structures, and they can be invaluable tools for research. But blasting high-energy cathode rays onto metal-coated samples in the vacuum chamber of a bulky and expensive instrument isn’t the only way to make useful images, as this home-brew laser scanning microscope demonstrates.

This one comes to us by way of [GaudiLabs], a Swiss outfit devoted to open-source lab equipment that enables citizen science; we saw their pocket-sized thermal cycler for PCR a while back. The basic scheme here is known as confocal laser scanning fluorescence microscopy, where a laser at one wavelength excites fluorescent tags bound to structures in a sample. Light emitted by the tags is collected, and a 3D image is built up from multiple scans of the sample at different focal planes.

Like many DIY projects, this microscope is built from old DVD parts, specifically the pickup heads. The precision optics in these commonly available assemblies, which are good enough to read pits as small as 150 nm on a Blu-Ray DVD, are well-suited for resolving similarly sized microstructures. One DVD pickup is used to scan the laser in the X-axis, while the other head is modified to carry the sample and move it in the Y-axis. The pickup head coils and laser are driven by an Arduino carried on a custom PCB along with the DVD heads. Complete build files are posted on GitHub for anyone interested in recreating this work.

We love tips like this that dig back a bit and find things we missed the first go-around. And the equipment [GaudiLabs] lists really has potential for the budding biohacker, which we also like.

Thanks for the tip on this one, [Bill].

Hackaday Podcast 077: Secret Life Of SD Cards, Mining Minecraft’s Secret Seed, BadPower Is Bad, And Sailing A Sea Of Neon

Hackaday editors Mike Szczys and Elliot Williams are deep in the hacks this week. What if making your own display matrix meant a microcontroller board for every pixel? That’s the gist of this incredible neon display. There’s a lot of dark art poured into the slivers of microSD cards and this week saw multiple hacks digging into the hidden test pads of these devices. You’ve heard of Folding@Home, but what about Minecraft@Home, the effort to find world seeds from screenshots. And when USB chargers have exposed and rewritable firmware, what could possibly go wrong?

Take a look at the links below if you want to follow along, and as always, tell us what you think about this episode in the comments!

Take a look at the links below if you want to follow along, and as always, tell us what you think about this episode in the comments!

Direct download (60 MB or so.)

Continue reading “Hackaday Podcast 077: Secret Life Of SD Cards, Mining Minecraft’s Secret Seed, BadPower Is Bad, And Sailing A Sea Of Neon”

The Real Story: How Samsung Blu Ray Players Were Bricked

In June, many owners of Samsung Blu Ray players found that their devices were no longer usable. Stuck in a boot loop, speculation was rife as to the cause of the issue. Now it seems that the issue has become clear – a badly formatted XML file may be responsible for the problems (via The Register).

The problem stems from the logging system that stores user data and passes it back to Samsung over the Internet. Which data is logged and sent back is managed by an XML file which contains the policy settings that control this behaviour. According to a source known only as “Gary” “Gray”, the XML file posted on Samsung’s servers on June 18 featured a malformed list element. This caused a crash in the player’s main software routine, leading the player to reboot.

The failure was exacerbated by the fact that the XML file is parsed very early in the boot sequence, even before checking for firmware updates or a new XML file. This has prevented Samsung from rolling out an update or fix over the air, and is why the player gets stuck in a loop of continuous reboots.

Reportedly, the file can be found at this URL, though is now an updated version that shouldn’t brick players. Samsung have had to resort to a mail-in repair scheme, wherein technicians with service tools can manually remove the offending XML file from the player’s storage, allowing it to boot cleanly once again. While this shows our initial assumptions were off the mark, we’re glad to see a solution to the problem, albeit one that requires a lot of messing around.

[Thanks to broeckelmaier for the tip!]

Broken 3D Printer Turned Scanning Microscope

A few years ago, [Wayne] managed to blow out the main board of his Flashforge Finder attempting to change the fan. But the death of one tool ended up being the birth of another, as he ended up using its mechanical components and a Raspberry Pi to create an impressive scanning microscope.

Scan of Ulysses S. Grant from a US $50 bill

As you might have guessed from the name, the idea here is to scan across the object with a digital microscope to create an enlarged image of the entire thing. This requires some very precise control over the microscope, which just so happens to be exactly what 3D printers are good at. All [Wayne] had to do was remove the hotend, and print some adapter pieces which let him mount a USB microscope in its place.

The rest is in the software. The Raspberry Pi directs the stepper motors to move the camera across the object to be scanned in the X and Y dimensions, collecting thousands of individual images along the way. Since the focus of the microscope is fixed and there might be height variations in the object, the Z stage is then lifted up a few microns and the scan is done again. Once the software has collected tens of thousands of images in this manner, it sorts through them to find the ones that are in focus and stitch them all together.

The process is slow, and [Wayne] admits its not the most efficient approach to the problem. But judging by the sample images on the Hackaday.io page, we’d say it gets the job done. In fact, looking at these high resolution scans of 3D objects has us wondering if we might need a similar gadget here at the Hackaday Command Bunker.

The project is actually an evolution of an earlier attempt that used gutted optical drives to move the microscope around.

Better Controls For Your Chromecast Through CEC

Modern home cinema equipment is well-equipped with features for interoperability and convenience, but in practice, competing standards and arcana can make it fall over. Sometimes, you’ve gotta do a little work on your own to glue it all together, and that’s what led [Victor] to develop a little utility of his own.

ChromecastControls is a tool that makes controlling your home cinema easier by improving Chromecast’s integration with the CEC features of HDMI. CEC, or Consumer Electronics Control, is a bidirectional serial bus that is integrated as a part of the HDMI standard. It’s designed to help TVs, audio systems, and other AV hardware to communicate, and allow the user to control an entire home cinema setup with a single remote. Common use cases are TVs that send shutdown commands to attached soundbars when switched off, or Blu-Ray players that switch the TV on to the correct output when the play button is pressed.

[Victor]’s tool allows Chromecast to pass volume commands to surround sound processors, something that normally requires the user to manually adjust their settings with a separate remote. It also sends shutdown commands to the attached TV when Chromecast goes into its idle state, saving energy. It relies on the PyChromecast library to intercept traffic on the network, and thus send the appropriate commands to other hardware. Simply running the code on a Raspberry Pi that’s hooked up to any HDMI port on a relevant device should enable the CEC commands to get through.

It’s a project that you might find handy, particularly if you’re sick of leaving your television on 24 hours a day because Chromecast never bothered to implement a simple CEC command on an idle timeout. CEC hacks have a long history, too – we’ve been covering them as far back as 2010!

Printed Arduino Turntable Takes Objects For A Spin

Have you built a 3D scanner yet? There’s more than one way to model those curves and planes, but the easiest may be photogrammetry — that’s the one where you take a bunch of pictures and stitch them into a 3D model. If you build a scanner like [Brian Brocken]’s that does almost everything automatically, you might consider starting a scan-and-print side hustle.

This little machine spins objects 360° and triggers a Bluetooth remote tethered to an iPhone. In automatic mode, it capture anywhere from 2-200 pictures. There’s a mode for cinematic shots that shoots video of the object slowly spinning around, which makes anything look at least 35% more awesome. A third mode offers manual control of the turntable’s position and speed.

An Arduino UNO controls a stepper that moves the turntable via 3D printed-in-place bearing assembly. This project is a (vast) improvement over [Brian]’s hand-cranked version that we looked at over the summer, though both are works of art in their own right.

Our favorite part aside from the bearing is the picture-taking process itself. [Brian] couldn’t get the iPhone to play nice with HC-05 or -06 modules, so he’s got the horn of 9g servo tapping the shutter button on a Bluetooth remote. This beautiful beast is wide open, so fire up that printer. You can watch the design and build process of the turntable after the break.

Want to scan some really tiny things? Make a motorized microscope from movie machines.

Continue reading “Printed Arduino Turntable Takes Objects For A Spin”