Got aliens in your attic? Squirrels in the skirting board? You need a trap, and [John Mangan] has come up with an interesting way to let you know that you have caught that pesky varmint: the IoT Critter Twitter Trap. By adding a ball switch, Electric Imp and a couple of batteries to a trap, he was able to set the trap to notify him when it caught something over Twitter. To do this, he programmed the Electric Imp to send a message over when a varmint trods on the panel inside the trap, slamming its door shut. The whole thing cost him less than $60 and can be seen in action after the break.
This is a pretty neat hack. I used to help with a Feral Fix program, where feral cats would be trapped, neutered and returned to the wild. This involved baiting the trap, then waiting hours in the cold nearby for the ferals to get comfortable enough to climb inside and trigger the trap. [John’s] version would only work indoors (as it uses WiFi), but it wouldn’t be that difficult to add a cell phone dongle or other RF solution to extend the range. With this hack, I could have at least waited somewhere warmer, while the trap would ping me when it was triggered.
The Raspberry Pi Zero Contest presented by Adafruit and Hackaday came to a close last week, as the clock struck 11:59 am on Sunday, March 13, 2016. Since then our team of judges has been working to pick the top three entries. It was a hard job sorting through nearly 150 amazing creations. In the end though, the judges were able to pick three grand prize winners. Each winner will receive a $100 gift card to The Hackaday Store. So let’s get to the winners!
[JohSchneider] and [Markus Dieterle] both won Pi Zero boards and went on to win $100 gift certificates. [shlonkin] didn’t win a Pi Zero, but persevered and continued working on the classroom music teaching aid even without a Zero board. The top winners aren’t the only ones who are doing well. Everyone who entered has a head start on a great project for The 2016 Hackaday Prize.
I’d like to thank Hackaday’s own [Dan Maloney], [Kristina Panos], [Sophi Kravitz] and [Brian Benchoff] who joined me to judge the contest. The entire Hackaday staff is indebted to [Limor Fried] and [Phil Torrone] over at Adafruit for coming up with 10 live videos, and providing 10 hard to find Pi Zero boards for our winners. The biggest thanks go to the entrants. If I could send a prize out to each and every one of you, I would!
While “writing it down” might seem like common sense, it wasn’t always the case. From the times of Ancient Greece, Plato tells a story of a worried Egyptian King, who, upon witnessing the invention of writing, remarks,
“If men learn this, it will implant forgetfulness in their souls; they will cease to exercise memory because they rely on that which is written, calling things to remembrance no longer from within themselves, but by means of external marks. [1]”
To some, the notebook was a dangerous device, a thief that would rob us of our memories [2]. Fortunately, these days, there’s plenty of evidence from our Psych texts that say we humans are pretty shabby at keeping the facts straight. In fact, each time we recall a memory, we change it! Here lies the beauty of the notebook. Have an idea for a new project? Why not log it somewhere for future reference? With diligence, the notebook can become our own personal hub for spurring on new project ideas.
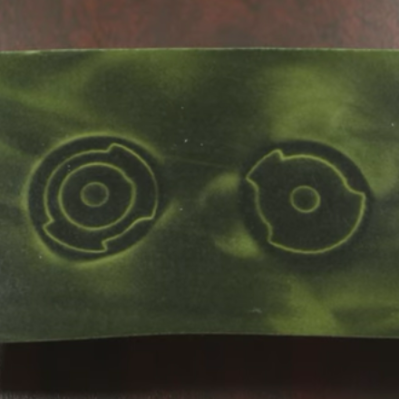
This is magic, big news, both, or neither. It’s so exciting to see magnets behave in this bizarre and wonderful way that we think it’s hard to forecast where this will go. Shown above is a pair of magnets that have several modes of operation. They attract each other, but repel when less than a centimeter apart. However, give one a twist and the two will strongly attract.
The behavior is thanks to a new process of 3D printing magnets to manipulate where the fields occur. With the behavior just described, they would function well as a cabinet latch which has soft close and positive lock, all built into two magnets.
This comes from one of our favorite YouTube channels, [SmarterEveryDay], who just toured Polymagnet — a company that has figured out how to actually print magnetic fields.
So how the heck does it work? Well, your standard magnet has a north face on one side, and a south face on the other — creating a magnetic loop between the two. But what if you could put north and south on the same side of the magnet, and vary their position and size? It means you can control the magnetic field down to the magnetic pixel, or as Polymagnet calls them — a Maxel.
Here you can see some magnetic film (which reacts visually to magnetic fields) put on top of the two parts of the demo magnet. The printed design is very similar to a mechanical mechanism. We’d explain more, but [Destin] does a great job teaching about the tech in the video found below.
Is this the dawn of magnetic mechanisms? We certainly have never seen anything like it.
As a fresh-faced electronic engineering student while the first Gulf War was raging in a far-off desert, I learned my way through the different families of 74 logic at a university in the North of England. 74LS was the one to use, the story went, because it’s quick and doesn’t use much power. At the time, there was an upstart on the scene: 74HC. Now that’s really quick. New. Exotic, even.
Thus an association was formed, when you want a quick logic function then 74HC is the modern one to go for. It could have been a lifelong love affair, but over twenty years, after many factors of speed increases and some RF tricks with gates we wouldn’t have dreamed of back then, it’s over. There is a whole world of newer logic families to choose from, and while HC is still good at what it does, it’s well past time to admit that it may just have been superseded.
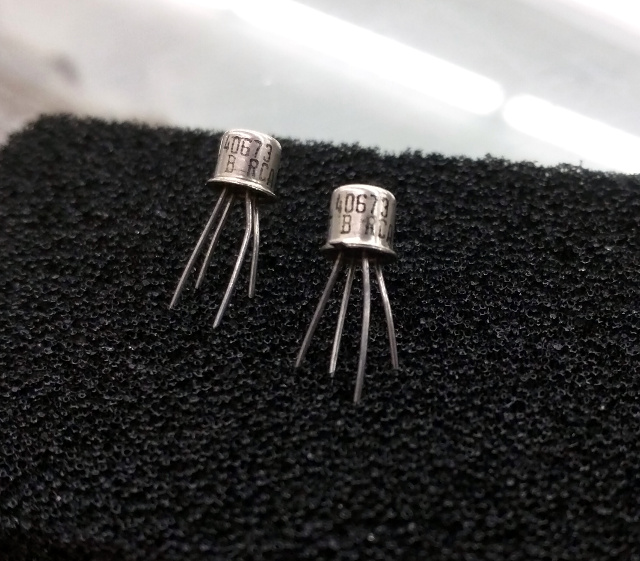
40673s, probably now worth more by weight than anything else on four legs. (Thanks are due to [Brandon Dunson] and Tanner Electronics) A tendency to cling to the past with logic families is pretty harmless. Like [Adam Fabio]’s TIP power transistors they’re pretty cheap, still very much in production, and still do most jobs demanded of them excellently. But what prompted this piece was a far more egregious example of an old component still being specified: the RCA 40673 dual-gate MOSFET. Launched in the mists of time when dinosaurs probably still roamed the earth, this static-sensitive four-pin TO72 found a home in a huge variety of RF amplifiers, oscillators, and mixers. It worked well, but as you might expect better devices came along, and the 40673 was withdrawn some time in the 1980s.
Unfortunately, nobody seems to have told a section of the amateur radio community about the 40673’s demise. Or perhaps nobody’s told them that many scrap analogue TV tuners of a certain age will yield a perfectly good newer replacement for free. Because even today, thirty years after the 40673 shuffled off this mortal coil, you can still find people specifying it. If you have a stash of them in your junk box, they’re worth a small fortune, and yours could be the bench with the throng of people at the next ham radio convention.
A different but equally annoying manifestation of the phenomenon comes when the device everyone likes to specify is not very old and very much still in production, but the designer hasn’t taken the time required to check for a cheaper alternative. Nobody ever got fired for buying IBM, they say, but perhaps they should be fired for specifying an AD8307 logarithmic amplifier in an amateur radio power meter. Don’t take this the wrong way, it’s a beautiful chip and probably a lot of work at Analog Devices has gone into laser-trimming resistors to make it perform to an extremely demanding specification. But eleven dollars for a chip? When a cursory search will turn up Maxim’s MAX9933 which does a perfectly good job in this application at well under two dollars? Someone isn’t doing their homework.
Sometimes there are components for which there are no perfect replacements. Germanium point-contact diodes, for example. 1N34As and OA91s are becoming like hen’s teeth these days, and though Schottky diodes can replace them in many applications, there are still a few places if you’re a radio person you’ll hanker for the original. There are suppliers on Alibaba who claim to manufacture 1N34s, but the pictures always look suspiciously like 1N4148s, and anyway who can find a home for a hundred thousand diodes? (Hang on, this is Hackaday. There will be someone out there with a hundred-thousand-diode project, you can count on it.)
OK, maybe germanium diodes are an edge case and the examples above have a radio flavour, but you get the picture. What the full-blown rant in the previous paragraphs has been building up to is this: a plea for designers to do their homework. Please try to design every project for the next two decades, and as though any extras in the component price come from your company’s bottom line. (We’ll make exceptions for building something for which the whole point is a retro circuit. An Apple I replica like the Mimeo 1 needs old logic chips for artistic purposes.)
Is there a vital electronic engineering skill that’s being lost here perhaps? Back when the Internet was the sole preserve of boffins and Tim Berners-Lee hadn’t yet plugged his hypertext ideas into it, we relied on catalogs. Big paper-bound books the size of telephone directories were our only window into the exciting world of electronic components. If you’re an American yours was probably from Radio Shack, but for most UK-based hackers and makers who couldn’t get their hands on a commercial account from RS or Farnell that meant the Maplin catalogue. Before they moved in a consumer-electronics direction, they were a component specialist whose catalogue with its distinctive spaceships on the cover could be bought at large newsstands.
It’s difficult to describe the impact of electronics catalogues in the ’70s and ’80s to someone who has known only the abundance of information from the WWW. These publications were our only window into the world of electronic components. They contained significant excerpts from semiconductor data sheets, and we read their wealth of information from cover to cover. We knew by heart what each device was capable of, and we eagerly devoured each new tidbit of information as it arrived.
In short, when we specified a component, we did so with a pretty good knowledge of all the components that were available to us.
By comparison, nowadays we can quickly buy almost any device or component in production from a multitude of suppliers. There are millions more devices available, and if RS or Farnell don’t have the part then Mouser or Digi-Key are sure to provide. The WWW allows us to find what we need in short order, and the miracle of global distribution means that we can have it delivered within 48 hours almost wherever we live.
CPC’s very aptly-named Big Book
Which means that all the new devices are available to us, but we’ve lost the ability to keep on top of them. We’ve become information rich, but knowledge poor. Printed catalogs still exist, but the sheer volume of information they contain forces brevity upon their entries and expands the size of the publication to the point at which it becomes an unwieldy work of reference. We therefore tend to stick with the devices and components we know, regardless of their cost or of whether they have been superseded, and our work is poorer for it.
We need to relearn the skill of inquisitiveness when it comes to the parts we use, and to rediscover the joy of just browsing, even if the medium is now a huge suppliers’ web site rather than a paper catalog. Otherwise we’ll still be looking at circuit diagrams containing 74LS logic and 40673 MOSFETs in the 2030s, and that can’t be a good thing!
There is of course also a slightly macabre alternative scenario. The highest online price we found for 40673s was over $30 each, so if a producer can make that kind of silly money then there’s a danger that RCA’s successors will see a business model in exhuming the corpse and re-animating it, thus ensuring that we’ll never be free of the undead. We need to make sure that doesn’t happen!
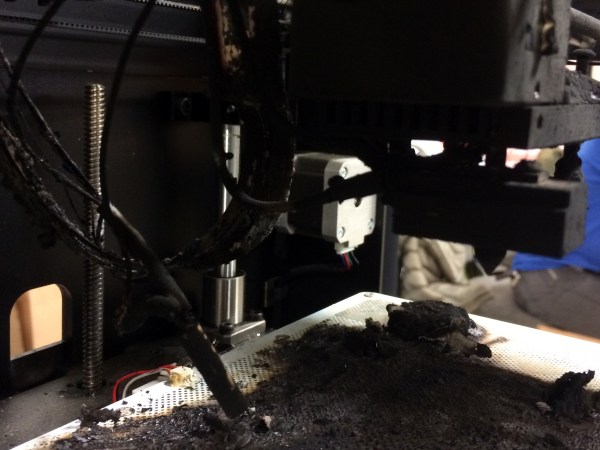
[Jay] out of the River City Labs Hackerspace in Peoria, IL cleared out a jam in his printer. It’s an operation most of us who own a 3D printer have performed. He reassembled the nozzle, and in a moment forgot to tighten down the grub nut that holds the heater cartridge in place. He started a print, saw the first layer go down right, and left the house at 8:30 for work. When he came back from work at 10:30 he didn’t see the print he expected, but was instead greeted by acrid smoke and a burnt out printer.
The approximate start time of the fire can be guessed by the height of the print before failure.
As far as he can figure, some time at around the thirty minute mark the heater cartridge vibrated out of the block. The printer saw a drop in temperature and increased the power to the cartridge. Since the cartridge was now hanging in air and the thermistor that reads the temperature was still attached to the block, the printer kept sending power. Eventually the cartridge, without a place to dump the energy being fed to it, burst into flame. This resulted in the carnage pictured. Luckily the Zortrax is a solidly built full metal printer, so there wasn’t much fuel for the fire, but the damage is total and the fire could easily have spread.
Which brings us to the topics of discussion.
How much can we trust our own work? We all have our home-builds and once you’ve put a lot of work into a printer you want to see it print a lot of things. I regularly leave the house with a print running and have a few other home projects going 24/7. Am I being arrogant? Should I treat my home work with a lesser degree of trust than something built by a larger organization? Or is the chance about the same? Continue reading “Ask Hackaday MRRF Edition: 3D Printers Can Catch Fire”→
As circuits find their way into more and more real-world environments, the old standard circuitry isn’t always up to the task. It wasn’t that long ago that a computer needed special power, cooling, and a large room. Now those computers wouldn’t cut it for the top-of-the-line smartphone. However, most modern circuits don’t bend well and don’t like getting wet.
An international team of researchers is developing chemical-based circuitry that uses gold nanoparticles and electrically charged organic molecules to build circuit elements that behave like semiconductor diode junctions. It’s simple to make flexible circuits that don’t mind being wet using this chemical soup.
In an interview with IEEE Spectrum, the developers mentioned that other circuit elements similar to transistors and light sensors should be possible. The circuits aren’t perfect, however. The switching speed needs improvement. Also, while conventional circuits don’t like to get wet, these chemical circuits have difficulties if things get dry. Still, like all technology, things will probably improve over time.
This technology needs a good bit of engineering refinement before it is practical. If you need flexible photosensitive circuits in the near term, you might try here. Meanwhile, waterproof circuitry just needs the right kind of enclosure.


 So how the heck does it work? Well, your standard magnet has a north face on one side, and a south face on the other — creating a magnetic loop between the two. But what if you could put north and south on the same side of the magnet, and vary their position and size? It means you can control the magnetic field down to the magnetic pixel, or as Polymagnet calls them — a Maxel.