A lot of you use WiFi for your Internet of Things devices, but that pretty much rules out a battery-powered deployment because WiFi devices use a lot of juice. Until now. Researchers at the University of Washington have developed a passive WiFi implementation that uses only microwatts per device.
Working essentially like backscatter RFID tags do, each node has a WiFi antenna that can be switched to either reflect or absorb 2.4 GHz radiation. Your cell phone, or any other WiFi device, responds to this backscattered signal. All that’s missing is a nice steady signal to reflect.
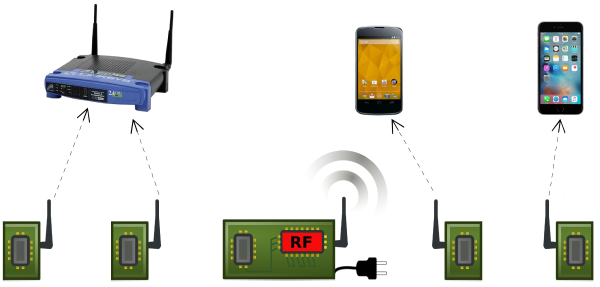
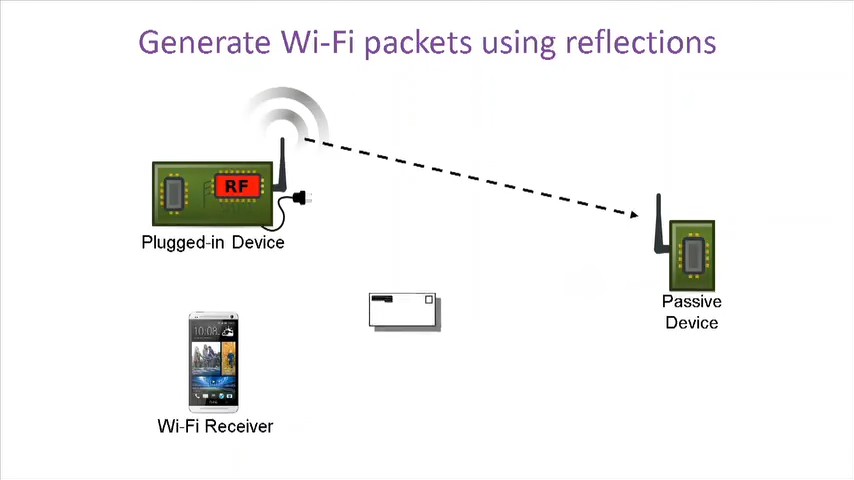 A single, plugged-in unit provides this carrier wave for multiple WiFi sensor nodes. And here’s the very clever part of the research: to keep the carrier from overwhelming the tiny modulated signal that’s coming from the devices, the plugged-in unit transmits off the desired frequency and the battery-powered units modulate that at just the right difference frequency so that the resulting (mixed) frequency is in the desired WiFi band.
If you’re a radio freak, you’ll recognize the WiFi node’s action being just like a frequency mixer. That’s what the researchers (slightly mysteriously) refer to as the splitting of the analog transmission stage from the digital. The plugged-in unit transmits the carrier, and the low-power nodes do the mixing. It’s like a traditional radio transmitter, but distributed. Very cool.
There’s a bunch more details to making this system work with consumer WiFi, as you’d imagine. The powered stations are responsible for insuring that there’s no collision, for instance. All of these details are very nicely explained in this paper (PDF). If you’re interested in doing something similar, you absolutely need to give it a read. This idea will surely work at lower frequencies, and we’re trying to think of a reason to use this distributed transmitter idea for our own purposes.
And in case you think that all of this RFID stuff is “not a hack”, we’ll remind you that (near-field) RFID tags have been made with just an ATtiny or with discrete logic chips. The remotely-powered backscatter idea expands the universe of applications.
Thanks [Ivan] for the tip!