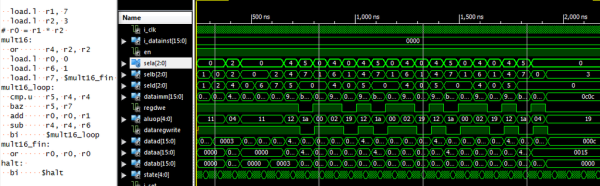
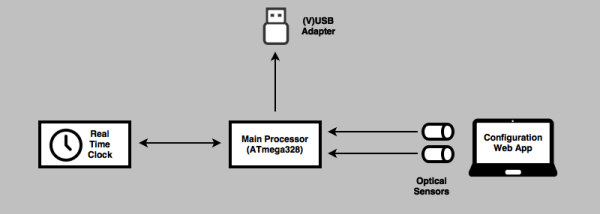
FPGAs aren’t really programmed, they are configured. Most designers use Verilog or VHDL to describe the desired circuit configuration. Developers typically simulate these configurations before committing them to silicon (a good habit, especially if you ever graduate from FPGAs to ASICs where changes are very expensive). That simulation takes a lot of software you have to install and learn, right?
Not necessarily. You can do e-mail, word processing, and PCB layout in your browser. Why not FPGA design? The EDAPlayground website provides two editor views: one for your main “code” and another for the testbench (the simulation driver you use to test your design). You can even open multiple files, if you have a complex design.
Once you’ve entered your Verilog or VHDL (or picked one of many examples) you can run the simulation and see the result right in your browser. No software to install, and–outside of actually learning VHDL or Verilog–not much learning curve.
As [Strauburn], [combinatorylogic], and others commented on our recent post about a VHDL CPU, you can do a lot of learning without ever having your hands on real hardware. The web site gives you access to several different tools (useful if you want to see how your code will behave on different tools) and also many standard verification libraries. There are limited synthesis tools, but honestly, if you want to go to real hardware, you are going to want the vendor tools for the specific FPGA you are using.


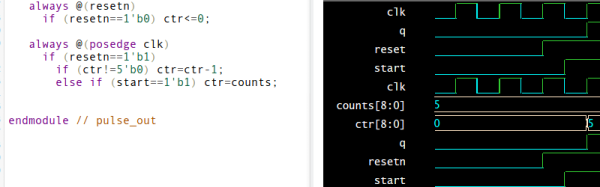
 Like the original simulator, this one is great to show a classroom circuits and encourage building or studying circuits in the browser. There’s no extra software to install, which is handy for an impromptu demo. Another cool feature is the visualization of current flow as animated dots. The dots move in the direction of the current flow and the speed of motion is proportional to the amount of current. Watching a capacitor charge with the moving dots is very illustrative. You can also view data in a scope format or hover the mouse over things to read their values.