This Saturday we’ll be in Shenzhen hosting a meetup at Bionic Brew at 19:00. Join us there and bring along your own hardware projects to show around. Everyone loves hearing about that latest build!
Even if you’re not in the area you can help us out by spreading the word. Tell your friends, share on your social media, and let us know about anyone in town who you think we should reach out to. Here’ s a poster if you want to print it out and hang it at your hackerspace, workplace, or other area where awesome people congregate.
The things you can do at this meetup: Laugh, drink, eat, and be happy. Talk excitedly about datasheets and timing diagrams. Pretend you hate talking about timing diagrams while being secretly giddy that someone wants to hear what you think of them. Recount your epic battles to meet production deadlines. Show off that latest blinky LED project you just got working. Meet a ton of awesome people. You can RSVP here to tell us you’re coming. See you soon!
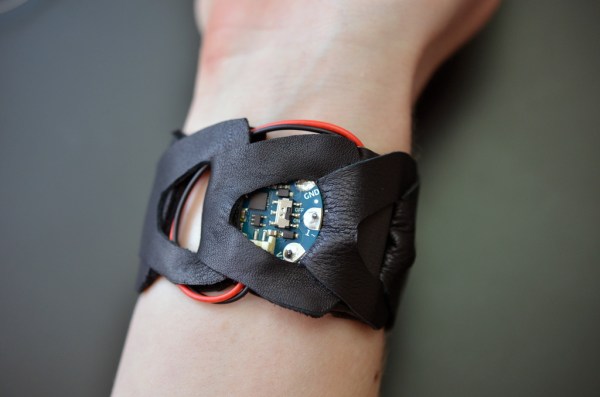
[Becky Stern] has created the mindfulness bracelet, a wearable which looks great and serves an important purpose. The bracelet buzzes every hour to remind you to stand up and take a break from work, soldering, gaming, or whatever it is you may be doing. The bracelet is made up of interlinked figure 8 shapes of leather, though [Becky] says rubber from a bicycle inner tube works great as well. The final shape reminds us of the link belts sometimes found on lathes or other industrial equipment. The links are the perfect size to slip an Arduino Gemma in, along with a battery and vibrating motor. A NPN transistor, diode, and resistor round out the entire bill of materials for this design. This bracelet is a heck of a lot cheaper than the Apple watch feature which inspired it!
The time interval is set in the code to 1 hour, and can be adjusted by the user. Although the times are stored in milliseconds, the design does use the ATtiny85’s Watchdog Timer (WDT) to conserve power. This means the time can drift up to 30 seconds per hour, which is fine in this application.
Click past the break to see the bracelet in action!
For last year’s Hackaday Prize, [PK] tried to build a video card for microcontrollers and headless Linux systems. It was only 640×480 resolution VGA, but the entire project was designed around a CPLD communicating with a microcontroller over SPI. This prize entry was, by [PK]’s own admission, a failure. It was late, but now he’s had an entire year to perfect his design. That means he can enter version two of his VGATonic in The Hackaday Prize.
The VGATonic version 2 uses a Xilinx XC95144XL CPLD for the VGA timing, and an ATTiny 2313a to read the SPI bus. Video memory is four megabits of static RAM. That’ls pretty much all you need for the most basic VGA graphics card, and all of this is packed onto a 3×3 inch PCB.
You can do a lot with 640×480 8-bit graphics running at 25FPS. In the video below, [PK] has a ‘hello world’ of sorts, Doom, running on a Raspberry Pi 2 with his SPI graphics card. Yes, it’s a graphics card for the Raspberry Pi, and it looks really good.
Further refinements of the design will include some primitive graphics routines. Not OpenGL or anything fancy, just something to reduce the number of writes on the SPI bus. It’s a great project, and perfect if you want to add video out to an Intel Galileo or other microcontroller project. [PK] has a video demo, you can check that out below.
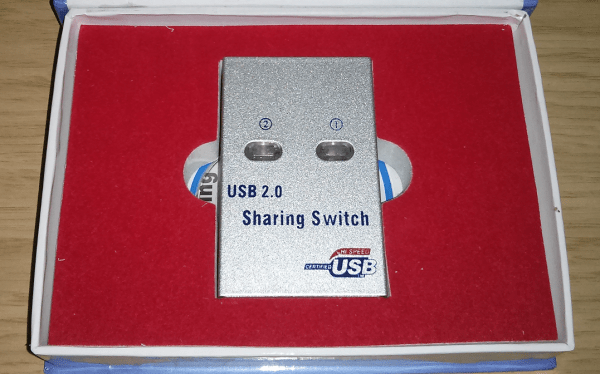
[Daniel] found himself with a need to connect a single USB device to two Linux servers. After searching around, he managed to find an inexpensive USB switch designed to do just that. He noticed that the product description mentioned nothing about Linux support, but he figured it couldn’t be that hard to make it work.
[Daniel] started by plugging the device into a Windows PC for testing. Windows detected the device and installed an HID driver automatically. The next step was to install the control software on the Windows system. This provided [Daniel] with a tray icon and a “switch” function. Clicking this button disconnected the HID device from the Windows PC and connected the actual USB device on the other side of the USB switch. The second computer would now have access to the HID device instead.
[Daniel] fired up a program called SnoopyPro. This software is used to inspect USB traffic. [Daniel] noticed that a single message repeated itself until he pressed the “switch” button. At that time, a final message was sent and the HID device disconnected.
Now it was time to get cracking on Linux. [Daniel] hooked up the switch to a Linux system and configured a udev rule to ensure that it always showed up as /dev/usbswitch. He then wrote a python script to write the captured data to the usbswitch device. It was that simple. The device switched over as expected. So much for having no Linux support!
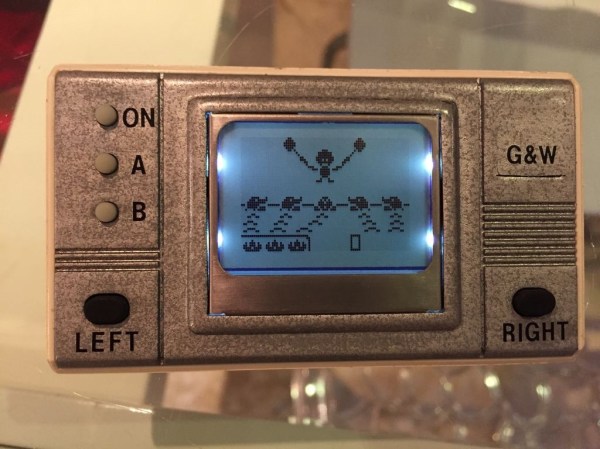
One of the earliest Nintendo products to gain popularity was the Game and Watch product line. Produced by Nintendo between 1980 and 1991, they are a source of nostalgia for many an 80s or 90s kid. These were those electronic handheld games that had pre-drawn monochrome images that would light up to make very basic animations. [Andrew] loved his old “Vermin” game as a kid, but eventually he sold it off. Wanting to re-live those childhood memories, he decided to build his own Game and Watch emulator.
The heart of [Andrew’s] build is a PIC18F4550 USB demo board he found on eBay. The board allows you to upload HEX files directly via USB using some simple front end software. [Andrew] wrote the code for his game in C using MPLAB. His device uses a Nokia 5110 LCD screen and is powered from a small lithium ion battery.
For the housing, [Andrew] started from another old handheld game that was about the right size. He gutted all of the old parts and stuck the new ones in their place. He also gave the housing a sort of brushed metal look using spray paint. The end result is a pretty good approximation of the original thing as evidenced by the video below. Continue reading “Give In To Nostalgia With A Retro Game And Watch”→
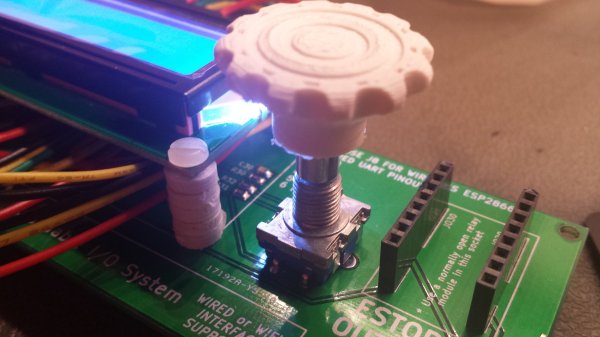
Rotary encoders are pretty interesting pieces of technology. They’re a solid way to accurately measure rotation including the direction. [David] recently wrote some software to handle these input devices, but unlike everyone else, his application can get by on only one microcontroller pin.
Most people will use three pins to handle a rotary encoder with a microcontroller: one to handle the switch and two to handle the quadrature inputs. With only one pin left available on his project [David] had to look for another solution, and he focused on the principle that the encoder pins behaved in very specific ways when turning the shaft. He designed a circuit that generates an analog voltage based on the state of those pins. He also wrote a program that can recognize the new analog patterns produced by his rotary encoder and his new circuit.
If you’ve been stuck on a project that uses a rotary encoder because you’ve run out of pins, this novel approach may help you get un-stuck. It’s a pretty impressive feat of circuit design to boot. Just think of how many other projects use these types of input devices and could benefit from it!
[Cody] has a nice little ranch in the middle of nowhere, a rifle, and a supply of ammunition. That’s just fine for the zombie apocalypse, but he doesn’t have an infinite supply of ammo. Twenty years after Z-day, he may find himself without any way to defend himself. How to fix that problem? He needs gunpowder. How do you make that? Here’s a plastic jug.
There are three ingredients required to make gunpowder – saltpeter, charcoal, and sulfur. The last two ingredients are easy enough if you have trees and a mine like [Cody], but saltpeter, the a source of nitrates, aren’t really found in nature. You can make nitrates from atmospheric nitrogen if you have enough energy, but [Cody] is going low tech for this experiment. He’s saving up his own urine in a compost pile, also called a niter bed. It’s as simple as putting a few grass clippings and straw on a plastic tarp, peeing on it for a few months, and waiting for nitrogen-fixing to do their thing.
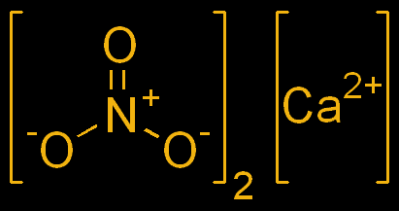
Calcium Nitrate
[Cody] doesn’t have to wait a year for his compost pile to become saturated with nitrates. He has another compost pile that has been going for about 18 months, and this is good enough for an experiment in extracting calcium nitrate. After soaking and straining this bit of compost, [Cody] is left with a solution of something that has calcium nitrate in it. This is converted to potassium nitrate – or saltpeter – by running it through wood ash. After drying out this mess of liquid, [Cody] is left with something that burns with the addition of a little carbon.
With a source of saltpeter, [Cody] only needs charcoal and sulfur to make gunpowder. Charcoal is easy enough to source, and [Cody] has a mine with lead sulfide. He can’t quite extract sulfur from his ore, so instead he goes with another catalyst – red iron oxide, or rust.
The three ingredients are combined, and [Cody] decides it’s time for a test. He has a homebuilt musket, or a piece of pipe welded at one end with a touch hole, and has a big lead ball. With his homebrew gunpowder, this musket actually works. The lead ball doesn’t fly very far, but it’s enough to put a dent in a zombie or deer; not bad for something made out of compost.
Historically, this is a pretty odd way of making gunpowder. For most of history, people with guns have also had a source of saltpeter. During the Napoleonic Wars, however, France could not import gunpowder or saltpeter and took to collecting urine from soldiers and livestock. This source of nitrates was collected, converted from calcium nitrate to potassium nitrate, and combined with charcoal and sulfur to field armies.
Still, [Cody] has a great example of what can be done using traditional methods, and the fact that he can fire a ball down a barrel is proof enough that the niter bed he’s peeing in will produce even better gunpowder.