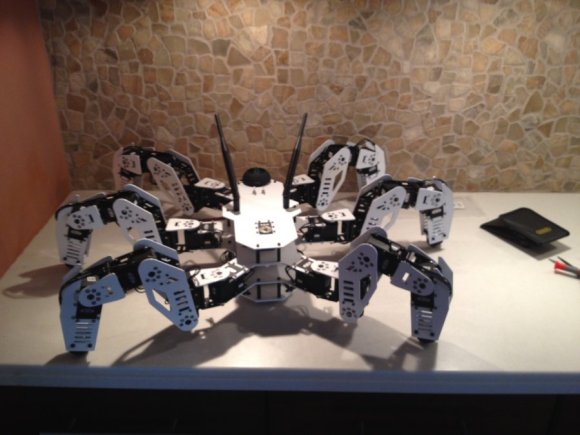
Elemental Display Is Also A LED Wall

elements

[Dan] is an element collector, someone who gets his socks knocked off by bismuth crystals and the orange vapor of bromine. Of course every element collector needs a proper display case, and since the periodic table table idea is cliché, [Dan] decided to build an elemental display that’s also a really awesome LED wall.

The build started off as most do with a few sheets of plywood and 120 acrylic shelves for each item in [Dan]’s collection. The real magic happened when [Dan]’s buddy [Bill] was called in to make the display a little more interesting.

Behind each acrylic shelf is a three-LED section of a LED strip, each part of the periodic table having a different color. The 120 individual shelving units are broken down into 16-shelf groups, each driven by a custom LED driver board. These driver boards are connected to a master Arduino with phone cables and make wonderful use of a very neat TCL5940 Arduino library.

The elemental display has a few options; all-on, twinkling, an Apple ‘breathing’ mode, and a graphic eq, as shown in the video after the break.

Continue reading “Elemental Display Is Also A LED Wall”

DIY Solder Stencils From Soda Cans

smd_stencil_done_w

Even if you’ve overcome your fear diddling about with tiny SMD components, applying solder paste – especially if you’re populating more than one board at a time – is still a chore. The pros use very expensive laser cut stainless steel solder paste stencils, something still a bit out of reach to the casual hobbyist. [Felix] solved this problem by making his own solder paste stencils very cheaply using empty soda cans.

The process begins just like any other home etching tutorial by lightly sanding the un-bent aluminum can and applying the etch resist via the toner transfer method. Etching is done with off-the-shelf HCl and hydrogen peroxide, resulting in an amazingly clean stencil comparable in quality with a professional stencil.

Sure, going through a dozen-step process to make a solder paste stencil may not be as convienent as [Cnlohr]’s toothpick and tweezers method, but [Felix]’ method is just about up to par with extraordinarily expensive laser cut stainless steel stencils. Not bad for something that came from the recycling bin.

Making High Concentrations Of Hydrogen Peroxide At Home

Hydrogen peroxide – the same stuff you can pick up from a drug store or beauty supply store – is one of those very interesting chemicals that belongs on every maker’s cabinet. At concentrations of about 30%, it’s perfect for etching PCB boards, and at even higher concentrations – about 70% – it can be used as rocket fuel. Unfortunately for the home hacker, it’s very difficult and expensive to obtain peroxide in concentrations above 3% or so. That’s alright with [Charlie], though, because he’s come up with a way to concentrate peroxide and measure the concentration once he’s done.

There are a few YouTube videos of kitchen chemists concentrating peroxide by heating it on a stove to just under 100°C. Because hydrogen peroxide boils at 150°C, they’re simply boiling off the water and increasing the concentration of peroxide. This is a qualitative method, and you’ll never know what concentration you’re getting. [Charlie] rigged up a small-scale with a pipette to measure the weight of his concentrated peroxide per unit of volume, giving him the density of his concoction and thus the concentration.

We have to note that concentrated peroxide is dangerous stuff, but the results of [Charlie]’s lab work aren’t much more dangerous than what hair stylists work with every day. If you’re going for high-test peroxide, good job, that’s awesome, but do be aware of the risks.

The Universal Geospatial Light Switch

project rita

Home automation has existed in one form or another for quite some time, but we thought this take on controlling lights was quite interesting.  Instead of having a menu of lights that you can turn on and off, this Android app lets you point your phone at the device and turn it on or of. Undoubtedly similar to how [Darth Vader] controls his lights at home.

Although the really technical details of this project aren’t listed, this setup reads the compass and GPS output of the Android device to figure out where it’s pointed in space. Combined with a script that understands the layout of the room, and an [X10] automation controller, it’s able to control lights accurately.

Be sure to check out the video of this device in action, or check out [Mike]’s [Project Rita] blog to see the other interesting projects that he’s working on!

Continue reading “The Universal Geospatial Light Switch”

Ammo Box PSU

PAB-PSU-1

Sometimes you need a power supply that can be thrown into the back of a car and taken into the field. [BadWolf] didn’t want to take his bench supply, so he whipped up this very portable power supply made from a computer PSU. To ruggedize his build a little, he put it in a 50 caliber ammo can making it more than able to handle the roughest field work.

While not a proper adjustable power supply, this ammo can is more than capable of delivering a whole lot of current in a number of different voltages. There are a few bells and whistles – a ‘plugged in’ and ‘on’ light, as well as a few very cool looking toggle switches that are sure to arouse the suspicions of unsuspecting bystanders.

[BadWolf] kept all the safety features built-in to the computer PSU, so this ammo box power supply is still protected from short circuits, and over-current, making it much safer than its appearance belies. It’s also a great example of what can be done if you don’t have a proper bench supply, so we’ve got to tip our hat to [BadWolf] for that.

BladeRF, Your Next Software Defined Radio

By now you might have a bit weary of your small and inexpensive TV tuner dongle software defined radio. Yes, using a USB TV dongle is a great introduction to SDR, but it has limited bandwidth, limited frequency range, and can’t transmit. Enter the bladeRF, the SDR that makes up for all the shortcomings of a USB dongle, and also serves as a great wireless development platform.

The bladeRF is able to receive and transmit on any frequency between 300 MHz and 3.8 GHz. This, along with a powerful FPGA, ARM CPU, and very good ADCs and DACs makes it possible to build your own software defined WiFi adapter, Bluetooth module, ZigBee radio, GPS receiver, or GSM and 4G LTE modem.

It’s an impressive bit of kit, but it doesn’t exactly come cheap; the bladeRF is available on the Kickstarter for $400. The folks behind the bladeRF seem to be doing things right, though, and are using their Kickstarter windfall for all the right things like a USB vendor ID.

There’s a video of two bladeRFs being used as a full duplex modem. You can check that out after the break.

Continue reading “BladeRF, Your Next Software Defined Radio”

Guitar Hero Controller Built From Toy Guitar And Keyboard

frets-on-fire-custom-controller

[Heinrich Laue] was kind of a latecomer to the fake guitar playing video game phenomenon. He played Frets on Fire — an open source clone of the game — on PC and eventually bought a copy of Guitar Hero World Tour. But playing on the keyboard was a drag. Instead of buying a controller he built his own hacked Guitar Hero controller from a scrapped keyboard and a toy guitar.

The plastic toy he started with was screwed together. This is a really nice since it’s almost impossible to open toys that have been welded together. There was plenty of room inside for all his components and even some space to run the wires.

He started the electronic portion of the build by tracing out the keyboard matrix to figure out which solder pads he could tap into. The strum bar uses a door hinge with buttons on either side of it. When you move it back and forth it hits the buttons, with the spring mechanism in each returning it back to center. The fret buttons are keys from the keyboard, but the switches uses were pulled from a few computer mice. But the real innovation comes into play when he added the Star Power tilt sensor and whammy bar. Follow the link above to find out how he did it.