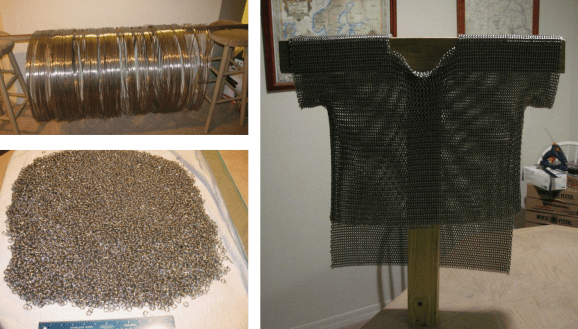
Hackaday Links: Sunday, April 14th, 2013

hackaday-links-chain

We figure we have to start off this week’s links post talking about PETMAN. Boston Dynamics shows off the humanoid robot donning a full chemical suit. It’s a lot scarier than when we first saw it as a couple of legs a few years ago [Thanks Joshua].

Seeing something like that might drive you back to smoking cigarettes. But since that’s pretty bad for your health perhaps you just need a mechanical chain-smoking machine to take the edge off. That thing can really suck ’em down! [Thanks Mike]

Last week’s links included a bit about the Raspberry Pi 2.0 board version’s reset header. [Brian] wrote in to share a link for adding reset to a 1.0 revision board.

Speaking of RPi, [Elvis Impersonator] is using it to automate his garage door with the help of Siri.

In shop news, [Brad] needed to sharpen a few hundred pencils quickly and ended up melting the gears on his electric sharpener. Transplanting the parts to his drill press gave him more power to get the job done in about six minutes.

And finally, you can forget how to decipher those SMD resistor codes. Looks like surface mount resistors might be unmarked like their capacitor brethren. We were tipped off by [Lindsey] who got the news by way of [Dangerous Prototypes and Electronics Lab]

Building A Replacement For A Broken Dehumidifier Controller

dehumidifier-replacement-controller

We’ve thought of doing a project like this ourselves as the dehumidifier we ordered online runs the fan 24/7 no matter what the humidity conditions. But it wasn’t that [Davide Gironi] was unhappy with the features on his unit. It’s that the dehumidifier controller stopped working so he replaced it with one of his own design. The original humidity sensor was mechanical and simply broke. He used an AVR along with a humidity and frost sensor to get the appliance up and running again.

A DHT22 humidity sensor is polled by the ATmega8 chip and compared to the user-adjustable trimpot value. If it is above that threshold the unit is switched on using one of the relays seen in the image above. The one problem you have to watch out for when using compressor cooled appliances is ice accumulation on the radiator. [Davide] uses a thermistor for temperature feedback, switching the compressor off when it gets below 7C and turning it back on again when it is above 12C.

The replacement still uses the reservoir sensor and indicator LEDs. We, however, would recommend using the watchdog timer on the chip to ensure that it is reset if something goes wrong in the code.

Teaching A Computer To Play Mario… Seemingly Through Voodoo

Some people know [Tom Murphy] as [Dr. Tom Murphy VII Ph.D.] and this hack makes it obvious that he earned those accolades. He decided to see if he could teach a computer to win at Super Mario Bros. But he went about it in a way that we’d bet is different that 99.9% of readers would first think of. The game doesn’t care about Mario, power-ups, or really even about enemies. It’s simply looking at the metrics which indicate you’re doing well at the game, namely score and world/level.

The link above includes his whitepaper, but we think you’ll want to watch the 16-minute video (after the break) before trying to tackle that. In the clip he explains the process in laymen’s terms which so far is the only part we really understand (hence the reference to voodoo in the title). His program uses heuristics to assemble a set of evolving controller inputs to drive the scores ever higher. In other words, instead of following in the footstep of Minesweeper solvers or Bejeweled Blitz bots which play as a human would by observing the game space, his software plays the game over and over, learning what combinations of controller inputs result in success and which do not. The image to the right is a graph of it’s learning progress. Makes total sense, huh?

Continue reading “Teaching A Computer To Play Mario… Seemingly Through Voodoo”

SqueezeBerry: A Raspberri Pi Powered Squeezebox Appliance

squeezeberry

We like the look which [Emmanuel] achieved with his Raspberry Pi based Squeezebox client. It’s got that minimalist slant that makes it seem like a commercial product at first glance. But one more look at the speakers without grates, the character LCD, and the utilitarian buttons, knobs, and switches tips us off that it’s filled with the hardware we know and love.

Since Logitech announced that it was terminating the Squeezebox line we’ve seen several projects which take up the torch. We’ve seen the RPi used as a Squeezebox server and several embedded Linux systems used as clients. This follows in the footsteps of the latter. The RPi is running Raspbian with the squeezelite package handling the bits necessary to talk to his server. The controls on the front include a power switch, rotary encoder and button for navigating the menus, and a potentiometer to adjust the HD44780 LCD screen’s contrast. The speakers are a set of amplified PC speakers that were liberated from their cases and mounted inside of the wooden box that makes up the enclosure. The in-progress shots of that case look pretty rough, but some sanding and painting really pulled everything together. As you would expect, we’ve embedded the demo video after the jump.

Continue reading “SqueezeBerry: A Raspberri Pi Powered Squeezebox Appliance”

Working 3D Printed Stepper Motor

Stepper Small 1

Most 3D printers use stepper motors to control the movement of the extruder head. If you could actually print those motors it would be one more big step toward self-replicating hardware. Now obviously [Chris Hawkins’] working 3d printed stepper motor wasn’t built 100% through 3D printing, but the majority of the parts were. All that he had to add was the electronic driver pieces, magnets, wire, and a few nails.

The coils are made up of nails wrapped in magnet wire. The rotor is a 3D printed framework which accepts neodymium rare earth magnets. The axle is pointed which reduces the friction where it meets the cone-shaped support on either side of the frame. The IC on the upper right is a transistor array that facilitates switching the 20V driving the coils. The board on the lower right is a Digispark, which is an ATtiny85 breakout board that includes a USB edge connector for programming and a linear regulator which is how he gets away with feeding 20V as the source.

Don’t miss the demo video after the break where you can see the motor stepping 7.5 degrees at a time.

Continue reading “Working 3D Printed Stepper Motor”

Network-controlled Fireworks Launcher

rpi-fireworks-launcher

[Thomas] and his friends wanted to ring in the new year by setting off some fireworks. To keep a safe distance and have a little fun they built this network controller launcher (translated).

the image on the left shows the build in its unused and pristine state. But by the end of the celebration it look a bit melted and burnt. Still, for the first revision of the system it ended up working pretty well.

We’ve seen several remote fireworks launchers that burn up resistors to light the fuses. But this system is much more reusable. The image on the right shows the heating elements which light the fuses. Younger readers might have no idea what they’re looking at, but every automobile used to come with at least one of these electric cigarette lighters. Just drive 12V through them and they get burning hot relatively quickly. That’s where the car battery on the base comes into play. It is connected to the lighters using some mechanical relays.

In the food container attached to the side of the launcher you’ll find a Raspberry Pi which provides the web connection for the system. [Thomas] wrote code which uses a webpage with some bomb icons as buttons. Check out the video after the break to see him demonstrate how fast one of these lighters will glow red after pressing a button on his smart phone.

Continue reading “Network-controlled Fireworks Launcher”

Generating Electricity From Alcohol

thermoelectric-generator-lamp

Here’s a thermoelectric generator which [x2Jiggy] built. The concept uses heat from a flame, biased against cooler temperatures produced by that huge heat sink making up the top portion of the build to produce electricity via the Peltier effect.

The build is passively cooled, using a sync assembly that takes advantage of heat pipes to help increase the heat dissipation. A nearly flat heat sink makes up the mounting surface for the hot side, which faces down toward a flame driving the generator. [x2Jiggy] started the project by using a can, wick, and olive oil as the heat source. He managed to get about 2V out of the system with this method. What you see here is the second version. It swaps out the olive oil lamp for an alcohol stove. The cans with holes punched in them act as a wind screen while also providing a stable base. This rendition produces about 3V, but it doesn’t sound like there are any precise measurements of what it can do under load.