Drop-in Pcb Makes Nintendo Four Score A USB Joystick

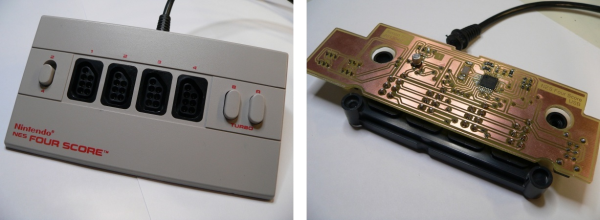
The Nintendo Four Score was a controller attachment for the original Nintendo Entertainment System which allowed you to use four controllers at one time. [Simon Inns] wanted to use some original NES controllers on his computer so he developed a drop-in replacement board that converts the device to USB.

As we’ve seen with other NES controller hacks, the hardware uses a simple parallel to serial shift register to deliver key-presses to the console. This means that reading four controllers at a time is no different than shifting in data to a microcontroller from the four different sources. The remaining portion of the problem is providing a USB connection that enumerates the device as a joystick. We’ve seen a bunch of USB projects from [Simon] so it’s no surprise that he was able to pull it off.

He went with the ATmega16U2 which has built-in support for USB. [Simon] wrote the code so that although there is only one USB cable, each of the four controller ports will appear as a separate USB joystick on the computer. To button up the project he carefully measured the original board and laid out his own version so that it fits the footprint of all the original components as well as the mounting brackets on the case. Top notch [Simon]!

3D Printing Some Sweet Music

3d-printer-music

If you don’t mind ending up with oddly shaped 3D printed parts you can get your printer to sing to you. The exhibit shown above is doing just that. The Lulzbot is being driven specifically to produce a certain frequency of sound with its stepper motors. The results of a few different songs are what’s hanging on the wall to the right. You can hear it printing Bizet’s Carmen in the clip after the break.

[Rickard Dahlstrand] hacked together a Python script capable of parsing a MIDI file and outputting a G-code equivalent that will produce the frequencies and durations necessary to hear the audio on a stepper motor. As we mentioned, he uses a Lulzbot but the script appears to include setting for Cupcake, Thingomatic, Shapercube, and Ultimaker. The parser script as well as the example G-code files for a library of classical music can be downloaded from his repository.

Now if you’re looking for some other crazy CNC music ideas you can’t beat this wineglass music hack.

Continue reading “3D Printing Some Sweet Music”

Mood Lamp/notifier Uses Neat Modular PCB Design

mood-lamp-with-modular-electronics

Not only does this mood lamp which [J. Sutton] built look great, but we love the modular design he adopted when building the circuit boards.

If you’re building something that is going to sit on your desk for some time it just has to look good. We think that he achieved that, using a small block of oak as the base, and a cloudy white cube of unknown origin as a diffuser. Notice that the different colors are not mixed. There’s a baffle inside the diffuser that keeps them separate as early testing showed any combination of intensities was resulting in nearly the same shade of color.

The part we really like is the modular design of his circuit boards. The project is based around a Teensy++ 2.0 board. He first built a PCB baseboard which feature two SIL sockets to accept the legs of the Teensy. There is a third SIL socket which accepts some long legs from the LED host board, letting it perch on top of the Teensy.

Continue reading “Mood Lamp/notifier Uses Neat Modular PCB Design”

GUI Window Manager On An AVR Chip

avr-window-manager-gui

This project is reminiscent of the old days when window managers were an amazing new idea. The difference is that this window-based GUI is running on an ATmega1284 microcontroller. But the behavior and speed of the interface is pretty much exactly what you’d expect if working on an early 90’s home computer. It even uses a mouse as input.

So how is this even possible? The key to the project is a serial to VGA module which handles the heavy lifting involved with generating a VGA signal. We featured one of [Andrew’s] past projects which used an AVR chip to generate the VGA signal. But that doesn’t leave nearly enough cycles to implement something like a window manager, not to mention the fact that it got nowhere near the resolution shown here.

He uses a serial mouse with an RS-232 converter chip to interact with the windows. This is best shown in his video after the break. He’s able to generate and interact with new windows. He even implemented a set of rudimentary controls which allow him to adjust the theme of the windows and drive the audio playback feature included on that VGA controller he’s using.

Continue reading “GUI Window Manager On An AVR Chip”

This Piggy Bank Is Our Stock Broker

piggy-bank-stock-buy

[Johna and Justin] are working to take the emotion out of playing the market. They built this piggy bank which automatically purchases stock when your coinage totals the cost of a single share. That’s right, just turn the selector to one of your three chosen stocks (Google, Facebook, and Apple are used in this example) and plug in some coins. The bank counts your money, compares it to the current online stock price, and pulls the trigger if you have enough dough. You can check out a demo clip after the jump.

The hardware is rather simple thanks to Adafruit’s programmable multi-coin acceptor. It handles the cash and it’s pretty easy to interface with the Arduino which handles the rest of the work. It connects to a computer via USB, depending on a PHP script to poll the current price. We dug through the code repository just a bit but didn’t find the snippet that does the actual stock purchase. Whether or not they actually implemented that, it’s certainly an interesting concept.

Continue reading “This Piggy Bank Is Our Stock Broker”

Asynchronous Fireflies Use Few Parts

led-firefly

[Karl Lunt] wrote in to share his LED firefly project. His goals for the project were to develop a low-power, low parts count module that can sense when it’s dark and then mimic the blinking patterns you’d associate with its biological namesake.

We like his design which uses a coin cell battery holder as the chassis for the project. The ATtiny13 driving the hardware is held in place by the two power wires. This lets him flash new firmware by rotating the chip and plugging in a little adapter he build. The LED connection might look a bit peculiar to you. It has a resistor in parallel, which doesn’t satisfy the normal role of a current limiting resistor. That’s by design. [Karl] is driving the LED without any current limiting, which should be just fine with the 3V battery and short illumination time of the diode. The resistor comes into play when he uses the LED as a light sensor. Past firefly projects included light dependent resistors to detect light and synchronize multiple units. [Karl] is foregoing the LDR, using the LED with a resistor in parallel to combat the capacitive qualities of the diode. As we mentioned, this senses ambient light, but we’d love to see an update that also uses the LED to synchronize a set of the devices.

Replace Your Project Power Supplies With Recycled Li-Ion Cells And A Switching Regulator

buck-regulator

[Dr. Iguana’s] experience moving from projects powered by disposable Alkaline cells and linear regulators to recycled Lithium Ion cells using the buck regulators seen above might serve as an inspiration to make the transition in your own projects.

The recycled cells he’s talking about are pulled out of larger battery packs. As we’ve seen in the past, dead battery packs for rechargeable tools, laptops, etc., are often plagued by a few bad apples. A small number of dead cells can bork the entire battery even though many perfectly usable cells remain. Once he decided to make the switch it was time to consider power regulation. He first looked at whether to use the cells in parallel or series. Parallel are easier to charge, but boosting the voltage to the desired level ends up costing more. He decided to go with cells in series, which can be regulated with the a less expensive buck converter. In this case he made a board for the RT8289 chip. The drawback of this method requires that you monitor each cell individually during charging to ensure you don’t have the same problem that killed the battery from which you pulled these good cells.