Click to embiggen

[Bunnie] Builds A Laptop For Himself, Hopefully Us


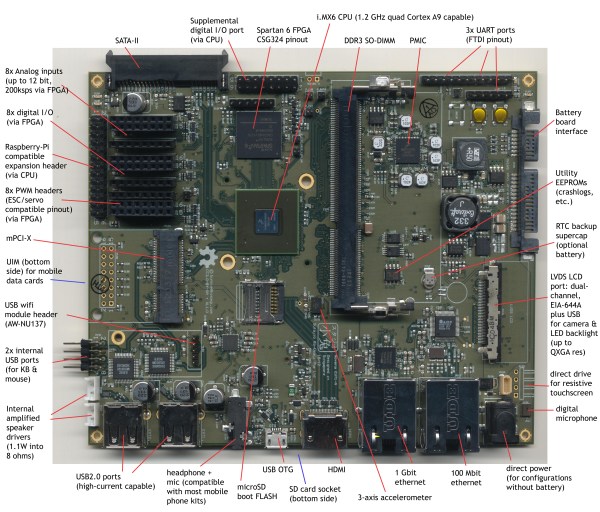
[Bunnie Huang], creator of the Chumby and artisan of chips and electrons, is building his own completely open source laptop. It’s called the Novena, and is powered by a quad-core ARM CPU, it’s got enough bells and whistles to make any hacker happy including an on-board FPGA, dual Ethernet ports, and enough GPIO pins to do some crazy, crazy stuff.

[Bunnie]’s laptop is an attempt to create a completely open-source laptop capable of some light code development, and web browsing. Every single chip on [Bunnie]’s laptop has a datasheet available (without requiring an NDA, unlike the Raspberry Pi), meaning this laptop might be the beginning of a completely open source laptop.

Officially, this laptop is a one-off project made just for [Bunnie]. He’ll be spending the next few months validating all features on the board and making a proper case. [Bunnie] says a few people may be interested in their own Novena (smart one, that guy), so he might consider a Kickstarter campaign in a few months. Don’t expect it to be cheap, but if you’d like to try your hand at making your own, all the files are up on the Novena wiki.
 

Solving A Rubick’s Cube With LEGO And Popsicle Sticks

solver

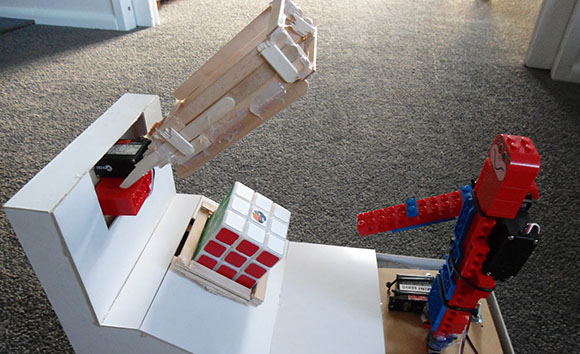
We’ve seen automated Rubick’s Cube solvers before, but never one that has garnered as many awards as [James]’ popsicle stick and LEGO Rubick’s Cube solver.\

To keep the project complexity down, [James] opted not to use a webcam to detect the color pattern on each face of the cube. Instead, he wrote a little Python app to manually enter the pattern on each face before letting his algorithm loose on the cube and calculating how to solve it.

So far, [James] has seen a huge amount of success from his project. He entered it in the New Zealand Brightsparks competition netting him $1000. This competition led to a win in the Realize the Dream science competition where he won a major prize and an entry into the International Taiwan Science Fair held early next year. An awesome accomplishment from a budding hacker, and we can’t wait to see what he comes up with next.

You can check out a video of [James]’ cube solver after the break.

Continue reading “Solving A Rubick’s Cube With LEGO And Popsicle Sticks”

Adventures In Mold Making And Making Your Own Enclosures

case

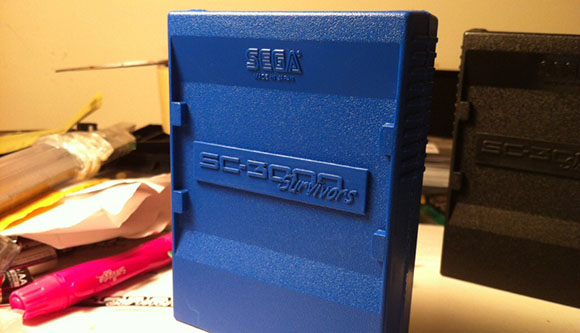
The folks at SC-3000 survivors have been working on a cartridge capable of storing dozens of games for the ancient Sega SC-3000 computer. The PCB works beautifully, but making a case for their cartridge left them with few options. They could use a 3D printer or simply collect a whole bunch of used cartridge cases, but making their own mold for a cartridge case was the best solution.

To create the mold for their multicart enclosure, the SC-3000 survivors first took an old, used case and made a silicone mold. While the first attempt at mold making was encouraging, several problems began to crop up due to the lack of vent holes and wiggling the mold before the resin had set. Before long, a proper technique to make resin casts was developed: use lots of resin, and don’t apply pressure or rubber bands to a curing mold.

We’re always impressed by what can be done with a few sheets of plastic, some Bondo, and the inordinate amounts of patience and sandpaper we see with other case mods and enclosure builds. the SC-3000 survivors put together an enclosure that rivals any Bondo build, and we’re happy they put out this tutorial.

A Thermal Imaging Camera For Your Phone

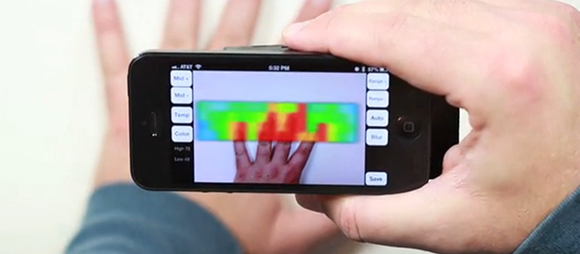
When last we heard of a cheap thermal imaging camera accessory for any smart phone, we were blown away at how easily a very expensive electronic device could be replicated with an Arduino and enough know how. Now, that thermal imaging camera is a kickstarter project and provides a cheap way to put a thermal imaging camera in the tool chest of makers the world over.

It’s called the IR-Blue, and simply by connecting your phone to the IR-Blue with Bluetooth, you can overlay the output of a thermal imaging camera on the output of your camera’s phone.

The thermal imaging sensor is basically a low-resolution camera (16 x 4 pixels) for infrared radiation. This sensor is factory calibrated to detect heat in a range between -20 and 300 ˚C. This range allows anyone to easily see where drafts in a house are coming from, where heat in a computer is being generated, or figuring out how to cook a steak.

It’s an awesome and well designed product, so we’ve got to hand it to [Andy] and the IR-Blue team for putting very expensive tools in everyone’s hands.

Leveraging The GPU To Accelerate The Linux Kernel

Powerful graphics cards are pretty affordable these days. Even though we rarely do high-end gaming on our daily machine we still have a GeForce 9800 GT. That goes to waste on a machine used mainly to publish posts and write code for microcontrollers. But perhaps we can put the GPU to good use when it comes compile time. The KGPU package enlists your graphics card to help the kernel do some heavy lifting.

This won’t work for just any GPU. The technique uses CUDA, which is a parallel computing package for NVIDIA hardware. But don’t let lack of hardware keep you from checking it out. [Weibin Sun] is one of the researchers behind the technique. He posted a whitepaper (PDF) on the topic over at his website.

Add this to the growing list of non-graphic applications for today graphics hardware.

UPDATE: Looks like we won’t be trying this out after all. Your GPU must support CUDA 2.0 or higher. We found ours on this list and it’s only capable of CUDA 1.0.

[Thanks John]

Self-balancing Unicycle Using Arduino And Sparkfun IMU

Raptor-Bike-self-balancing-unicycle

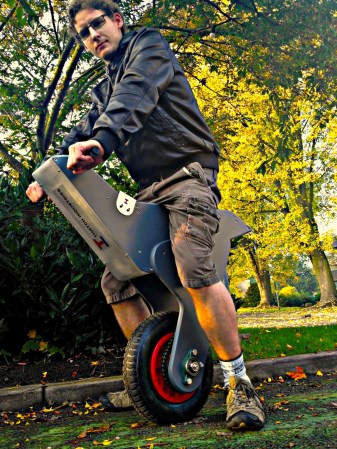
Here’s proof that you can build cool stuff with simple tools. This self-balancing unicycle uses an Arduino and a five degree of freedom IMU from Sparkfun to keep the rider upright. Well, it’ll keep you upright as long as you have good side-to-side balance. But that’s true of any unicycle, right?

The Raptor was built by [Nick Thatcker] who is no stranger to self-balancing transportation. A few years back he built a Segway clone and the same type of geared motor used in that project also went into this one. I connects to the wheel with a chain, allowing him to keep the motor hidden in the saddle. He gets between 90 and 120 minutes of used on one charge with a top speed of 10 MPH. The motor could move you along faster but he has limited this in firmware to ensure it has enough power to ‘catch up’ if you lean too far forward.

Don’t miss the demo after the break. If you like this unicycle there are several others worth looking at.

Continue reading “Self-balancing Unicycle Using Arduino And Sparkfun IMU”

Raspberry Pi Used To Automate A Dimmable Light Bulb

raspberry-pi-controlled-dimmer

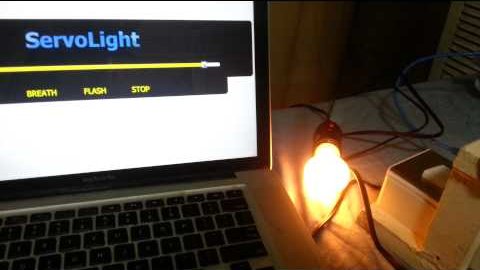
[Stephen] took the safe route when getting his Raspberry Pi to dim an AC light bulb. He didn’t roll his own outlet box with a mains-rated relay inside, going with a mechanical connection instead of electrical. By attaching a servo motor to the dimmer knob the RPi can adjust the light level without risk of electric shock.

He is using the ServoBlaster package to drive the servo motor with the Raspberry Pi GPIO pins. That’s all fine and good by itself, but he went the extra mile and designed a few different levels of functionality around the pairing. The motivation behind the hack was to build a sunrise clock that had a lot of power when it comes to luminosity. But he also plied the RPi’s networking features to serve up a web-based control. It has a slider to set the light level, as well as breath (like a slow fade) and flash features.

The servo is a bit noisy when moving quickly, but the sunrise alarm takes 30 minutes so the gears don’t really make any noise at all. Check it out in the clip after the break.

Continue reading “Raspberry Pi Used To Automate A Dimmable Light Bulb”