Review: Beepy, A Palm-sized Linux Hacking Playground

In the long ago times, when phones still flipped and modems sang proudly the songs of their people, I sent away for a set of Slackware CDs and embarked on a most remarkable journey. Back then, running Linux (especially on the desktop) was not a task to be taken lightly. The kernel itself was still in considerable flux — instead of changing some obscure subsystem or adding support for a niche gadget you don’t even own, new releases were unlocking critical capabilities and whole categories of peripherals. I still remember deciding if I wanted to play it safe and stick with my current kernel, or take a chance on compiling the latest version to check out this new “USB Mass Storage” thing everyone on the forums was talking about…

But modern desktop Linux has reached an incredible level of majority, and is now a viable choice for a great number of computer users. In fact, if you add Android and Chrome OS into the mix, there are millions and millions of people who are using Linux on daily basis and don’t even realize it. These days, the only way to experience that sense of adventure and wonderment that once came pre-loaded with a Linux box is to go out and seek it.

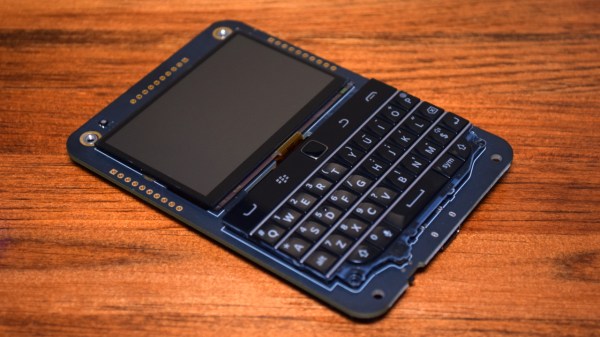
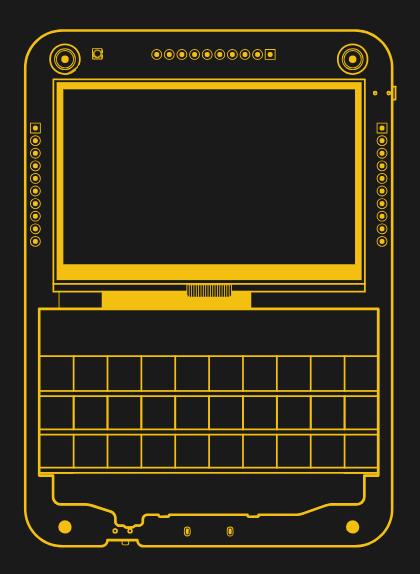
Which is precisely how it feels using using the Beepy from SQFMI. The handheld device, which was formerly known as the Beepberry before its creators received an all-too-predicable formal complaint, is unabashedly designed for Linux nerds. Over the last couple of weeks playing with this first-run hardware, I’ve been compiling kernel drivers, writing custom scripts, and trying (though not always successfully) to get new software installed on it. If you’re into hacking around on Linux, it’s an absolute blast.

There’s a good chance that you already know if the Beepy is for you or not, but if you’re still on the fence, hopefully this in-depth look at the hardware and current state of the overall project can help you decide before SQFMI officially starts taking new orders for the $79 gadget.

Continue reading “Review: Beepy, A Palm-sized Linux Hacking Playground”

Force Feedback Steering Wheel Made From Power Drill

When it comes to controllers for racing games, there is perhaps no better option than a force feedback steering wheel. With a built-in motor to push against the wheel at exactly the right times, they can realistically mimic the behavior of a steering wheel from a real car. The only major downside is cost, with controllers often reaching many hundreds of dollars. [Jason] thought it shouldn’t be that hard to build one from a few spare parts though and went about building this prototype force feedback steering wheel for himself.

Sourcing the motor for the steering wheel wasn’t as straightforward as he thought originally. The first place he looked was an old printer, but the DC motor he scavenged from it didn’t have enough torque to make the controller behave realistically, so he turned to a high-torque motor from a battery-powered impact driver. This also has the benefit of coming along with a planetary gearbox as well, keeping the size down, as well as including its own high-current circuitry. The printer turned out to not be a total loss either, as the encoder from the printer was used to send position data about the steering wheel back to the racing game. Controlling the device is an Arduino, which performs double duty sending controller information from the steering wheel as well as receiving force feedback instructions from the game to drive the motor in the steering wheel. Continue reading “Force Feedback Steering Wheel Made From Power Drill”

Better 3D Prints, Courtesy Of A Simple Mass-Produced Bracket

On the “hack/not-a-hack” scale, a 3D printed bracket for aluminum extrusions is — well, a little boring. Such connectors are nothing you couldn’t buy, and even if you insisted on printing them instead, Printables and Thingiverse are full of ready-to-use designs. So why would you waste your precious time and effort rolling your own?

According to production 3D printing company [Slant 3D], a lot of times, we forget to take advantage of the special capabilities of 3D printing. The design progression of the L-bracket shown is a perfect example; it starts as a simple L, moves on to a more elaborate gusseted design, and eventually into a sturdy sold block design that would be difficult to make with injection molding thanks to shrinkage but is no problem for a 3D printer. Taking that a step further, the bracket morphs into a socketed design, taking advantage of what 3D printers can do by coming up with a part that reduces assembly time and fastener count while making a more finished, professional look.

Again, this isn’t really about the bracket. Rather, it’s about a different way of thinking about your designs and leveraging the unique capabilities of 3D printers relative to other mass-production methods, like injection molding. We’ve covered some of [Slant 3D]’s high-volume design insights before, such as including living hinges and alternatives of pins and holes for assembling printed parts. Continue reading “Better 3D Prints, Courtesy Of A Simple Mass-Produced Bracket”

Heartbeat packets of LKV373

Audio, Not Video Over The LKV373 HDMI Extender

[eta] found herself in a flat with several LKV373 HDMI extenders. Find the corresponding transmitter, plug it into your device, and you’ve got a connection to the TV/sound system, no fussing with wires behind the TV. However, [eta] wanted to get rid of the need to plug in a laptop and start sending packets directly to play music. As her flatmate [dan] had already reverse-engineered the receiver, she tested her prototype against their virtualized receiver, de-ip-hmdi.

The actual sending of images was surprisingly straightforward — just a JPEG sliced into 1024 bytes chunks and sent over. However, early testing showed nothing on the receiver. The end of a frame needed marking by setting the most-significant bit of the chunk number to one. Now de-ip-hdmi showed the image, but the actual hardware would not. With something missing, [eta] returned to Wireshark to scan packets. Noticing some strange packets on port 2067, she analyzed the pattern to reveal it sent another packet just before a new frame and included the frame number. With this tweak, it was still not enough. Ultimately, heartbeat packets sent every second synchronize things, but compared to the noise of the video packets, they were easy to miss. Now [eta] had some functioning video streaming rust code.

In theory, audio for the LKV373 followed the same thought process as video. Two channels of 32-bit big Endian integers at 44,100 hz chunked into 992-byte sections and sent as a packet formed the audio stream. With only 992 bytes, two streams, and 4 bytes per sample, each packet only held 2.812 milliseconds of sound. The first tests resulted in no audio output or distorted crunchy sound. Of course, this was every audio engineer’s worst nightmare: jitter. With a spin loop and an efficient ring buffer, the audio packets were soon slinging across the network reliably.

The code is available on a hosted version of GitLab. It’s a beautiful journey through reverse engineering some obscure but relatively cheap hardware. Along the way, there is nicely annotated Rust code, which makes it all the better.

Just How Is Voyager 2 Going To Sort Out Its Dish Then?

Anybody who has set up a satellite TV antenna will tell you that alignment is critical when picking up a signal from space. With a satellite dish it’s a straightforward task to tweak the position, but what happens if the dish in question is out beyond the edge of the Solar System?

We told you a few days ago about this exact issue currently facing Voyager 2, but we’re guessing Hackaday readers will want to know a little bit more about how a 50+ year old spacecraft so far from home can still sort out its antenna. The answer lies in NASA Technical Report 32-1559, Digital Canopus Tracker from 1972, which describes the instrument that notes the position of the star Canopus, which along with that of the Sun it can use to calculate the antenna bearing to reach Earth. The report makes for fascinating reading, as it describes how early-1970s technology was used to spot the star by its specific intensity and then keep it in its sights. It’s an extremely accessible design, as even the part numbers are an older version of the familiar 74 logic.

So somewhere out there in interstellar space beyond the boundary of the Solar System is a card frame full of 74 logic that’s been quietly keeping an eye on a star since the early 1970s, and the engineers from those far-off days at JPL are about to save the bacon of the current generation at NASA with their work. We hope that there are some old guys in Pasadena right now with a spring in their step.

Read our coverage of the story here.

Steel For Your Fighting Robot

The job of processing video after a large event must be a thankless one for whichever volunteer upon whose shoulders it falls, and thus it’s not unusual for talks at larger events to end up online much later than the event itself. Electromagnetic Field 2022 was last year, but they have continued to drop new videos. Among the latest batch is one from [Jennifer Herchenroeder], in which she discusses the steel used in her team’s BattleBot, Hijinx (Edit: her EMF talk was cut short due to time pressures, so she re-recorded it in full after the event and we’ve replaced the link. The EMF video meanwhile is here). The result is a fascinating introduction to the metallurgy of iron and steel, and is well worth a watch.

To fully understand the selection of armor steel it’s necessary to start from first principles with iron, to look at its various allotropes, and understand something of how those allotropes form and mix in the steel making and metalworking processes. We’re treated to a full description of the various tempering and hardening processes, before a panel-by-panel rundown of the various steels used by Hijinx.

For a Hackaday writer with a past in robot combat it’s fascinating to see how the design of robots has evolved over the decades since the British Robot Wars, and it’s particularly nice to see the current generation as part of our community. However, if you’ve tempted yourself, bear in mind that it’s not all plain sailing.

Continue reading “Steel For Your Fighting Robot”

VanMoof E-Bike Bankruptcy: The Risks Of Cloud-Connected Transport

When the bankruptcy of VanMoof, the company behind a series of e-bikes, was announced recently, many probably shrugged at this news. After all, what is an e-bike but a regular bicycle that has some electronics and a battery strapped to it to assist with cycling? Unfortunately for owners of a VanMoof e-bike, their fancy wheels come with a Bluetooth-connected smartphone app that somehow involves storing a special encryption key on the VanMoof servers, as detailed by [Gergely Orosz] at the Pragmatic Engineer. Without this key that is connected to your VanMoof account, your VanMoof app cannot communicate with your VanMoof e-bike.

Although basic functionality of the e-bike will be retained, features such as setting the gear modes, changing assistance mode, locking the bicycle and other features not exposed on the bicycle itself will be lost. Essentially this is the equivalent of losing the remote control to a modern-day TV and getting locked out of 90% of the device’s features.

Fortunately, as [Gergely] and others are (urgently) pointing out to VanMoof e-bike owners, this special key can be downloaded with a Key Exporter project on GitHub, as well as obtained and used with an alternative app by Cowboy Bikes, which is a competitor of VanMoof. The unfortunate reality remains, however, that should you lose this special key, you are going to be in a world of pain as your expensive e-bike now is mostly an e-brick.

(Thanks to [Jan Praegert] for the tip)