Charting The Efficiencies Of Boiling Water

Water takes a lot of energy to heat up. If you’d like evidence of this, simply jump into a 50° F swimming pool on Memorial Day. Despite the difficulty of heating water, that simple act accounts for a lot of industrial processes. From cooking a steak to running a nuclear reactor, there isn’t much that doesn’t involve heating water.

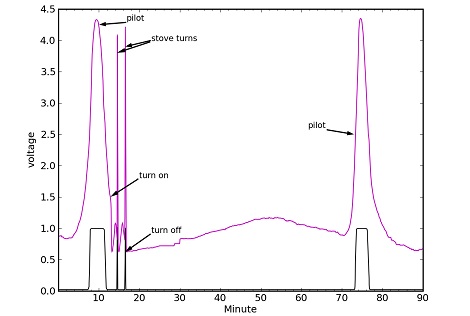
[Tom Murphy], Physics prof at UCSD decided to test out exactly how efficiently he could boil water. Armed with a gas stove, electric kettle, microwave, and a neat laser pointer/photodiode setup on his gas meter to measure consumption, he calculated exactly how much energy he was using to make a cup of tea.

The final numbers from [Tom]’s experiment revealed that a gas stove – using a pot with and without a lid on large and small burners – was about 20% efficient. A gas-powered hot water heater was much better at 55% efficiency, but the microwave and electric kettle had a miserable efficiencies of around 15 and 25%, respectively. There is a reason for the terrible inefficiency of using electricity to heat water; if only the power from the wall is considered, the electric kettle put 80% of energy consumed directly into the water. Because the electricity has to come from somewhere, usually a fossil-fueled power plant that operates at around 30% efficiency, the electric kettle method of turning dinosaurs into hot water is only about 25% efficient.

The take-home from this is there’s a lot of power being wasted every time you run a bath, make some coffee, or wash the dishes. We would all do better by decreasing how much energy we use, much like [Tom]’s efforts in using 5 times less power than his neighbor. Awesome job, [Tom].

[Easton’s] Robot Arm Takes 2nd Place In The International Science And Engineering Fair

Here we see [Easton LaChappelle] getting a congratulatory handshake from the robotic arm he built. This project is aimed at human prosthetics, and we’re happy to report that [Easton] won second place in Electrical and Mechanical engineering division of this year’s International Science and Engineering Fair (PDF listing the winners).

In the video he gives us a great look of the state of the project. Since we checked in with him last he’s added a body for the arm to mount to. The arm now has shoulder movement, which uses geared DC motors along with some potentiometers for orientation feedback. For the elbow he wanted to have the same setup but ran into trouble mounting the potentiometer. His solution was to use some shapelock to mold a bracket (shapelock is the plastic you melt in water to form any shape). In addition to the aforementioned joints, the wrist, fingers, and hand have all seen improvements in how they are supported and in their performance.

We think this is amazing work for anyone, especially a 16-year-old High School student. Great job [Easton]!

Continue reading “[Easton’s] Robot Arm Takes 2nd Place In The International Science And Engineering Fair”

Shoulder Robot For The Forever Alone

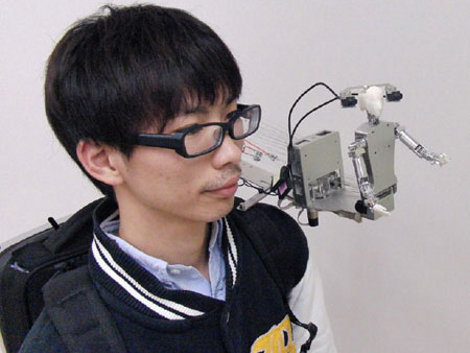
Don’t have anyone to share activities with? Forget Siri, she’s just a disembodied voice in a box. You need to get yourself a shoulder-mounted robot pal.

The idea behind this design actually has something to do with telepresence. Let’s say you and your best friend want to go check out the local Hackerspace. The problem is that you met your best friend on the Internet and they live thousands of miles away. Well just strap on your shoulder robot and have your friend log on. There’s a camera to give him or her feedback, and twenty degrees of freedom lets them control the torso, arms, and head of the bot in a realistic and creepy way. This works much like a marionette, with motors pulling wires to actuate the robot’s movements. You can get a very brief look at this in the clip after the break.

Continue reading “Shoulder Robot For The Forever Alone”

Visualizing Sound Without A Computer

[Emre] sent in a cool art piece he’s been working on that visualizes your voice without the use of a microcontroller.

The project is called Visible Voice only consists of a laser, mirror, audio speaker and a phosphorescent disk. The laser shines onto a mirror mounted on the speaker and is reflected onto the disk. When an audio signal is played through the speaker, the light bounces off the mirror and produces a waveform on the disk. Think of it as the lowest tech way of building a model of a CRT; the laser is the electron gun and the speaker is a deflection coil.

Right now, [Emre]’s project displays a waveform along a circular path on the slowly rotating phosphorescent disk. Anyone wanting to copy this project could use a moving belt of the same material giving a much more linear (and straighter) waveform trace.

After the break you can see [Emre]’s friend [Ivan] testing out the glowing laser waveform visualizer.

Continue reading “Visualizing Sound Without A Computer”

Building A Quiz-show Style Buzzer System

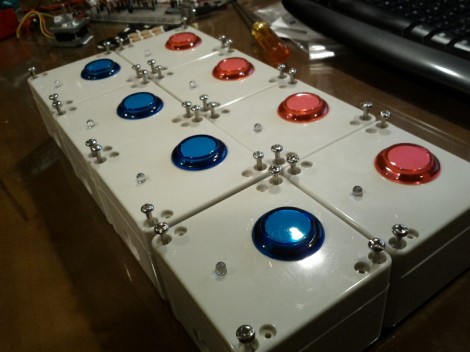
Theses are the team buzzer boxes which [Philippe Chrétien] built for his mother. She’s a big fan of quiz shows (we’re thinking Jeopardy and the like) and he thought she’d enjoy a proper setup for home gaming.

Each unit consists of an arcade button and one LED, both housed in a project box. He uses telephone wire to connect each buzzer to the base unit. We like that idea since we’ve got a lot of old telephone cable lying around and our RJ-45 crimp includes an RJ-11 slot. This is perfect for making our own cables.

The base unit houses an Arduino board which polls the buttons to see which is pressed first. The LED on the appropriate buzzer box is illuminated so the players know who got in first. One special feature of this setup is the ability to choose from 30 different buzzer sounds.

There are several other quiz buzzer projects kicking around Hackaday if you’re interested. One of our favorites is this system which uses plastic bowls as the buttons.

[via Adafruit]

Scratch-build Garden Nursery Uses Arduino Monitoring

Starting your garden indoors helps to ensure large yields. This is because the plants get a head start before it’s warm enough for them to be put in the ground. But the process involves a fair amount of labor, ensuring that the lights are turned on and off at the right times each day, and that the temperature for germination and growth, as well as humidity, hit a certain target. It’s obvious that a bit of automation would be nice, and this Arduino-based garden nursery does just that. One of the things that sets this project apart is that it shows you how to go from an empty room to the bounty of plant starters seen here.

For the most part the equipment is what you’d expect, seed trays and covers, tray warming mats, and fluorescent light fixtures. the whole thing is given a small footprint thanks to an adjustable shelving unit. The Arduino is used in conjunction with a Sprout Board to add connectivity for switching the lights and warming mats. This is just a matter of driving a relay to switch mains voltage and can take any number of forms, including this home automation project we saw the other day.

[Thanks Tom]

Making Color Matched Perler Bead Art

You may remember Perler beads from first or second grade; these small plastic beads are placed into a peg board and then ironed to produce a solid multicolored piece of plastic. Recently, Perler beads have seen somewhat of a revival due to a few people creating 8 and 16-bit video game sprites in plastic, but there’s still the enormous effort of color matching beads to make a passable Sonic or Mega Man.

[Jon Wilson] sent in an awesome bead pattern generator that takes those color images of video game sprites – and just about any other picture –  and translates them into Perler bead patterns. One awesome feature is color matching; [Jon] found the RGB values of every color of Perler beads and his program chooses the closest match from the original image.

[Jon] started on a GUI app for his bead pattern generator, but because his kids aren’t into beads anymore the GUI is still unfinished. There is a command line Python script that takes an image and shoots out a PDF of the bead pattern, which should be more than enough for all but the most complicated design.