Hackaday Links: July 1, 2012

Opening really old lock boxes

[Barry Wels] is a locksmith. One day, he got a call from a museum that had a few 17th century strong boxes that needed to be opened. After a little probing with an endoscope, he decided they could be picked with a little bit of spring steel. So, what’s in the box? [Barry] is going to send in an update in a month or two.

An awesome Geordi La Forge VISOR. But don’t take my word for it.
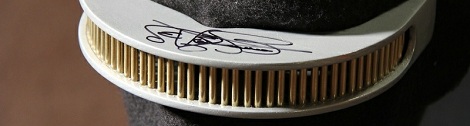
[DrewSmith007] made a replica of Geordi’s VISOR from Star Trek: The Next Generation. Bonus: it’s autographed by Levar Burton.

Free mirrors for your laser cutter

If you have a laser cutter, your mirrors will get damaged, and they’re very expensive to replace. [Phil] sent in a neat tip: make your own mirrors from hard drive platters.

A proper M.U.L.E. remake

Combine Settlers of Catan with M.U.L.E.. That’s what this Kickstarter is trying to do, and it sounds freakin’ awesome.

This game is so cool

A few months ago, I mapped the surface of a video game moon. Since then, Kerbal Space Program had a huge update with a brand new moon. Over on Reddit, [InsanityCore] started mapping this new moon, so I rendered it. Go give [InsanityCore] some karma. He did all the hard work.

Test Firing The Largest Amateur-built Liquid Fuel Rocket Engine

Last April, we caught wind of a very impressive rocket engine being built by Copenhagen Suborbitals. That engine was on the test pad this weekend, and the video is incredible (skip to 20:30 for the actual test). The Copenhagen Suborbitals team pulled off a successful test firing of their 65 kilo Newton alcohol and liquid Oxygen-fueled rocket.

When last we saw the TM65 engine, it was sitting on the design floor of the Copenhagen Suborbitals workspace. The plan was to fire the engine using alcohol fuel and LOX pressurized by Helium, but that plan was changed to use Nitrogen as the pressurant. The static test was an immensely successful demonstration of the engine, but unfortunately the chamber pressure (and therefore thrust) was a little low meaning the team will be moving back to Helium for the next test.

Thanks to the very successful test of the TM65, Copenhagen Suborbitals may be launching their HEAT booster later this year possibly carrying their new space capsule. Even if it’s only a crash test dummy that will make the ride into space, we can’t wait for the video of the flight.

Check out a few more (abridged) videos of the TM65 test firing after the break.

Continue reading “Test Firing The Largest Amateur-built Liquid Fuel Rocket Engine”

Raspberry Pi Controlled Tank Goes Deeper Than You Might Think

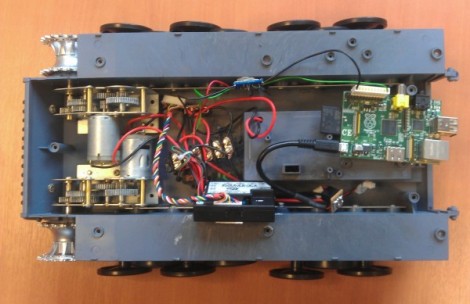
This remote control tank now takes its orders from a Raspberry Pi board. Well, actually it’s taking orders from commands pushed to the RPi board via SSH. The control scheme works out quite well. Using a low-profile WiFi dongle the RPi automatically connects to the wireless network when it is powered on. This makes it a snap to SSH into the device, and a more user-friendly controller will put a nice front-end into play at some time in the future.

But the real meat and potatoes of the hack comes in getting the RPi to talk to the tank’s circuitry. Just getting the Heng Long Tiger I remote control tank apart proved to be a ton of work as the treads need to be removed to do so and there’s a lot of screws holding it together. Instead of just replacing all of the control circuitry [Ian] wanted to patch into the original controller. To do so he spent a bit of time analyzing the signals with an oscilloscope and discovered that commands were coming in a Manchester encoded format. He established what various packets were doing, used a transistor to protect the GPIO pin on his board, and now has full control of the Tank. The final part of the hardware alteration was to power the RPi from the Tank’s battery.

After the break you can catch a demo of the reassembled tank sporting its new wireless controller.

Continue reading “Raspberry Pi Controlled Tank Goes Deeper Than You Might Think”

Computer Desk… Literally

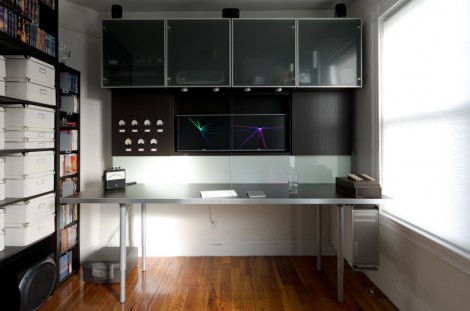
This piece of furniture begs the question, why think of a desk and a computer case as separate things? It combines Ikea furniture with electronic hardware to create the ultimate command center.

First the obvious parts: there’s a nook for the computer case that hangs just below the desktop off to the side, and the twin displays are mounted front and center. The divider between the cabinet pieces was cut away to allow the monitors to be wall-mounted. But things start to get interesting to the left of those monitors. You can see a series of dial displays in the door for that cabinet. Those meters were sourced from the MIT Flea Market and after a bit of alteration they display CPU load information fed to them by  an Arduino board. This also drives some LED strips which are mounted behind the frosted glass panel that we guess could be called a back splash. The heavier the load, the better the light show.

All of the power management is taken care of in the cabinet to the right of the monitors. The top row hides a printer, external hard drive backup system, and several gaming consoles. Heat will be an issue so exhaust fans were added to each of these partitions. They’re switched based on a temperature sensor in each. It’s a lot of work, but the outcome proves it was worth it.

[via Reddit]

Raspberry Pi Power Regulator Transplant Reduces Power Consumption

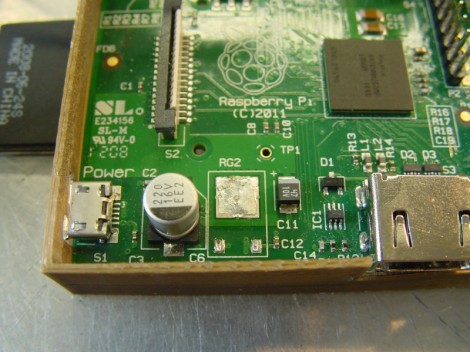
If you want to run your Raspberry Pi from something other than a mains power converter, and you’ve got some courage to spare, this hack is right up your alley. [Tom] wrote in with a switch mode power replacement for the RPi’s stock linear regulator. This is the first hack we’ve seen where the RPi’s on-board hardware is being altered and that’s where things get a little scary.

The first thing done was to remove the linear regulator, leaving the unpopulated RG2 footprint seen above. Apparently a rework station wasn’t available as the technique they used describes holding the board up by gripping the regulator with tweezers, then blasting it with a hot air gun. It makes us a bit queasy because the processor chip has a solder footprint you don’t want to mess with.

But apparently all is still well. With the wasteful linear regulator gone a pair of 5v and 3.3V switch regulators inject voltage through the GPIO header. Initial tests show a savings of around 25% but we’d imaging this varies greatly based on load.

Under-bench Timed Outlets Won’t Let You Leave The Iron On

When we used to use firesticks (the pen style plug-in soldering irons) it was always a worry that we might leave them on. But now we use a base unit which has an indicator light to serve as a reminder. Still, [FoxxTexx] isn’t taking any chances and instead built this timer-based outlet which kills the power automatically.

The parts are all pretty common. The timer itself is the same form factor as a light switch and is commonly used for heat lamps or hot tub jets. It feeds the outlet next to it by way of the indicator switches to the right. We like the use of the switches but since mains voltage is still running through them we would suggest using a three-gang box and mounting them on the cover plate so that all the wiring is contained. If done this way you could just have the electrical box siting on your bench, but it is a nice touch to have it mounted this way.

We’ve long been proponents of a timer system. Back when we put together our Hacker’s Soldering Station we just used a plug-in timer unit.

Robot Dares You To Snatch The Pebble From This Flower

This pleasant-looking plant may try to take your hand off if you’re not careful. The robot flower (translated) includes sensors that cause the petals to move in reaction to external stimuli.

You can just make out the distance sensors as black rectangles on two of the petals. These let the flower track an object by rotating the flower stem. But if they determine the object is getting a bit too close for comfort, the servo motor on the back of each petal will cause the flower to suddenly clamp shut.

The video after the break starts off with an in-depth look at the hardware that went into the project. An Arduino clone called the GRoboduino makes this project a lot easier since it has a bunch of extras on the board aimed at things like sensors and servo motors. The mounting technique for the petal-powering-servos is quite attractive, and we enjoy the Snapple lid (probably not the actual brand but you get the picture) which has been coated with yellow felt for the center of the bloom. The final look is normal enough to fit in with home decor, but it still has enough geek in it to melt our hacker hearts.

Continue reading “Robot Dares You To Snatch The Pebble From This Flower”