Printing Mounting Boards And Boxes For Hobby Projects

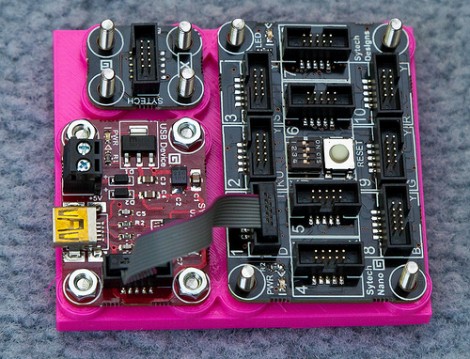
That’s a great base board for these Gadgeteer components. [Rob Miles] has been designing and printing mounting boards and enclosures for several of his projects. He just got into printing parts with the Ultimaker last week, and we’d say he’s found his stride. The board pictured here features nubs that act as stand-offs, and on the underside there are countersunk spaces for the bolt heads used as fasteners.

He started designing with Autodesk 123D but the interface didn’t really suit his working style. He switched over to FreeCAD and that experience fit him like a glove. He starts out with the sketch view to draw his parts, then extrudes that into the 3D model for further refinement before having the printer turn the digital into the real. This is the third board he produced in just one day of experimenting, but he is also showing off an enclosure he made for his thermal printer.

If you’re not working with boards that have nice mounting holes like these, don’t fret. We’ve seen 3d printed mounting systems that cradle the board, like these Raspberry Pi enclosures.

[Thanks Peter]

Adding A Bomb Bay To A Quadcopter

The Fourth of July is fast approaching, and what better way to celebrate the independence of your country than by blowing up a small piece of it? [Anzel360] decided to take that line of thought to a whole new level by adding a bomb bay to his quadrocopter.

[Anzel360] recently upgraded his transmitter to a Spektrum DX8, giving him two extra channels on his four-channel quadrotor. After adding a small servo to the quad, it was a simple matter of taping a box to the undercarriage and filling it full of fireworks.

The ammo [Anzel] is using is just a handful of Snappin’ Pops – otherwise known as the lamest firework ever created. We won’t hold that against him, though; a remote ignition system for a few Black Cats mounted on a fancy quadrocopter is just asking for trouble. We do recall a throwable cap gun bomb from our youth, though, that would allow for year-round ammo replenishment…

Printing Organs With A 3D Printer

[Jordan Miller], [Christopher Chen], and a whole bunch of other researchers at the department of bioengineering at U Penn have figured out a way to print 3D tissues using a 3D printer. In this case, a RepRap modified to print sugar.

Traditional means of constructing living 3D tissues face a problem – in a living body, there’s a whole bunch of vasculature sending Oxygen and nutrients to the interior cells. In vitro, these nutrients can’t get to the cells in the core of a mass of tissue. [Jordan], [Chris], et al. solved this problem by printing a three-dimensional sugar lattice. After encasing this lattice in a gel embedded with living cells, the sugar can be dissolved and the nutrients pumped through the now hollow capillaries in the gel.

If you have access to Nature, the full text article is available here. There’s also a great video showing off this technique after the break.

Continue reading “Printing Organs With A 3D Printer”

Getting A Console And Quake II Running On A Raspberry Pi

Those Raspberry Pi boards are flying into the mailboxes of tinkerers all around the globe, so our tip line is currently awash in a deluge of Raspi hacks. Here’s two that came in over the weekend:

First up is [reefab]’s port of Quake II for the Raspberry Pi. The build is based of Yamagi Quake II and is mostly playable. The Quake III port for the Raspberry Pi is old hat, but we’re happy to relive the pulse-pounding action of Quake II any day.

Next up is [Joonas]’ take on getting a serial console up and running with the Raspi. The Raspberry Pi has a UART serial console on its 26-pin header, but you can’t just connect those pins to a serial port. To shift the +/- 12V down to the 3.3 Volts the Raspi can understand, [Joonas] used a MAX3232 – the 3.3 Volt version of everyone’s favorite RS-232 transceiver. With a breadboard and a couple of caps, it’s easy to connect your Raspi to a serial console. Neat.

Open Source Synth Sounds Awesome

A little bird sent in a tip about a really cool MIDI synth. It’s called the Ambika, and it seems like just the thing to introduce a synth head to the world of soldering.

Compared to an entry-level synthesizer like the microKorg or its ilk, the Ambika is packed full of really cool features that just happen to sound awesome. In addition to the basic saw, square, and sine waves, there is also FM, and wavetable synthesis along with a noise generator, rudimentary voice synth, and a bitcrushed sawtooth wave voice. Really, the sound demos (available after the break) speak for themselves.

The hardware is based on the ATMega644p, a fairly high-powered 8-bit microprocessor notably used in the Sanguino. This synth supports up to 6 voices, each individual voice is contained on a separate circuit board attached to the motherboard.

Of course, the schematics/board files/firmware for the Ambika are freely available along with a pretty amazing set of technical notes. There’s no word on how much the Ambika will cost, but having it available as a kit should make it palatable if you don’t mind spending a Saturday holding an iron.

Tip ‘o the hat to an anon for sending this one in.

Continue reading “Open Source Synth Sounds Awesome”

Codebender: An Online Arduino IDE

Because everything is moving to a web app, [Vasilis Georgitzikis], a.k.a. [tzikis] developed codebender, a cloud-based Arduino IDE replete with built-in libraries, documentation, and the ability to upload your code to an Arduino from a browser.

To compile an Arduino sketch, codebender uses clang a wonderful compiler that will give you extremely descriptive warnings on terrible code. Like any good IDE, there’s built-in highlighting and documentation, and a small bit of Java allows you to upload your code and monitor the serial port right in the browser.

One of the more interesting innovations is codebender’s (upcoming) use of a TFTP bootloader. With this and an Ethernet shield, it’s easy to upload code to any Internet-connected Arduino, whether it’s on your desk or halfway across the world. We can see that being very useful for a data logger or even a UAV balloon, and can’t wait to see it in action.

Spoofing GPS And Getting Your Own UAV

A couple folks over at the Radionavigation Lab at UT Austin successfully spoofed GPS to take control of a small helicopter drone this weekend. Of course, this attracted the attention of the Department of Homeland security, so you’d better stock up on GPS spoofing equipment while there’s still time.

The DHS, CIA, and US Military have a huge interest in spoofing GPS; Iran stole a drone late last year using the same method. The UT Austin team used only about $1000 worth of equipment to take control of an autonomous drone and pilot it away under unauthorized control. Of course with matters of homeland security, the open-source hacker scene has yet to publish how this spoofing attack was actually done, but here’s a paper covering what is needed to remotely control up to four GPS-guided drones.

While waiting on the details of this build to be made public, feel free add your own insight in the comments as to how this attack was actually performed.