Controlling A TV With A Microcontroller

Here’s two builds that print text to a TV with only two pins:

Still Alive with an Arduino

After seeing all the builds that play Still Alive, [Bob] decided to take a 1972 amber monitor and recreate the cut scene at the end of PortalThe build uses the TVout library for Arduino. There were a few problems with running the Unix and Still Alive animations at the same time, so [Bob] flips a bit in the EEPROM at the end of the command line animation and restarts into GLaDOS’ report. You can check out the old school color monitor here

ATMega Video Text Generator

[Stian] didn’t think his build was good enough for Hackaday, but his friend [Mikael] thought otherwise. [Stian] wrote a library to generate an NTSC video signal in real time. It’s a text-based build with 37×17 character resolution and only requires about 3kB of RAM. As a bonus, it only takes up two pins on [Stian]’s ATMega128.

You can check out the videos for both these builds after the break.

Continue reading “Controlling A TV With A Microcontroller”

Sell Your Projects With Club Jameco

Everyone’s favorite electronic component distributor, Jameco, rolled out a new way for you to make a few bucks off of your projects. It’s called Club Jameco and looks like a great place to design, sell, and learn about new projects from around the Internet.

The premise behind Club Jameco is simple. You send Jameco a short description of one of your projects. If the folks at Jameco think your project will sell, they’ll post it on Club Jameco for some feedback while you write up the instructions and the BOM. Once your project is done, Jameco will build it, sell it, and send you a nice royalty check in the mail.

Already there are some pretty neat projects up on Club Jameco like a build your own transformer kit and a photodiode geiger counter. We’re sure Hackaday readers have a few interesting projects up their sleeves, so we’ll wait patiently until we see them on Club Jameco.

Tip ‘o the hat to [War_Spigot] and [PUNiSH3R] for sending this one in.

Turning An Oscilloscope Into A Logic Analyzer

Sooner or later, you’re going to need a logic analyzer. If you don’t have a Bus Pirate or Logic Sniffer lying around, [Joonas] has a great MacGyverism that turns an oscilloscope into the simplest logic analyzer ever.

The basic premise of the build is tying four digital lines to the analog input of an oscope. This is done with a 74HC126 buffer that provides a high impedance input for the logic probes and outputs the four-bit status of each logic channel. With a few resistors in an R-2R network, the state of four digital lines can be easily read.

[Joonas] included the source code to turn his Picoscope 2000 into a logic analyzer, but there’s no reason why this couldn’t be done with any digital scope that has a serial output. Not bad for a very, very simple logic analyzer – just one chip and a handful of resistors – that costs less than $5.

DIY Science – Acid/Base Natural Indicators

natural-indicators

Nearly everything at [HAD] is at least based on science in some way or another. If, however, you would like to do some actual scientific experiments with stuff around the house, [Observationsblog] might be for you.

The particular posts that [Ken] wrote in to tell us about were all about acids, bases, and natural indicators. In his first post he goes over some definitions of acids, bases, and what pH exactly means. A good refresher for those that have forgotten some of their high school (or college) chemistry classes.

The other two posts have to do with making your own natural acid/base indicators. The first is called Anthocyanin, and can be extracted from Red Cabbage.  Quite specific directions can be found here. Similar directions can be found to turn the Indian spice of [Turmeric] into an indicator as well. Although these concepts probably won’t help build your next robot, they could easily be copied inspire young minds for a great science fair project!

Self-Powered USB Host Mode On The HP Touchpad

touchpad-usb-host-power

[ften] was having plenty of fun running Android on his HP Touchpad, but he soon discovered that the tablet’s micro USB port didn’t provide enough juice to his peripherals when running in host mode. He started digging around and found the perfect means of providing the extra power while maintaining the device’s stock appearance.

He pried the tablet apart and installed a small DC step up converter in an empty space located behind the Touchpad’s dummy SIM slot. After wiring the converter to the battery terminals, he installed a micro USB adapter in the empty slot, which fit perfectly after a bit of sanding.

He hacked together a USB Y-cable to pull power from his new USB jack, while retaining the existing data connection through the original USB interface. You can see the results of his work in the video below, and while [ften] hasn’t said how much his mod affects the Touchpad’s battery life, he has confirmed that it will still shut down gracefully once you inevitably sap the battery dry.

Continue reading “Self-Powered USB Host Mode On The HP Touchpad”

Cardboard Kinetic Creatures

Browsing around today, I saw this little kit on kickstarter called Kinetic Creatures.  These flat packed models are made from cardboard and can be assembled without tools. Their mechanical legs are operated either by a simple cam that you turn by hand or by a motorized attachment. I love the basic idea here. This is the kind of thing that my 6 year old would really enjoy doing that also serves to get him into making things (he’d probably insist on motorizing it with scraps, he collects dc motors and has quite a collection).

I did notice that they mentioned using it as a robotic platform, adding custom electronics to the empty space allowed in the body of the animal. This initially got me quite excited, thinking that I could, for $30 have a 1 foot tall quadruped platform that looked awesome, then I realized it can’t turn. I guess I’ll have to hack it a little bit to put separate drives in for each side. That would be a cool upgrade they could offer.

Have any of you tried to do turning with a set of only 4 [jansen] legs before?

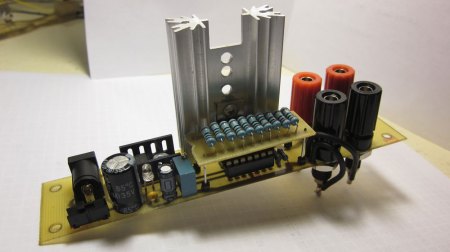
Constant Current Dummy Load

Inspired by a design he saw on the EEVblog, [George Graves] put together this constant current dummy load.  You might need on of these if you’re testing power supplies or batteries. They pull a constant current regardless of the voltage of the supply. [George’s] version extends the range of the original a little bit by running the op-amp at 8 volts. He says that everything runs fine at 1 amp. He tried 2 amps but things got hot pretty quickly. What we really like though, is he took fantastic pictures. Sometimes even simple things can catch our attention with the right pictures!