Do you know Morse code already? Or are you maybe trying to learn so you can be an old school ham? Either way, you could have a lot of fun with [felix]’s great little entry into the 2024 Tiny Games Contest — Morse Quest.
This minimalist text-based adventure game is played entirely in Morse code. That is, the story line, all the clues, and the challenges along the way are presented by a blinking LED. In turn, commands like LOOK, TAKE, and INVENTORY are entered with the slim key on the lower right side. A wee potentiometer allows the player to adjust the blink rate of the LED, so it’s fun for all experience levels. Of course, one could always keep a Morse chart handy.
The brains of this operation is an Arduino Nano, and there’s really not much more to the BOM than that. It runs on a 9 V, so theoretically it could be taken anywhere you want to escape reality for a while. Be sure to check out the demo video after the break.
What happens when an unfortunate bug ends up in a spider’s web? It gets bitten and wrapped in silk, and becomes a meal. But if the web belongs to an orb-weaver and the bug is a male firefly, it seems the trapped firefly — once bitten — ends up imitating a female’s flash pattern and luring other males to their doom.
Fireflies communicate with flash patterns (something you can experiment with yourself using nothing more than a green LED) and males looking to mate will fly around flashing a multi-pulse pattern with their two light-emitting lanterns. Females will tend to remain in one place and flash single-pulse patterns on their one lantern.
When a male spots a female, they swoop in to mate. Spiders have somehow figured out a way to actively take advantage of this, not just inserting themselves into the process but actively and masterfully manipulating male fireflies, causing them to behave in a way they would normally never do. All with the purpose of subverting firefly behavior for their own benefit.
It all started with an observation that almost all fireflies in webs were male, and careful investigation revealed it’s not just some odd coincidence. When spiders are not present, the male fireflies don’t act any differently. When a spider is present and detects a male firefly, the spider wraps and bites the firefly differently than other insects. It’s unknown exactly what happens, but this somehow results in the male firefly imitating a female’s flash patterns. Males see this and swoop in to mate, but with a rather different outcome than expected.
The research paper contains added details but it’s clear that there is more going on in this process than meets the eye. Spiders are already fascinating creatures (we’ve seen an amazing eye-tracking experiment on jumping spiders) and it’s remarkable to see this sort of bio-hacking going on under our very noses.
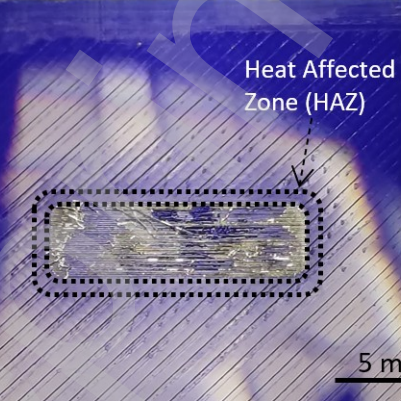
Ever needed a strong yet adhesive-free way to really stick PLA to glass? Neither have we, but nevertheless there’s a way to use aluminum foil and an IR fiber laser to get a solid bond with a little laser welding between the dissimilar materials.
A piece of sacrificial aluminum foil bonds the PLA to glass with a form of laser welding, with precise control and very little heat to dissipate.
It turns out that aluminum can be joined to glass by using a pulsed laser process, and PLA can be joined to aluminum with a continuous wave laser process. Researchers put them together, and managed to reliably do both at once with a single industrial laser.
By putting a sacrificial sheet of thin aluminum foil between 3D printed PLA and glass, then sending the laser through the glass into the aluminum, researchers were able to bond it all together in an adhesive-free manner with precise control, and very little heat to dissipate. No surface treatment of any kind required. The bond is at least as strong as any adhesive-based solution, so there’s no compromising on strength.
When it comes to fabrication, having to apply and manage adhesives is one of the least-preferable options for sticking two things together, so there’s value in the idea of something like this.
Still, it’s certainly a niche application and we’ll likely stick to good old superglue, but we honestly didn’t know laser welding could bond aluminum to glass or to PLA, let along both at once like this.
Researchers at the University of British Columbia leveraged an unusual discovery into ultra-black material made from wood. The deep, dark black is not the result of any sort of dye or surface coating; it’s structural change to the wood itself that causes it to swallow up at least 99% of incoming light.
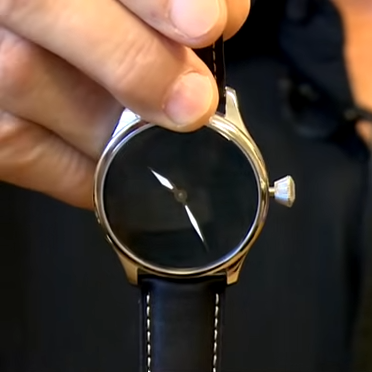
One of a number of prototypes for watch faces and jewelry.
The discovery was partially accidental, as researchers happened upon it while looking at using high-energy plasma etching to machine the surface of wood in order to improve it’s water resistance. In the process of doing so, they discovered that with the right process applied to the right thickness and orientation of wood grain, the plasma treatment resulted in a surprisingly dark end result. Fresh from the plasma chamber, a wood sample has a thin coating of white powder that, once removed, reveals an ultra-black surface.
The resulting material has been dubbed Nxylon (the name comes from mashing together Nyx, the Greek goddess of darkness, with xylon the Greek word for wood) and has been prototyped into watch faces and jewelry. It’s made from natural materials, the treatment doesn’t create or involve nasty waste, and it’s an economical process. For more information, check out UBC’s press release.
You have probably heard about Vantablack (and how you can’t buy any) and artist Stuart Semple’s ongoing efforts at making ever-darker and accessible black paint. Blacker than black has applications in optical instruments and is a compelling thing in the art world. It’s also very unusual to see an ultra-black anything that isn’t the result of a pigment or surface coating.
We (well, some of us) are complete suckers for things that are both much smaller and much larger than life. And if that thing actually does what its supposed to? Squee! So naturally, we rushed to bring you news of this mini NUC rack designed by [Jeremy Weatherford].
Inspiration comes from a lot of places, often times from stuff that lives on your desk. [Jeremy] had a pile of NUCs and thought they resembled a mini rack already, so why not build them one to live in? It was the perfect excuse to learn CAD, so off [Jeremy] went. Although this is a mini rack, the parts were too big to print. Another opportunity presented itself, and [Jeremy] tried out an online service to get the acrylic cut.
Assembly may have been fiddly with super glue all over the nice black acrylic, but [Jeremy] learned an important tip: excess glue can be removed with vegetable oil. Once it was built, he decided to make it into a control system lab and even found a perfect little five-port switch to top it off. The logo plate, of course, is the icing on this cake.
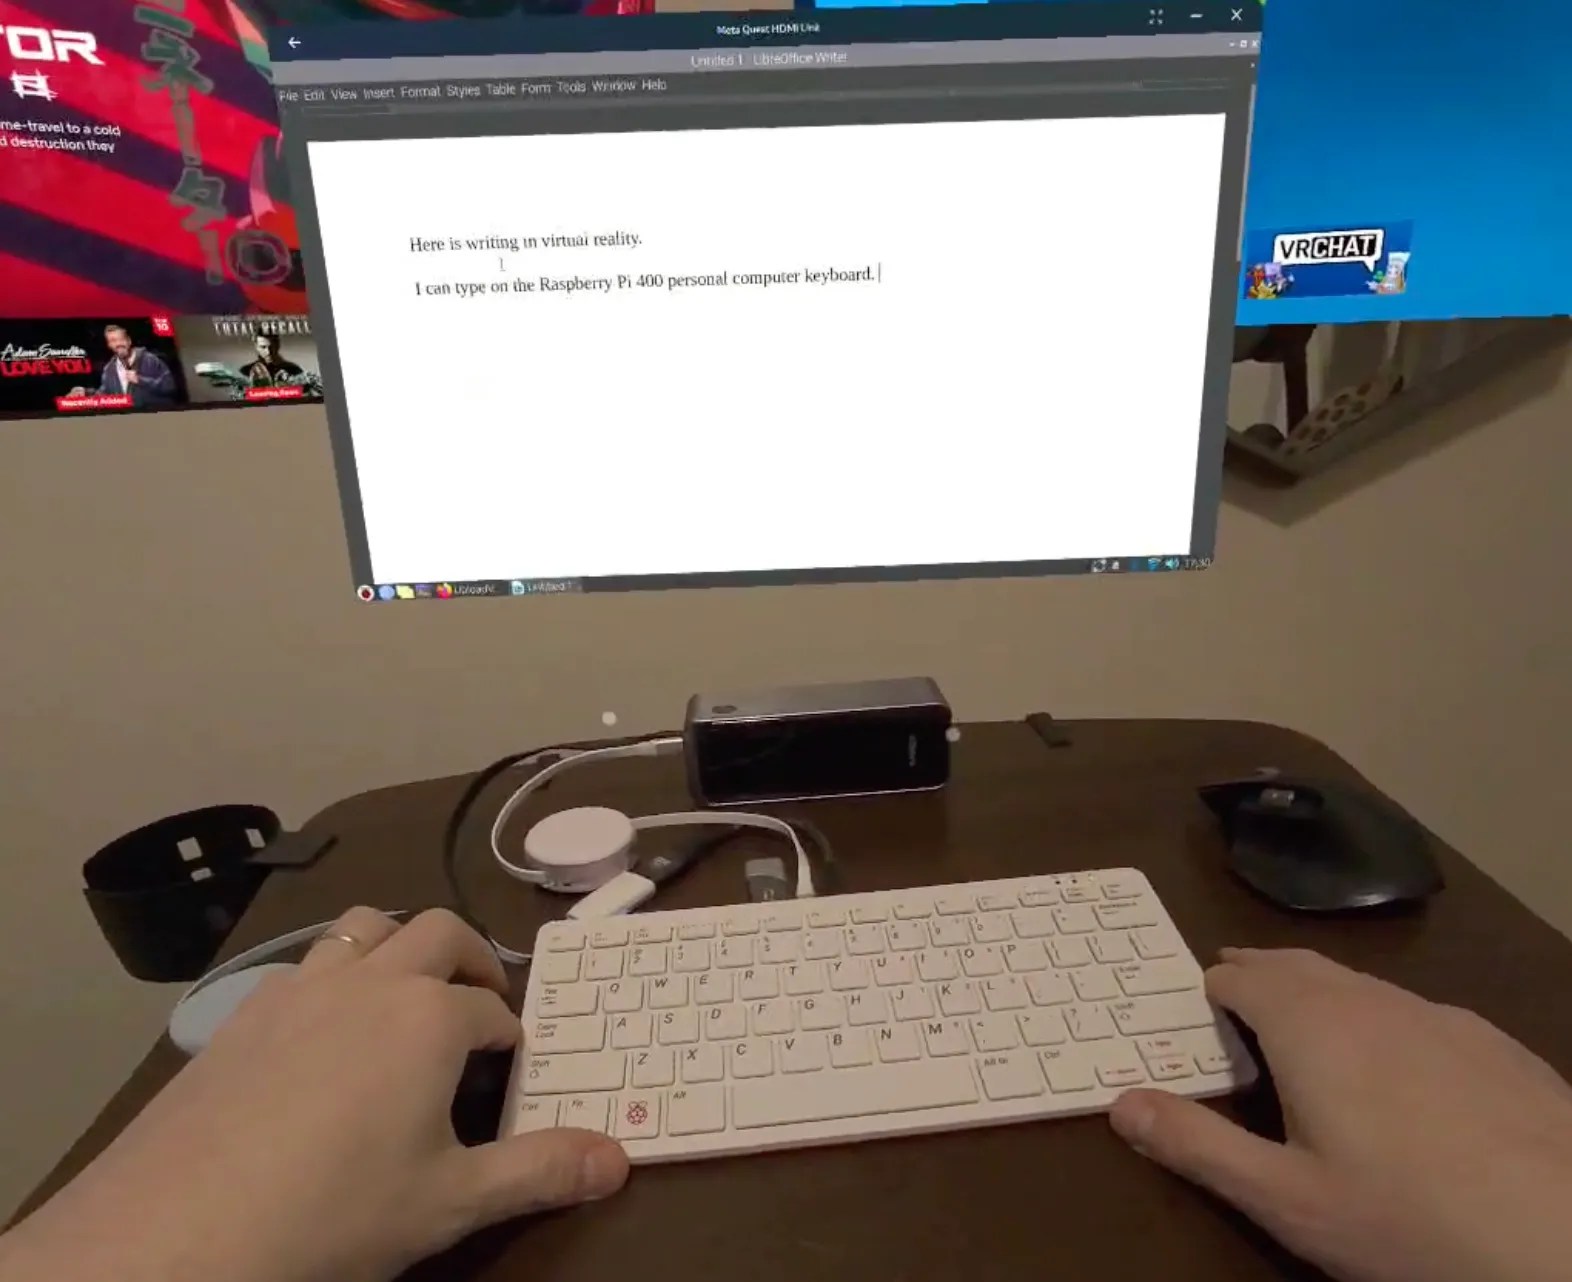
Meta’s Quest VR headset recently got the ability to accept and display video over USB-C, and it’s started some gears turning in folks’ heads. [Ian Hamilton] put together a quick concept machine consisting of a Raspberry Pi 400 that uses a VR headset as its monitor, which sure seems like the bones of a new breed of cyberdeck.
With passthrough on, one still sees the outside world.
The computer-in-a-keyboard nature of the Pi 400 means that little more than a mouse and the VR headset are needed to get a functional computing environment. Well, that and some cables and adapters.
What’s compelling about this is that the VR headset is much more than just a glorified monitor. In the VR environment, the external video source (in this case, the Raspberry Pi) is displayed in a window just like any other application. Pass-through can also be turned on, so that the headset’s external cameras display one’s surroundings as background. This means there’s no loss of environmental awareness while using the rig.
[Note: the following has been updated for clarity and after some hands-on testing] Video over USB-C is technically DisplayPort altmode, and both the video source and the USB-C cable have to support it. In [Ian]’s case, the Raspberry Pi 400 outputs HDMI and he uses a Shadowcast 2 capture card to accept HDMI on one end and outputs video over USB-C on the other.
Here’s how it works: the Quest has a single USB-C port on the side, and an app (somewhat oddly named “Meta Quest HDMI link”) running on the headset takes care of accepting video over USB and displaying it in a window within the headset. The video signal expected is UVC (or USB Video Class), which is what most USB webcams and other video devices output. (There’s another way to do video over USB-C which is technically DisplayPort altmode, and both the video source and the USB-C cable have to support it. That is not what’s being used here; the Quest does not support this format. Neither is it accepting HDMI directly.) In [Ian]’s case, the Raspberry Pi 400 outputs HDMI and he uses a Shadowcast 2 capture card to accept HDMI on one end and output UVC video on the other, which is then fed into the Quest over a USB-C cable.
As a concept it’s an interesting one for sure. Perhaps we’ll see decks of this nature in our next cyberdeck contest?
Why is it always a helium leak? It seems whenever there’s a scrubbed launch or a narrowly averted disaster, space exploration just can’t get past the problems of helium plumbing. We’ve had a bunch of helium problems lately, most famously with the leaks in Starliner’s thruster system that have prevented astronauts Butch Wilmore and Suni Williams from returning to Earth in the spacecraft, leaving them on an extended mission to the ISS. Ironically, the launch itself was troubled by a helium leak before the rocket ever left the ground. More recently, the Polaris Dawn mission, which is supposed to feature the first spacewalk by a private crew, was scrubbed by SpaceX due to a helium leak on the launch tower. And to round out the helium woes, we now have news that the Peregrine mission, which was supposed to carry the first commercial lander to the lunar surface but instead ended up burning up in the atmosphere and crashing into the Pacific, failed due to — you guessed it — a helium leak. Continue reading “Hackaday Links: September 1, 2024”→