A Tiny Board For Driving LEDs In…Whatever

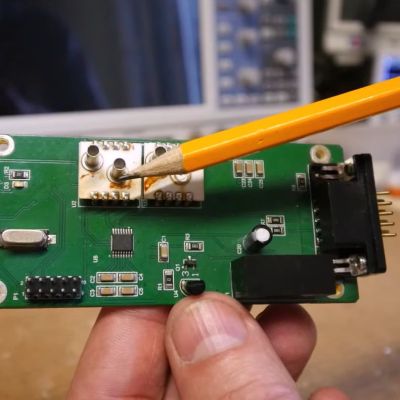
Whether you’re into chiptune or just playing Tetris on original hardware, you might like rocking a heavily-customized Game Boy. Lovely flashing LEDs can only improve the aesthetic, so if that’s what you’re after, you might consider the ARCCore board from [NatalieTheNerd].

The board is a compact and easy way to drive some addressable LEDs, with a form factor designed to take up a small amount of space when stuffed into a Game Boy or other game console. It rocks an RP2040 microcontroller set up to drive a strip of WS2812B LEDs. Three buttons are used to configure the color and brightness settings. The board is designed to run on 3.3 to 5 V, thanks to an onboard buck converter. It’s capable of delivering enough juice to run up to 10 RGB LEDs, though you could potentially use more if you ran them from external power.

You can use just about any microcontroller on the market today to run addressable LEDs if you so desire. If you want a compact drop-in solution that takes up less space, though, you might find the ARCCore useful. If you’ve got your own nifty kit for running addressable LEDs, don’t hesitate to share it with the broader hacker massive — hit the tipsline!

Simple Badge Is Simple, But It’s Yours

Making conference badges, official or unofficial, has become an art form. It can get pretty serious. #badgelife.

But DEFCON-goers aren’t the only people making fancy personalized nametags. Hams often had callsign badges going back as far as I can remember. Most were made of engraved plastic, but, at some point, it became common to put something like a flashing LED on the top of the engraved antenna tower or maybe something blinking Morse code.

Going back to that simpler time, I wanted to see if I could make my own badge out of easily accessible modules. How easy can it be? Let’s find out. Along the way, we’ll talk about multicore programming, critical sections, namespaces, and jamming images into C++ code. I’ll also show you how to hijack the C preprocessor to create a little scripting language to make the badge easier to configure.

Bottom Line Up Front

The photo shows the Pico badge. It has an RP2040 CPU but not a proper Raspberry Pi Pico. The Waveshare RP2040-Plus clone has a battery connector and charger. It also has a reset button, and this one has 16 MB of flash, but you don’t need that much. The LCD is also a Waveshare product. (This just happened to work out. I bought all of this stuff, and I don’t even know anyone at Waveshare.) The only other thing you need is a USB C cable and a battery with an MX 1.25 connector on it with the correct polarity. Hardware done! Time for software.

Continue reading “Simple Badge Is Simple, But It’s Yours”

Simple Hack Lets Smartphone Take Resin Printer Time-Lapses

With how cheap they’re getting, everyone seems to be jumping on the resin printer bandwagon. They may not be able to fully replace your trusty old FDM printer, but for certain jobs, they just can’t be beaten. Sadly though, creating those smooth time-lapse videos of your prints isn’t quite as easy to do as it is on their filament-based counterparts.

Not as easy, perhaps, but not impossible. [Fraens] found a way to make time-lapses on any resin printer, and in a wonderfully hacky way. First, you need to find a smartphone, which shouldn’t be too hard, given how often we all tend to upgrade. [Fraens] recommends replacing the standard camera app on the phone with Open Camera, to prevent it from closing during the long intervals with nothing happening. The camera is triggered by any readily available Bluetooth dongle, which is connected via a simple transistor circuit to an Arduino output. To trigger the shutter, a light-dependent resistor (LDR) is connected to one of the microcontroller’s inputs. The LDR is placed inside the bed of the resin printer — an Anycubic Photon in this case — where light from the UV panel used to cross-link the resin can fall on it. A simple bit of Arduino code triggers the Bluetooth dongle at the right moment, capturing a series of stills which are later stitched together using DaVinci Resolve.

The short video below shows the results, which look pretty good to us. There are other ways to do this, of course, but we find the simplicity of this method pleasing.

Continue reading “Simple Hack Lets Smartphone Take Resin Printer Time-Lapses”

The Simulated Universe Thought Experiment And Information Entropy

Do we live in a simulation? This is one of those questions which has kept at least part of humanity awake at night, and which has led to a number of successful books and movies being made on the subject, topped perhaps by the blockbuster  movie The Matrix. Yet the traditional interpretation of the ‘simulated universe’ thought experiment is one in which we – including our brains and bodies – are just data zipping about in a hyper-advanced simulation rather than physical brains jacked into a computer. This simulation would have been set up by (presumably) a hyper-advanced species who seem to like to run their own version of The Sims on a Universe-sized scale.

Regardless of the ‘why’, the aspect of this question where at least some scientific inquiry is possible concerns whether or not it would be possible to distinguish anything uniquely simulation-like in our environment that’d give the game away, like a sudden feeling of déjà vu in the world of The Matrix where you can suddenly perceive the fabric of the simulation. However, the major problem which we have to consider when trying to catch a simulation in the act is that to this point we cannot ourselves create even a miniature galaxy and intelligent beings inside it to provide a testable hypothesis.

Beyond popular media like movies and series like Rick & Morty, what do science and philosophy have to say about this oddly controversial subject? According to some, we have already found the smoking gun, while others are decidedly more skeptical.

Continue reading “The Simulated Universe Thought Experiment And Information Entropy”

A Paper Printer For QR Code Menus

Do you miss the days of thumbing through a sticky, laminated booklet to order your food? Sick of restaurants and their frustrating electronic menus? Fear not, for [Guy Dupont] and his QR code menu printer are here to save the day.

Yes, that’s right — it’s a lunchbox-sized printer designed to spit out a paper version of a digital menu. Using a Tiny Code Reader from Useful Sensors, the device can scan a QR code at a restaurant to access its menu. A Seeed Studio XIAO ESP32 takes the link, and then passes it to a remote computer which accesses the menu online and screenshots it. The image is processed with TesseractOCR to extract food items and prices, and the data is then collated into a simple text-only format using ChatGPT. The simplified menu is finally sent to a thermal printer to be spat out on receipt paper for your casual perusal.

[Guy] was inspired to build the project after hating the experience of using QR code menus in restaurants and bars around town. It’s his latest project that solves an everyday problem, it makes a great sequel to his smart jeans that tell you when your fly is down.

Continue reading “A Paper Printer For QR Code Menus”

This Machine Has Lost Its Marbles

The astonishing variety of ways to tell the time which have appeared on these pages over the years provides a showcase of the talents and ingenuity of our community. Many clocks use designs we are familiar with, but every now and then along comes a clock that rings something new. So it is with [Ivan Miranda]’s latest work — a digital clock that shows the time with a dot matrix made of marbles. So far he’s published only part one of what will become a series. There’s technically no clock yet, but as it stands it’s enough of a marble machine to be a worthy project in its own right.

In the video below we see him solving the problems of creating free-running marble transport and handling via a conveyor belt, and solving such unexpected problems as cleanly releasing them from the belt, holding a row of marbles with a solenoid, and catching errant marbles that bounce free of the machine. The result is a rather pretty marble machine that makes an endless cascade of falling marbles on a curved track. We’re guessing that future videos will deal with the assembly of lines for the dot matrix display, such that the figures of the clock will be formed from black and white marbles, so this is a series to watch out for.

We’ve seen [Ivan]’s work in the past, not least for his giant 3D printer.

Continue reading “This Machine Has Lost Its Marbles”

Booting The Raspberry Pi 5 With An NVMe SSD

The Raspberry Pi has come a long way since its humble origins, adding faster processors and better interfaces with each new generation. Now, the Raspberry Pi 5 has a lovely new PCIe port right on board, and [Jeff Geerling] has gone right ahead and slammed in an NVMe SSD as a boot drive.

[Jeff] explains that to use an NVMe to boot, you first have to modify /boot/config.txt to enable PCIe and modify the Raspberry Pi’s boot order. Once the bootloader is appropriately configured, you can boot straight off an SSD with Raspberry Pi OS installed. To get the operating system on to an NVMe drive, he recommends cloning an existing boot volume from a microSD install.

One of the primary reasons you might want to do this is speed. NVMe drives are generally a significant cut above even the best microSD cards, both in speed and reliability. [Jeff] also notes that you can use an NVMe SSD through a PCIe switch on the Pi 5 if you so desire, but you can’t currently boot with this configuration.

It’s a great feature to have on the Pi 5, and it follows on from the earlier implementation on the Raspberry Pi Compute Module 4. Video after the break.

Continue reading “Booting The Raspberry Pi 5 With An NVMe SSD”