There have been all kinds of wild ideas to get spacecraft into orbit. Everything from firing huge cannons to spinning craft at rapid speed has been posited, explored, or in some cases, even tested to some degree. And yet, good ol’ flaming rockets continue to dominate all, because they actually get the job done.
Rockets, fuel, and all their supporting infrastructure remain expensive, so the search for an alternative goes on. One daring idea involves using airships to loft payloads into orbit. What if you could simply float up into space?
Back in 2021, [stacksmashing] found that it took little more than a Raspberry Pi Pico and some level-shifters to create a USB connection with the Game Boy’s link port. Add in the proper software, and suddenly you’ve got online multiplayer for the classic handheld. The hardware was cheap, the software open source, and a good time was had by all.
The big change from the original design is that this is using the far smaller, but equally capable, RP2040-Zero development board. This is mated with a SparkFun logic level converter board (or a clone of one from AliExpress) by way of a custom PCB that also includes the necessary edge connectors to connect directly to a Game Boy Link Cable.
Once the PCB is assembled, it’s dropped into the 3D printed Game Boy shell. [weiman] really worked some nice details into the case, such as aligning the d-pad and buttons in such a way that pressing them engages either the RESET or BOOTSEL buttons on RP2040-Zero. The screen of the printed handheld also lines up with the RGB LED on the top of the dev board, which can produce some cool lighting effects.
How many lines do you need on a CP/M terminal? More is usually better, of course, but the MicroOffice RoadRunner managed with an 8-row, 80-column LCD screen. That may sound anemic, but in 1983, it was high-tech, as was the RoadRunner, and [Tech Time Traveller] tells us about them in a recent video you can see below.
The intro to the video shows some really strange old laptops before it gets to the RoadRunner. The machine used a Z80 work-alike CPU and a form of CP/M with some organizer functions. The machine didn’t have floppies or other disk storage, but did have four cartridge slots that could hold more memory, a spreadsheet, BASIC, or a text editor. The memory cartridges were static RAM with battery backup, so they retained data when you pulled them from the slot. Assuming the battery didn’t die.
Inside a RoadRunner cartridge.
Unfortunately, this particular machine suffered some shipping damage. In addition to the cartridges, it also had a removable battery and modem. At around the eight-minute mark, the case comes off, and inside are — surprise — more internal cartridges.
While MicroOffice isn’t a household name today, it was founded by a former Exxon executive and tapped a CEO and investor from Timex. It was funded by the likes of Olivetti. The computer rolled out in late 1983 and lived until Telxon bought MicroOffice in 1985.
Attempts to run Zork were not fruitful. There really wasn’t enough memory, and file transfer was a bit wonky. If you want a modern Z80 laptop, we know of one with 16 cores. As clunky as the RoadRunner looks, it still beats the old suitcase computers.
When you think about virtualization, you usually think about making some CPU pretend to be another CPU. However, there are sometimes advantages to making a computer pretend to be the same computer.
That’s the case with [oldvcr]’s KIMplement, which emulates a KIM-1 with a 6502 using a Commodore 64, which also uses a 6502.The reason this makes sense is that you have total control over an emulated CPU. If a program, for example, writes to a critical memory location or tries to take over the screen or keyboard, you can easily make the emulator do something more appropriate. Things like breakpoints and single stepping also become trivial.
The virtual machine at the heart of it is 6o6 (6502 on 6502), and it seems to perform well. By virtualizing, you can easily protect the system from programs that try to, for example, take over an interrupt vector. This is similar to how x86 protected mode can run old real-mode code in a virtual environment and intervene for certain instructions. The emulation is good enough that the emulator can run the emulator, which then runs the emulator to actually run the real target. That’s wasteful, of course, but it does speak to the completeness of the pretend CPU.
If you want a KIM-1 (and an 1802 Elf) but only have an Arduino, you can emulate a different way. At least an emulated KIM-1 doesn’t develop bad memory chips.
iSCSI is a widely used protocol for exposing SCSI devices over a network connection, and some scanners have in the past been equipped with SCSI ports. So, could you have an iSCSI network scanner? [xssfox] details her journey making a Canoscan FS4000US film scanner work over iSCSI, sparked by someone’s overly-confident StackOverflow comment that it couldn’t be done. Nothing in the spec said it couldn’t actually work, however, and after figuring out a tentative architecture, a hardware setup was put together.
No flatbed scanners with SCSI ports could be found on the cheap, so a film scanner had to be procured. After figuring out a few hitches with the loading mechanism and getting a test image locally, it was time to try and build up the software setup, tearing through SCSI compatibility and cabling, driver and PCI pass-through woes, bluescreens, and intermediate software having dropped some of the necessary features by now. Still, [xssfox] eventually exported the scanner as an iSCSI target – and, on the other end of the network, successfully connected to it and completed a scan. The StackOverflow answer was wrong, after all.
Don’t pack your bags for the trip to exoplanet K2-18b quite yet — it turns out that the James Webb Space Telescope may not have detected signs of life there after all. Last year, astronomers reported the possible presence of dimethyl sulfide there, a gas that (at least on Earth) is generally associated with phytoplankton in the ocean. Webb used its infrared spectrometer instruments to look at the light from the planet’s star, a red dwarf about 111 light-years away, as it passed through the hydrogen-rich atmosphere. The finding was sort of incidental to the discovery of much stronger signals for methane and carbon dioxide, but it turns out that the DMS signal might have just been overlap from the methane signal. It’s too bad, because K2-18b seems to be somewhat Earth-like, if you can get over the lack of oxygen and the average temperature just below freezing. So, maybe not a great place to visit, but it would be nice to see if life, uh, found a way anywhere else in the universe.
Attention Fortran fans: your favorite language isn’t quite dead yet. In fact, it cracked the top ten on one recent survey, perhaps on the strength of its numerical and scientific applications. The “Programming Community Index” is perhaps a bit subjective, since it’s based on things like Google searches for references to particular languages. It’s no surprise then that Python tops such a list, but it’s still interesting that there’s enough interest in a 67-year-old programming language to make it onto the list. We’d probably not advise building a career around Fortran, but you never know.
For all intents and purposes, photography here in 2024 is digital. Of course chemical photography still exists, and there are a bunch of us who love it for what it is, but even as we hang up our latest strip of negatives to dry we have to admit that it’s no longer mainstream. Among those enthusiasts who work with conventional black-and-white or dye-coupler colour film are a special breed whose chemistry takes them into more obscure pathways.
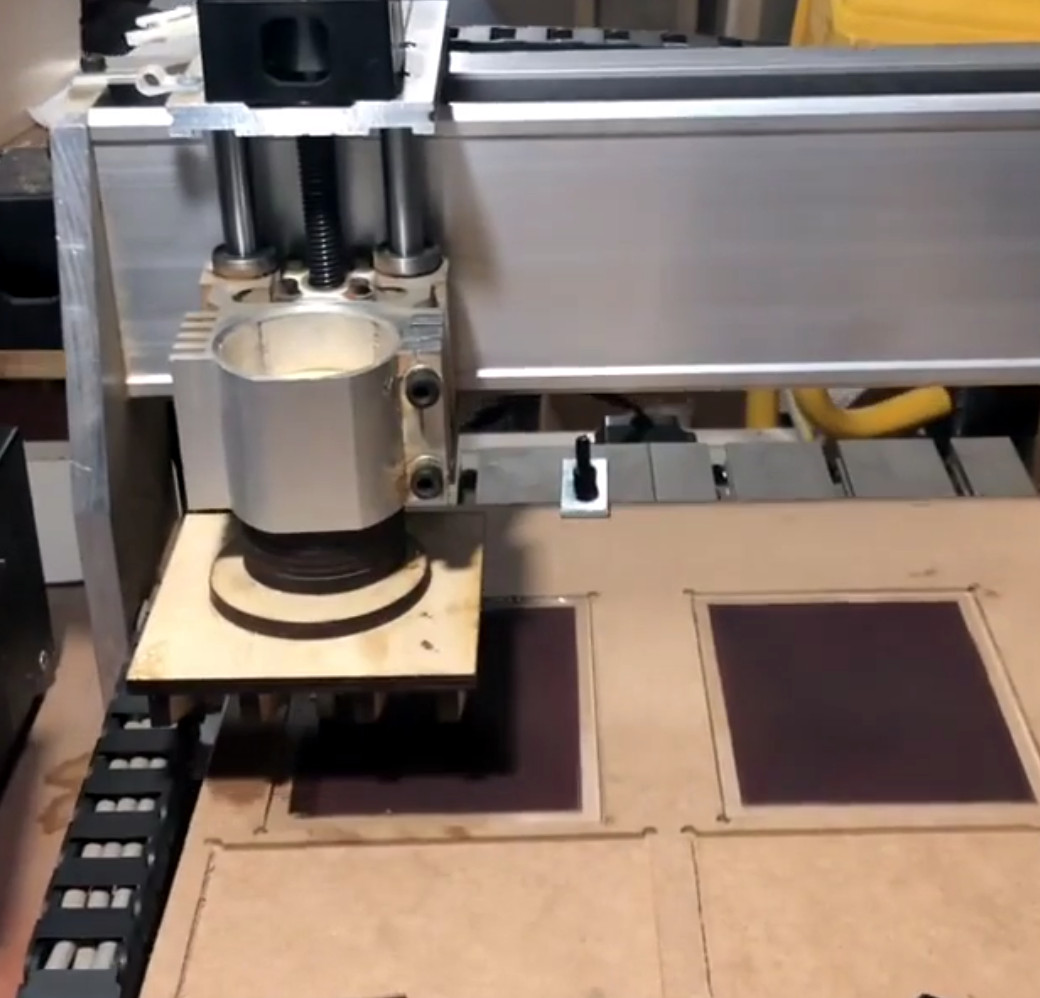
Wet-collodion plates for example, or in the case of [Jon Hilty], the Lumière autochrome process. This is a colour photography process from the early years of the twentieth century, employing a layer of red, green, and blue grains above a photosensitive emulsion. Its preparation is notoriously difficult, and he’s lightened the load somewhat with the clever use of CNC machinery to automate some of it.
Pressing the plates via CNC
His web site has the full details of how he prepares and exposes the plates, so perhaps it’s best here to recap how it works. Red, green, and blue dyed potato starch grains are laid uniformly on a glass plate, then dried and pressed to form a random array of tiny RGB filters. The photographic emulsion is laid on top of that, and once it is ready the exposure is made from the glass side do the light passes through the filters.
If the emulsion is then developed using a reversal process as for example a slide would be, the result is a black and white image bearing colour information in that random array, which when viewed has red, green, and blue light from those starch filters passing through it. To the viewer’s eye, this then appears as a colour image.
We can’t help being fascinated by the autochrome process, and while we know we’ll never do it ourselves it’s great to see someone else working with it and producing 21st century plates that look a hundred years old.


![The film scanner [xssfox] found, in the center of a table, with other stuff strewn across the table](https://hackaday.com/wp-content/uploads/2024/05/hadimg_iscsi_scanner_feat.png?w=600&h=450)