Removing The Air Gap From An IPad Display

Some recent models of the Apple iPad have a rather annoying air gap in between the display and the outer touch surface. This can be particularly frustrating for users that press hard or use the Apple Pencil regularly. It is possible to eliminate this gap in the iPad 9, at least, as demonstrated by [serg1us_eng]. (Warning: TikTok)

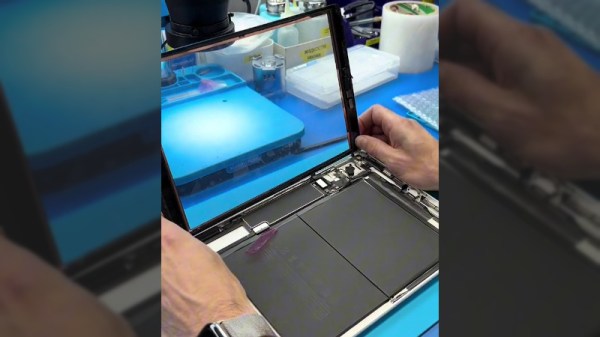
Doing the job well takes some finesse, however, and plenty of fancy equipment. The iPad’s front touch glass was first covered to avoid scratches during the work, and then heated to 60 C to remove it. The display was also removed, with several glued-down ribbon cables having to be carefully pried off to avoid damage. A layer of transparent material was then cut to size to fit in the gap between the display and the front glass, with the stack laminated together. Getting this result without air bubbles or dust particles spoiling the result involved the use of a heated press and a clean room, which are now widely used in phone repair shops around the world.

For the average user, it might not be a big deal. For power users and touch-and-feel fanatics, though, there’s great appeal in an iPad without this annoying flaw. Video after the break.

Continue reading “Removing The Air Gap From An IPad Display”

Ingenuity’s 62nd Flight And Attempting A New Speed Record

One of the fun aspects of exploring a new planet is that you can set a lot of new records, as is the case with the very first Mars-based helicopter, Ingenuity. Since its inaugural flight on April 19th of 2021, Ingenuity has flown 61 times, setting various records for distance traveled and other parameters. Although setting the first record is easy on account of anything being better than literally nothing, the real challenge lies in exceeding previously set records, as the team behind Ingenuity seeks to do again with flight 62 and a new speed record.

Targeting October 12th, the goal is to travel 268 meters (1.33 furlong) at a maximum altitude of 18 meters while hitting 10 meters per second (36 km/h), which would shatter the 8 m/s (28.8 km/h) set by flight 60. Although still quite a distance to the 240 m/s required to hit Mach 1 on Mars, the fact that this feat is being performed by a first-of-its-kind helicopter in the thin Martian atmosphere, using off-the-shelf components that were expected to last maybe a handful of flights, is nothing short of amazing.

(Thanks to [Mark Stevens] for the tip!)

(Top image: Fourth flight of Ingenuity (circled), captured by Perseverance rover. Source: NASA/JPL)

2023 Halloween Hackfest: Musical Jack-o-Lanterns Harmonize For Halloween

Halloween is many things to many people. For some, it’s a chance to dress up and let loose. For others, it’s a chance to give everyone in the neighborhood a jump scare. For [Aaron], it’s the perfect time to put on a show in the yard with some musical, light-up jack-o-lanterns.

[Aaron] came across some deeply-discounted light-up jack-o-lanterns a few years ago. They all had one of those Try Me buttons that’s powered by a couple of coin cells and uses a temporary two-wire connection to the PCB, and [Aaron] figured he could remotely control them using this port of sorts.

Now the guts are made of addressable RGB LEDs that are connected through the battery compartment via weatherproofed pigtails.

On the control side, he has a Raspberry Pi 3, an amplifier, and a couple of power supplies all housed in a weatherproof box. Since it’s not possible to multiplex both the lights and the audio on a Pi 3, he added a USB sound card into the mix.

Be sure to check out the awesome demo video after the break, followed by a pumpkin conversion video.

If you’re more into scaring people, carve up an animated evil-eye pumpkin.

Continue reading “2023 Halloween Hackfest: Musical Jack-o-Lanterns Harmonize For Halloween”

Badminton String Winder Gets The Tension Just Right

If you want to keep your badminton game at its peak, you’ll need a good racket with a proper set of strings. When an injury kept [Antonie Colin] off the court for a few months, building a restringing machine helped pass the time.

The design is straightforward, using commonly-available motion components and 3D-printed parts. The round assembly at one end is used to hold the racket during the restringing process. A leadscrew mechanism driven by a stepper motor is used to apply tension to the strings, anywhere from 18 lbs to 34 lbs. Strings can also be prestretched if so desired. The stringing process is managed by an Arduino, which uses a loadcell to monitor tension placed on the strings. An LCD screen on the device provides feedback on the process and allows various functions to be selected. Flying clamps are used to hold strings in place during the process, either fitted from above or below the device as needed.

If you find yourself regularly restringing your badminton racket, or you simply don’t trust your local pro shop to do so, you might find this build useful. You might also like to build a shuttlecock launcher for training if your practice partners aren’t available on the regular. Our badminton department is looking rather bare at the moment, so don’t hesitate to send your own nifty hacks in to the tipsline!

Hackaday Prize 2023: AC Measurements Made Easy

When working on simple DC systems, a small low-cost multimeter from the hardware store will get the job done well enough. Often they have the capability for measuring AC, but this is where cheap meters can get tripped up. Unless the waveform is a perfect sinusoid at a specific frequency, their simple algorithms won’t be able to give accurate readings like a high-quality meter will. [hesam.moshiri] took this as a design challenge, though, and built an AC multimeter to take into account some of the edge cases that come up when working with AC circuits, especially when dealing with inductive loads.

The small meter, an upgrade from a previous Arduino version that is now based on the ESP32, is capable of assessing root mean square (RMS) voltage, RMS current, active power, power factor, and energy consumption after first being calibrated using the included push buttons. Readings are given via a small OLED screen and have an accuracy rate of 0.5% or better. The board also includes modern design considerations such as galvanic isolation between the measurement side of the meter and the user interface side, each with its own isolated power supply.  The schematics and bill-of-materials are also available for anyone looking to recreate or build on this design.

With the project built on an easily-accessible platform like the ESP32, it would be possible to use this as a base to measure other types of signals as well. Square and triangle waves, as well as signals with a large amount of harmonics or with varying frequencies, all need different measurement techniques in order to get accurate readings. Take a look at this classic multimeter to see what that entails.

Continue reading “Hackaday Prize 2023: AC Measurements Made Easy”

USB-C For Hackers: Build Your Own PSU

What if you wanted to build your own USB-C PSU? Good news – it’s easy enough! If you ever wanted to retrofit a decent DC PSU of yours to the USB-C standard, say, you got a Lenovo/HP/Dell 19V-20V charger brick and you’ve ever wished it were USB-C, today is the day when we do exactly that. To be fair, we will cheat a bit – but only a tiny bit, we won’t be deviating too much from the specification! And, to begin with, I’ll show you some exceptionally easy ways that you can turn your DC PSU into a USB-C compatible one, with a simple module or a few.

Turning a 20 V PSU into a USB-C PSU feels natural if you want to charge a laptop – those tend to request 20 V from a USB-C PSU anyway, so what’s the big deal? However, you can’t just put 20 V onto a USB-C connector – you have to add a fair bit of extra logic to make your newly christened USB-C PSU safe to use with 5 V devices, and this logic also requires you go through a few extra steps before 20 V appears on VBUS. Any USB-C PSU has to output 5 V first and foremost whenever a device is connected, up until a higher voltage is negotiated digitally, and the PSU may only switch to a higher voltage output when it’s requested to do so.

Now, for that, a PSU offers a list of profiles, and we looked into those profiles in the Replying PD article – each profile is four bytes that contain information about the profile voltage, maximum current that the device may draw at that voltage, and a few other details. For a PSU to be USB-C compliant, the USB-C specification says that, in addition to 5 V, you may also offer 9 V, 15 V, and 20 V.

Also, the specification says that if a PSU supports certain in-spec voltage like 15 V, it’s also required by the spec to offer all of the spec-defined voltages below the maximum one – for 15 V, that also requires supporting 9 V. Both of these are UX requirements, as opposed to technical requirements – it’s easier for device and PSU manufacturers to work with a small set of pre-defined voltages that majority of the chargers will support, but in reality, you can actually offer any voltage you want in the PSU advertisement; at worst, a device is going to refuse and contend with slowly charging from the 5 V output that you’re required to produce.

I’d like to walk you through how off-the-shelf USB-C PSUs work, all of the options you can use to to create one, and then, let’s build our own USB-C PSU from scratch! Continue reading “USB-C For Hackers: Build Your Own PSU”

Hackaday Superconference 2023: Workshops Announced, Get Tickets Now!

Last week, we announced just half of our fantastic slate of talks for Supercon. This week, we’re opening up the workshops. The workshops are small, hands-on opportunities to build something or learn something, lead by an expert in the field. Workshops sell out fast, so register now if you’re interested.

And stay tuned for the next round of talk reveals next week! And maybe even the badge reveal?

Andy Geppert
Weave Your Own Core Memory – Core16!

This workshop provides you with the opportunity to weave your own core memory! Using 16 authentic ferrite core bits and 16 RGB LEDs, you can play tic-tac-toe, paint with a magnetic stylus, and create your own interactive experiences. Andy Geppert will guide you through the assembly of Core16. The Core16 kit is the little brother of the Core64 kit. The smaller Core16 kit reduces assembly time/cost, enabling more people to experience the challenge and satisfaction of creating their own core memory.

Travis Foss
Presented by DigiKey: Introduction and expansion of the XRP Robotics Platform

In this workshop you will be able to get your hands on the new XRP (Experiential Robotics Platform) and take the basics a step further with a few additional parts. Along with the base kit, participants will have the opportunity to install a RGB twist encoder, a LCD screen, and a buzzer to create a setup that will allow the user to choose a program onboard without being tethered to a computer.

Becky Button
How to Make a Custom Guitar Pedal

Musical effects are for everybody! Join this workshop and get hands-on experience assembling and programming your musical effects pedals. Walk away from this workshop with the capability of integrating multiple musical effects into 1 device and reprogramming the pedal with any effects you want!

Daniel Lindmark
From Zero to Git: 1 Hour Hardware Git Bootcamp

In this workshop, you will learn all about basic git operations, including how to download and install the client, setting up a repo, synching changes, and much more. Learn how to navigate common issues and take advantage of a live FAQ during the workshop.

Jazmin Hernandez
Solder and Learn How to Use Your Own Anti-Skimmer (HunterCat)

Have you ever been vulnerable to data theft? Do you fear using your bank card in ATMs or even in a restaurant? Protect your information from potential skimmers in this workshop while you learn to solder some components of your anti-skimmer/magnetic stripe clone detectors. By the end of the workshop, you’ll have a device to insert before using your bank card to check for potential issues.

Matt Venn
Tiny Tapeout – Demystifying Microchip Design and Manufacture

In this workshop, you can design and manufacture your own chip on an ASIC. You will learn the basics of digital logic, how semiconductors are made, the skills needed to use an online digital design tool for simulation, and how to create the GDS file for manufacturing. Participants will also have the option to submit their designs to be manufactured as part of the Tiny Tapeout project.

You can’t attend the workshops without attending Supercon, so get your tickets!  (As we write, there are only ten more…)