General admission tickets for this weekend’s Hackaday Remoticon are only available for two more hours! These are free, but you need to have one to get in on tonight’s Bring-a-hack.
Today’s Live Events:
The Community Bring-a-Hack meetup for all general admission ticket holders begins today at 16:00 PST. Check the ticketing hub page for your link to the event which is being held on Remo.
Live streaming events open to the public will begin on Saturday at 10:00 PST with open remarks and Kipp Bradford’s keynote talk. Workshops and the SMD Challenge will live-stream all day. And Alfred Jones will present his keynote at 18:30 PST followed by the Hackaday Prize Ceremony. Follow our media channels to be notified of all live streams:
It seems like just yesterday (maybe for some of you it was) we were installing Windows 3.1 off floppy drives onto a 256 MB hard drive, but hard drives have since gotten a lot bigger and a lot more complicated, and there are a lot more options than spinning platters.
The explosion of storage options is the result of addressing a variety of niches of use. The typical torrenter downloads a file, which is written once but read many times. For some people a drive is used as a backup that’s stored elsewhere and left unpowered. For others it is a server frequently reading and writing data like logs or swap files. In all cases it’s physics that sets the limits of what storage media can do; if you choose wisely for your use case you’ll get the bet performance.
The jargon in this realm is daunting: superparamagnetic limit, LMR, PMR, CMR, SMR, HAMR, MAMR, EAMR, XAMR, and QLC to name the most common. Let’s take a look at how we got here, and how the past and present of persistent storage have expanded what the word hard drive actually means and what is found under the hood.
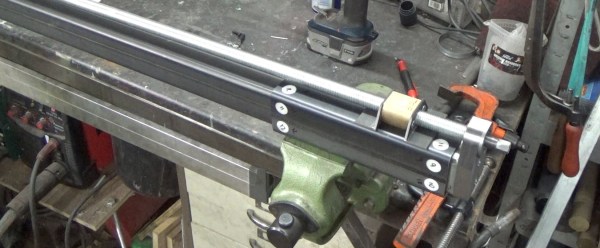
The rise of cost-effective CNC platforms like 3D printers, routers, and laser cutters has gone hand in hand with the availability of affordable and accurate linear rails and extrusions. However, they quickly become expensive when you need something for heavy loads. [Andy Pugh] found himself in need of a large linear slide, so he resorted to making his own with steel square tubing and a bit of PTFE (Teflon).
The PTFE slider/spacers
[Andy] needed a compact motorcycle lift for his small workshop, so he designed one with a single vertical tube that mounts on his floor. The moving part of the lift is a slightly larger tube, onto which the motorcycle mounts. To allow the outer part to slide easily [Andy] machined a set of 16 PTFE spacers to fit between the surfaces of the tubes. The spacers have a small shoulder that lets them mount securely in the outer tube without pushing out. After a bit of fine-tuning with a file, it slides smoothly enough for [Andy]’s purposes. With a large lead screw mounted onto the lift, he can easily lift his 200 kg motorcycle with a cordless drill, without taking up all the floor space required by a traditional motorcycle lift.
Although the Teflon spacers will wear with regular use and, they are more than good enough for the occasional motorcycle service, and are also easy to replace. You may not want to use this on your next CNC machine build, but it is a handy blueprint to keep in your mental toolbox for certain use-cases. These spacers were machined on a lathe, but we found that very similar looking PTFE parts are sold as “wrist pin buttons” for the piston of old air cooled VW engines, and could be modified for the purpose.
For other lifting applications, check out this hydraulic workbench, and this forklift for moving stuff in your crawl space without crawling.
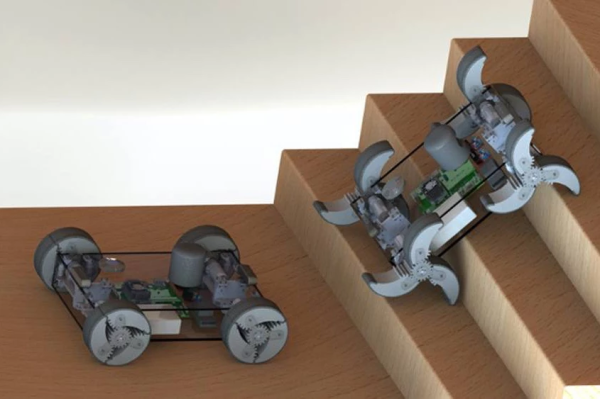
Out of the thousands of constraints and design decisions to consider when building a robot, the way it moves is perhaps one of the most fundamental. The method of movement constrains the design and use case for the robot perhaps more than any other parameter. A team of researchers at Texas A&M led by [Kiju Lee] is trying to have their cake and eat it too by building a robot with wheels that transform into legs, known as a-WaLTR (Adaptable Wheel-and-Leg Transformable Robot).
a-WaLTR was designed to conquer one of wheeled robots’ biggest obstacles: stairs. By adding a bit of smarts to determine whether a given terrain is better handled by wheels or legs, a-WaLTR can convert its segmented wheels into simple legs. Rather than implemented complex and error-prone articulated legs, the team stuck with robust appendages that remind us a little of whegs.
The team will show off their prototype at DARPA OFFSET Sprint-5 in February 2021, which is a program focused on building robots that can form adaptive human-swarm teams.
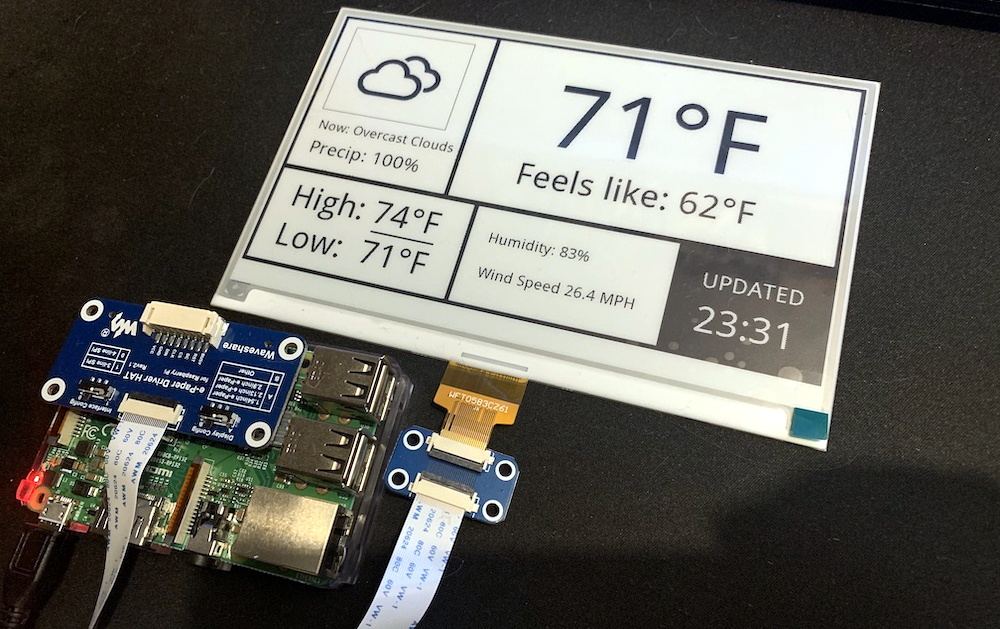
As e-paper modules have become more affordable, we’ve started to see them pop up more and more in hacker projects. It used to be that you had to force a second-hand Kindle to do your bidding, but now you can buy just the screen itself complete with a header to plug right into your Raspberry Pi. It will still cost you as much as a used Kindle…but at least it comes with some documentation and there are Python libraries to talk to it.
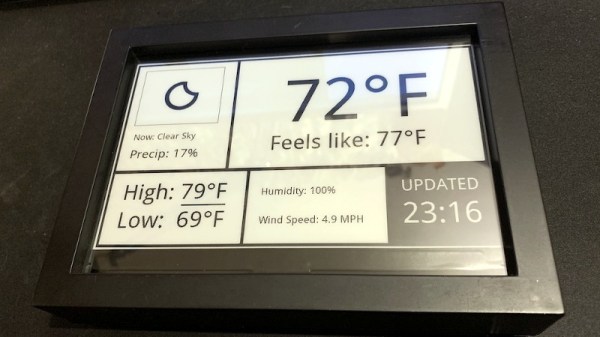
But where to start? If you need some inspiration, and perhaps a little source code, this very slick weather display put together by [James Howard] is a great as baseline. Not that it really needs any additional refinement, as we think it already looks gorgeous. But rather than starting from scratch for your own project, it would be much easier to graft some additional functionality onto his code.
A lot of that has to do with how concise and well commented his code is. We’ve seen enough of these projects to know the kind of spaghetti that’s often running on the backend, but there’s none of that here. [James] assembles the display using the powerful Pillow graphics library, which lets you draw primitives and drop in text and icons with just a couple lines of code.
Once all the data is plugged in, the entire screen is saved as an image file which is then opened up on the e-paper display. Even if you aren’t a Python expert, you should be able to understand what’s happening and how to bend it to your will.
Hackaday editors Mike Szczys and Elliot Williams dig through the greatest hacks that ought not be missed this week. There’s a wild one that flexes engineering skills instead of muscles to beat the homerun distance record with an explosively charged bat. A more elegant use of those engineering chops is shown in a CNC software tool that produces intricate wood joinery without needing an overly fancy machine to fabricate it. If your flesh and blood pets aren’t keeping up with your interests, there’s a new robot dog on the scene that far outperforms its constituent parts which are 3D-printed and of the Pi and Arduino varieties. And just when you thought you’d seen all the craziest retrocomputers, here’s an electromechanical relay based machine that took six years to build (although there’s so much going on here that it should have taken sixteen).
Take a look at the links below if you want to follow along, and as always, tell us what you think about this episode in the comments!
While the cost of a hobby-grade remote control transmitter has dropped significantly over the last decade or so, even the basic models are still relatively expensive. It’s not such a big deal if you only need to get one for personal use, but for a school to outfit a classroom’s worth of students their own radios, they’d need to have a serious STEM budget.
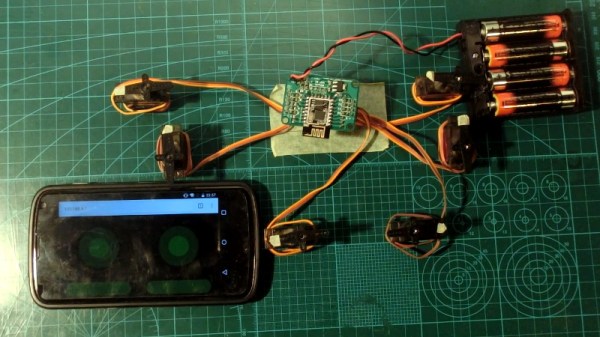
Which is why [Miharix], himself an educator with a decade of experience, developed a project that leverages the ESP8266 to create affordable RC vehicles that can be controlled with a smartphone’s web browser. There’s a bit of irony at play since the smartphones are more expensive than the RC transmitters would have been; but with more and more school-age kids having their own mobile devices, it takes the cost burden off of the educators. Depending on the age of the students, the teacher would only need to keep a couple of burner phones on hand for student that doesn’t have a device of their own.
A custom PCB makes connections easier for students.
In its fully realized form, the project uses an open hardware board that allows standard RC hobby servos to be connected to the GPIO pins of a ESP-12E module. But if you don’t want to go through the trouble of building the custom hardware, you could put something similar together with an ESP development board. From there it’s just a matter of installing the firmware, which starts up a server providing a touch-based controller interface that’s perfect for a smartphone’s screen.
Since the ESP8266 pops up as an Access Point that client devices can connect to, you don’t even need to have an existing network in place. Or Internet access, for that matter. [Miharix] says that in tests, the range between a common smartphone and the ESP8266 is approximately 85 meters (260 feet), which should be more than enough to get the job done.