Copying Objects In 3D

photocopier

[Pulse 9] sent in a very interesting project he just finished up at an internship. It’s a 3D photocopier that scans an object and then mills said object into floral foam.

The copier is made out of material [Pulse] found sitting around – PVC, drawer slides for the X and Y axes, acrylic for the structure, and broken printer parts for the Z axis.

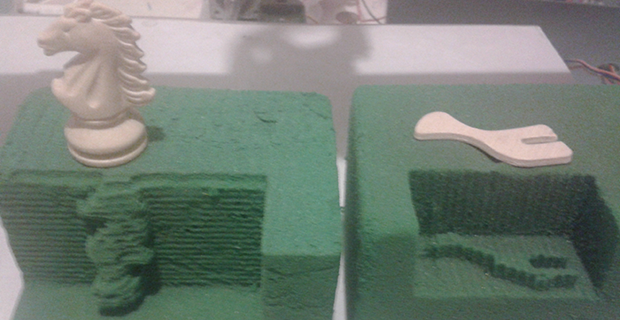
To scan an object, [Pulse] puts an object down on the bed and scans it with a laser and webcam. The images recorded on the camera are fed into MATLAB. The output from MATLAB is sent over serial to a custom board containing a PIC18F4620 that controls the axis motors. The spindle for this floral foam router is a simple drill; one layer at a time, the drill mills out the unneeded foam which can be sucked up by a vacuum when the object is complete.

Below you’ll find [Pulse]’s demo of his photocopier and a piece the local news did on the project. If anyone is willing to translate that story, feel free to do so in the comments.

Continue reading “Copying Objects In 3D”

3D Printed Guitar

We’re not sure how we missed this one, but it definitely deserves a look. Professor of Mechtronics [Olaf Diegel’s] 3D printer must go to 12, because he’s printed these incredible electric guitar bodies. You probably won’t be making your own on your filament printer, however, because [Diegel] uses SLS (Selective Laser Sintering) to create the body out of nylon, then he dyes the resulting piece in a two-step process. You can read more about the construction specifics on his website.

And, they’re more than just eye-candy: the guitars sound brilliantly metallic. There are more than enough pictures and videos to keep you occupied on the site, where you can sift through all eight designs to your heart’s content. You’ll want to keep reading for a couple of videos embedded after the break, which feature some demonstrations of the guitar and comparisons to traditional electric guitars, as well as a brief history of its construction and build process.

Continue reading “3D Printed Guitar”

Touring Deezmaker, The First *Good* 3D Printer Store In The World

When we visited the Crash Space hackerspace earlier this week, it came to our attention we were staying mere blocks away from Deezmaker, a 3D printer store in beautiful Pasadena that is home base for the Bukobot and Bukito printers, an awful lot of awesome printed plastic things, and [Rich] a.k.a [whosawhatsis], creator of the RepRap Wallace and all this stuff. Obviously a tour was in order.

Inside Deezmaker is a treasure trove of printed baubles and a fishbowl full of a herringbone planetary gear systems free for the taking. They have printers running all the time, a very nice lab for [whosawhatsis], and enough work space to host a few workshops every week.

In the video below, [Diego], the big cheese of Deezmaker takes us around the shop showing off his wares. [whosawhatsis] also makes an appearance showing off his latest invention, the Bukito printer. It’s a very small and incredibly portable printer that can be powered by batteries. They’re using a 3-cell 5000mAh lipo battery when they take the Bukito camping. I didn’t catch how long the battery lasts, but it’s more than enough to squirt out a few of the gear systems they give away.

Video after the break.

Continue reading “Touring Deezmaker, The First *Good* 3D Printer Store In The World”

3D Printering: Making A Thing In Autodesk 123D

printering

In the continuing battle against 3D printers used exclusively for fabricating plastic octopodes and useless trinkets, here’s yet another installment of a Making A Thing tutorial. If you’ve ever wanted to make one single object in multiple 3D design softwares, this is for you.

Previously, we’ve built a ‘thing’ in a few different 3D modeling programs, including:

See that ‘Read more…’ link below? You might want to click that.

Continue reading “3D Printering: Making A Thing In Autodesk 123D”

A Quick And Simple Filament Joiner For Multi-Color Prints

Filament splicer

[Malcolm] was having a grand time with his new 3D printer. He was getting tired of monochromatic prints, though. Not having a machine with multiple extruders, he went looking for a way to join pieces of filament. There were a few designs on Thingiverse, but they required milled parts that he didn’t have the tools to recreate. Rather than invest in a mill, [Malcolm] decided to build his own filament joiner. He started by raiding his wife’s hair care tools. His first test was a curling iron. It had the heat, but lacked a good surface to join the filament. [Malcolm’s] next test was a ceramic hair straightener, which he found to be the perfect tool.

The splicing process is simple. Start with a hot iron, then lay two pieces of filament on top of the short end of the iron. They soften quickly and melt together. [Malcolm’s] real trick is to slightly pull the joint once the two pieces have joined. Pulling causes the filament to stretch, slightly reducing the diameter of the joint. A thinner joint helps prevent extruder jams as the joint passes through. This method works great for PLA. We’d love to see if it works for ABS as well.

Click past the break for an example piece and for [Malcom’s] instructional video.

Continue reading “A Quick And Simple Filament Joiner For Multi-Color Prints”

3D Printering: Making A Thing With SketchUp

printering

Imagine for a second it’s the mid-1980s and you’re looking in to desktop publishing setups. Those new LaserJets and LaserWriters are pretty cool, but imagine the desktop publishing world if you couldn’t create your own documents. Yes, it seems absurd to have a printing press that won’t create unique documents.

Now flash forward 30 years to the world of desktop manufacturing and rapid prototyping. There are dozens of repositories for 3D printable objects, but making something of your own design is apparently a dark art and arcane knowledge to everyone buying 3D printers for plastic octopodes and bottle openers.

This week, by popular demand, we’re going to be making a ‘thing’ in SketchUp Make. It’s free, easy, and surprisingly versatile despite its limited tool set. Common sense and Google algorithms dictate I link to previous tutorials in this series below:

And now on with the show. You’re gonna want to click the ‘read more’ link.

Continue reading “3D Printering: Making A Thing With SketchUp”

Creating PCBs With 3D Resin Printers

PCB

The folks over at Full Spectrum Laser are Kickstarting their own 3D printer – a stereolithography machine like the Form 1 and B9 Creator printers. During their testing, they discovered a new application for these SLA printers that should prove to be very useful for the makers and builders using machines – manufacturing PCBs with UV-sensitized copper clad boards.

Full Spectrum Laser’s printer – the Pegasus Touch – uses a near UV laser and a galvo system to build objects in UV-curing resin layer by layer. In retrospect it seems pretty obvious a UV laser would expose UV sensitive boards, but this discovery simply reeks of cleverness and is a nice ‘value added’ feature for the Pegasus printer.

The Pegasus printer has a laser spot size of 0.25mm, meaning the separation between traces on Pegasus-produced PCBs will be just under 10 mils. That’s a bit larger than the limits of laser printer-based PCB fabrication but far, far less complicated. Making a PCB on an SLA printer is as easy as removing the resin tank and putting a sensitized board on the build platform. Draw some traces with the printer, and in a few minutes you have an exposed board.

We’d really like to see if this technique can also be used with other SLA printers. if anyone out there would like to experiment, be sure to send the results into the tip line.

Video from Full Spectrum Laser below.

Continue reading “Creating PCBs With 3D Resin Printers”