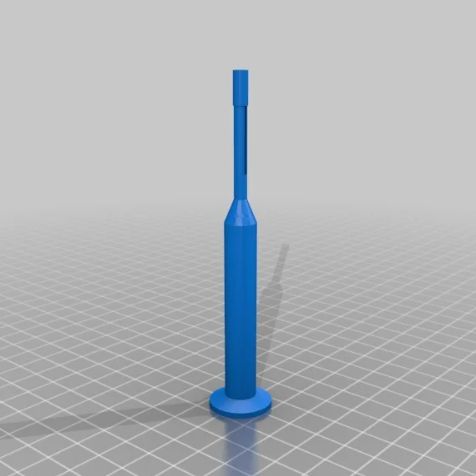
Sometimes, you see a project that isn’t a technical powerhouse but just looks so good you can’t help but think about duplicating it. That’s how we felt with the mini-neon signs made by [makerverse]. From an electronics point of view, it is just some filament LEDs and a 3D-printed casing. But, as you’ll see in the video below, these look like little miniature neon signs, and they look great.
Although we might use a different set of tools to get there, the idea is to create your text in DXF, extrude it in CAD, and then print a dark shell with a light or translucent center using a filament change. Glow-in-the-dark filament is also an option. Obviously, if you are handy in any CAD tool, you could easily pull this off.
Although less popular these days, wire-wrap is still a very relevant, easily reversible solder-free way to assemble (prototype) systems using wire-wrap wire and a wire-wrap tool. This latter tool can be either a hand or powered tool, but all it has to do is retain the stripped wire, fit around the wire-wrapping post and create a snug, oxidation-proof metal-metal contact fit. For the very common 30 AWG (0.25 mm) wire-wrap wire, the Jonard Tools (OK Industries) WSU-30M wire-strip-unwrap tool is pretty much the popular standard. It allows you to strip off insulation, wrap and unwrap connections all with one tool, but the question is whether you can just 3D print a wrap-unwrap tool that’s about as good?
First a note about cost, as although the genuine WSU-30M has risen in cost over the years, it can still be obtained for around $50 from retails like Mouser, while clones of varying quality can be obtained for around $15 from your favorite e-tailer website. From experience, these clones have quite sloppy tolerance, and provide a baseline of where a wrapping tool becomes unusable, as they require some modding to be reliable.
Wire-wrap tool model by [KidSwidden] on Thingiverse.Taking a quick look at the wire-wrap tools available on Thingiverrse, we can see basically two categories: one which goes for minimally viable, with just a cylinder that has a hole poked on the side for the stripped wire to fit through, as these versions by [JLSA_Portfolio], [paulgeneres], [orionids] and [cmellano]. The WSU-30M and similar tools have a channel on the side that the stripped wire is fed into, to prevent it from getting tangled up and snagging. On the clone units this channel often has to be taped off to prevent the wire from escaping and demonstrating why retaining the wire prior to wrapping is a good idea.
This leads us to three examples of a 3D printed wire-wrap tool with such a wire channel: by [KidSwidden] (based on a Radio Shack unit, apparently), another by [DieKatzchen] and an interesting variation by [4sStylZ]. Naturally, the problem with such fine features is that tolerance matter a lot, with an 0.2 mm nozzle (for FDM printers) recommended, and the use of an SLA printer probably a good idea. It’s also hard to say what kind of wire-wrap connection you are going to get, as there are actually two variants: regular and modified.
The starting guide to wire-wrapping by Sparkfun uses the WSU-30M, which as the name suggests uses modified wire-wrap, which means that part of the wire insulation is wrapped around the bottom of the post, for extra mechanical stability, effectively like strain-relief. A lot of such essential details are covered in this [Nuts and Volts] article which provides an invaluable starting guide to wire-wrapping, including detecting bad wraps.
Naturally, the 3D printed tools will not include a stripper for the wire insulation, so you will have to provide this yourself (PSA: using your teeth is not recommended), and none of these 3D models include an unwrap tool, which may or may not be an issue for you, as careful unwrapping allows you to reuse the wire, which can be useful while debugging or reworking a board.
Top image: completed wire-wrap on a post. (Credit: Sparkfun)
Embossing (making raised shapes) and debossing (making sunken shapes) on 3D-printed surfaces is not a new idea; we do it all the time. [Cory] from Vancouver Hack Space was playing around with 3D printing on wood, and came up with the idea of creating raised tactile surfaces using a simple transfer process.
We don’t often try to print directly onto a wooden surface for various reasons, but [Cory] wanted to give it a go. They hoped to get some grain patterns to transfer to the surface, but as they say in the blog entry, the beauty of wood patterns is in the colouration, which doesn’t transfer. Next, they laser etched a logo into the wood surface to see how well that would transfer. It did create a discernable raised impression, but they forgot to mirror the image (oops!) and relevel the bed, so the results are less impressive than they could be. Still, it’s another useful technique to consider.
Embossing is the process by which braille sheets are made. This DIY braille encoder is pretty sweet. Of course, the process can simply be decorative. Here’s how to use a laser cutter to create your own embossing seals. The traditional way to emboss paper for a fancy effect was to use embossing powder to selectively change the properties of drying paper. But how can you make the stuff for cheap?
As a test artifact, 3DBenchy does a pretty good job of making sure your 3D printer is up to scratch. As an exemplar of naval architecture, though — well, let’s just say that if it weren’t for the trapped air in the infilled areas, most Benchy prints wouldn’t float at all. About the only way to make Benchy less seaworthy would be to make it out of cast iron. Challenge accepted.
We’ve grown accustomed to seeing [Denny] over at “Shake the Future” on YouTube using his microwave-powered kilns to cast all sorts of metal, but this time he puts his skill and experience to melting iron. For those not in the know, he uses standard consumer-grade microwave ovens to heat kilns made from ceramic fiber and lots of Kapton tape, which hold silicon carbide crucibles that get really, really hot under the RF onslaught. It works surprisingly well, especially considering he does it all on an apartment balcony.
For this casting job, he printed a Benchy model from PLA and made a casting mold from finely ground silicon carbide blasting medium mixed with a little sodium silicate, or water glass. His raw material was a busted-up barbell weight, which melted remarkably well in the kiln. The first pour appeared to go well, but the metal didn’t quite make it all the way to the tip of Benchy’s funnel. Round two was a little more exciting, with a cracked crucible and spilled molten metal. The third time was a charm, though, with a nice pour and complete mold filling thanks to the vibrations of a reciprocating saw.
After a little fettling and a saltwater bath to achieve the appropriate patina, [Denny] built a neat little Benchy tableau using microwave-melted blue glass as a stand-in for water. It highlights the versatility of his method, which really seems like a game-changer for anyone who wants to get into home forging without the overhead of a proper propane or oil-fired furnace. Continue reading “Microwave Forge Casts The Sinking-est Benchy Ever”→
If you want to smooth out the top surface of your FDM 3D prints, you can try ironing. Many slicers allow you to set this option, which drags the hot printhead through the top surface with a tiny bit of plastic to smooth out the extrusion lines. However, a recent paper explains how non-planar ironing can provide a better result.
Usually, non-planar printing requires rotating the print bed in addition to the normal linear motion. However, you can also manipulate the layer height in real time to create bulges in the 3D print. This is the approach taken by Curvislicer, which shares authors with this paper. Another approach is to build a part conventionally but add non-planar printing to the last few layers.
The non-planar ironing is a variation of the latter technique. After slicing, the top layer of g-code passes through a Python script. The results on a test object look very impressive. We’d be interested to see how some more complex shapes look, though.
Of course, it looks like all you need is an ordinary printer, a modified copy of Slic3r, and the script, so if you try it yourself, let us know what you think. It would be great to smooth prints without extra chemicals and post-processing. While you can get good results, it is a lot of work.
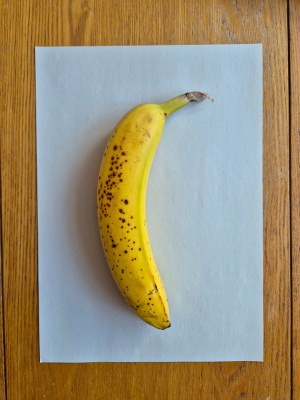
We love it when a community grabs hold of an idea and runs wild with it despite obvious practicality issues. Gridfinity by YouTuber [Zach Freedman] is one of those concepts. For the unaware, this is a simple storage system standard, defining boxes to hold your things. These boxes can be stacked and held in place in anything from a desk drawer to hanging off the side of a 3D printer. [Georgs Lazdāns] is one such Gridfinity user who wanted to create tool-specific holders without leaving the sofa. To do so, they made a web application using node.js and OpenCV to extract outlines for tools (or anything else) when photographed on a blank sheet of paper.
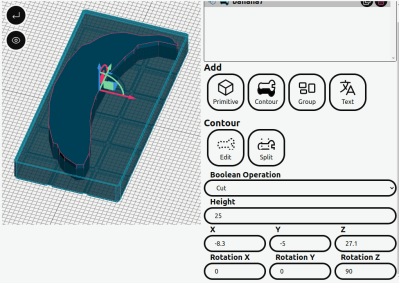
The OpenCV stack assumes that the object to be profiled will be placed on a uniformly colored paper with all parts of its outline visible. The first part of the stack uses a bilateral filter to denoise the image whilst keeping edge details.
Make a base, then add a banana. Easy!
Next, the image is converted to greyscale, blurred, and run through an adaptive threshold. This converts the image to monochrome, again preserving edge details. Finally, the Canny algorithm pulls out the paper contour. The object outline can be given an accurate scale with the paper contour and paper size specified. The second part of the process works similarly to extract the object outline. The second contour should follow the object pretty accurately. If it doesn’t, it can be manually tweaked in the editor. Once a contour is captured, it can be used to modify a blank Gridfinity base in the model editor.
The European Space Agency (ESA) is showing 3D-printed metal parts made onboard the International Space Station using a printer and materials the agency sent earlier this year. While 3D printing onboard the ISS is nothing new, the printing of metal parts in space is an important advancement. The agency’s goals are to be able to produce more tools and spares in situ rather than having to rely on resupply missions. An ambitious idea being pitched is to use captured space debris as input as well, which would further decrease the ISS’s dependence on Earth and expensive cargo runs from the bottom of the gravity well.