Fail Of The Week: Blown Light Bulb Controllers

fotw-nyc-resistor-chandelier-driver

We’ve been meaning to get around to this one for many weeks now. It’s been hard to find good fail write-ups… it’s as if hackers are afraid to admit that sometimes projects fail. We hope you’ll shake off that opinion as failure is the fastest path for learning and true understanding!

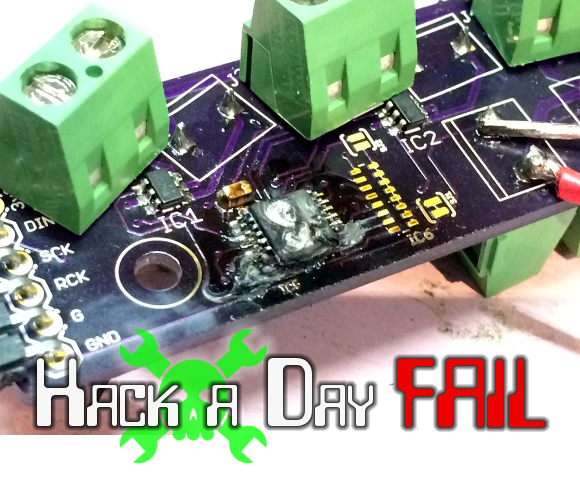
[xymax] was working on a control system for a chandelier with 150 bulbs which use 5 Watts each. This project was being readied for the NYC Resistor Interactive Party which [Adam Fabio] attended last month. As deadline for the show approached, the last piece was put in place late into the night… but it was connected backwards. In a tale worthy of a slapstick movie, the reverse polarity caused a chip on all seven controller boards for this module to blow like the one seen above. But that’s not all, the laptop being used during prototyping was connected by USB and started smoking!

All of us feel the pain of this type of equipment failure. Luckily [xymax] looked for lessons to learn instead of dwelling on the mistake itself. Use protection diodes, keyed connectors, and write about your failures. Hopefully reading this will help others avoid a similar equipment-destroying mistake.


2013-09-05-Hackaday-Fail-tips-tileFail of the Week is a Hackaday column which runs every Thursday. Help keep the fun rolling by writing about your past failures and sending us a link to the story — or sending in links to fail write ups you find in your Internet travels.

THP Hacker Bio: Radu.motisan

thp-contestant-bio-radu-motisan

Here’s a great example of thinking big while keeping it simple. [Radu Motisan‘s] putting together a global radiation monitoring network as his entry in The Hackaday Prize.

The simplicity comes in the silver box pictured above. This houses the Geiger tube which measures radiation levels. The box does three things: hangs on a wall somewhere, plugs into Ethernet and power, and reports measurements so that the data can be combined with info from all other functioning units.

After seeing the idea we wanted to know more about [Radu]. His answers to our slate of queries are found below.

Continue reading “THP Hacker Bio: Radu.motisan”

Developed On Hackaday: Demonstration Video And Feedback Request

http://www.youtube.com/watch?v=RYaz-s5SXCc

For months our dear Hackaday readers have been following the Mooltipass password keeper’s adventures, today we’re finally publishing a first video of it in action. This is the fruit of many contributors’ labor, a prototype that only came to be because of our motivation for open hardware and our willingness to spend much (all!) of our spare time on an awesome project that might be just good enough to be purchased by others. We’ve come a long way since we started this project back in December.

In the video embedded above, we demonstrate some of our platform’s planned functionalities while others are just waiting to be implemented (our #1 priority: PIN code entering…). A quick look at our official GitHub repository shows what it took to get to where we are now. What’s next?

We need your input so we can figure out the best way to get the Mooltipass in the hands of our readers, as our goal is not to make money. The beta testers batch has just been launched into production and I’ll be traveling to Shenzhen in two weeks to meet our assembler. When materials and fabrication are taken into account we expect each device to cost approximately $80, so please take 3 seconds of your time to answer the poll embedded below: (poll has ended)

Retrotechtacular: Build Yourself An Airplane

retrotechtacular-cub-j-3-piper

Planes these days are super complicated – think about the recent flaming-lithium battery issues in the B787 that may or may not have been solved – but it wasn’t always this way. Here’s a great example. The manufacture of a Piper J-3 Cub shows simple and efficient mechanical design brought to life in a multitude of steps all performed without automation.

The build starts with the frame. Pipes are nibbled into specialized fish mouths for a tight fit before being strapped to a jig and tack welded. With the fuselage in one piece the frame is removed for each joint to be fully welded and subsequently inspected. Cables are run through the frame to connect control surfaces to the cockpit. Continuing through to wing assembly we were especially surprised to see hand hammering of nails to secure the wood ribs to metal spars. How many nails do you think that worker pounded in a career? The entire aircraft is covered in fabric, an engine is added, and it’s into the wild blue yonder.

The look back at manufacturing techniques is interesting — do you think the large model shown in the video would be built these days, or would they just use a CAD rendering?

Continue reading “Retrotechtacular: Build Yourself An Airplane”

Hackaday Links: June 29, 2014

hackaday-links-chain

Ever see a really cool build on YouTube with no build details at all? Frustrating, right? That’s us with the NES Keytar covering the Game of Thrones theme. He’s using a Raspi with the sound chip in the NES to do live chiptunes. Freakin’ awesome. There’s also the ST:TNG theme as well.

A few years ago the folks at Oculus had an idea – because of cellphones, small, high resolution displays are really cheap, so why not make VR goggles? At Google IO this week someone figured out everyone already has a cellphone, so just wrap it in some cardboard and call it a set of VR goggles. You can get a kit here, but the only difficult to source components are the lenses.

What happens when you put liquid nitrogen under a vacuum? Well, it should evaporate more, get colder, and freeze. Then it breaks up into solid nitrogen snow. No idea what you would do with this, but there ‘ya go. Oh, [NC], we’re going to need a writeup of that LN2 generator.

About a month ago, the House4Hack hackerspace in South Africa told us of their plans to bring a glider down from 20km above the Earth. They finally launched it, The CAA only allowed them to glide back from 6km (20,000 feet), but even from there the foam glider hit 230kph (124 knots). That’s a little impressive for a foam FPV platform, and we’re betting something with a larger wingspan would probably break a spar or something. Shout out to HABEX.

All the electronic dice projects we’ve seen have one thing in common: they’re not cubes. Thus uberdice. It’s six nine-pixel displays on the faces of a cube, powered by a battery, and controlled by an accelerometer. Yes, it is by far the most complicated die ever made, but it does look cool.

Hacklet #5 – Hackerspaces And DIY Laptops

sector67

Did you know that Hackaday.io has a hackerspace index? That’s right, you can enter your local hackerspace’s info, pictures, videos, and social media links. Members and crew can link their hackaday.io profiles and drop comments about their latest projects.

The map up at the top of the hackerspace index’s page is interactive too – zoom in on your country and local area to see any spaces nearby. It’s like one-stop shopping for awesome. Well, except that this awesome is free.

It really is great to see all the pictures of spaces large and small. Some of the most stunning shots are from c-base, in Berlin, Germany. Founded in 1995, the c-base crew have created an incredible space. Take a look at the workstation in the photo. Is it Steampunk? Matrix-punk? Heck no, that’s 100% c-base.

c-base


Do It Yourself Laptops

You don’t have to be Bunnie Huang to build your own laptop. All it takes is some time, ingenuity,and a good hot glue gun.

opentech-laptop

Our first laptop is actually inspired by Bunnie’s Novena. The OpenTech-Laptop uses two binders as it’s shell, but inside hides some decent computing power. [OpenTech] used a miniITX motherboard with an ATOM N2800 CPU. The screen came from an old laptop (long live matte 4:3 screens!) [OpenTech] even hand wired a Low Voltage Differential Signaling (LVDS) cable so the motherboard can push those pixels. A wireless keyboard, hard drive, and speakers round out the build. [OpenTech] is still looking for a portable power solution.Why not follow Bunnie’s lead and grab some R/C Plane LiPo batteries, [OpenTech]?

minibsd

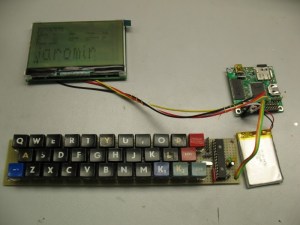
Next up is a MiniBSD laptop computer created by [Jaromir]. MiniBSD is based on RetroBSD, a PIC32 based BSD single board computer. Rather than use a premade platform like the Fubarino, [Jaromir] laid out his own board with everything he wanted – a microSD socket, SDRAM, real-time clock, and all the trimmings. He then added a graphical LCD, a LiPo battery, and a sweet retro keyboard from an old Czech computer company called Tesla. [Jaromir’s] next task is a 3D printed case. The only problem is the case is 2cm wider than his current printer’s bed!

http://hackaday.io/project/1559-Laptop-pi

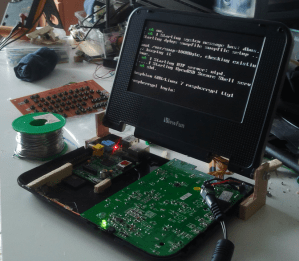
You didn’t think we’d leave the Raspberry Pi out, now did you? Laptop-pi is [Bram’s] project to convert an old DVD player (remember those?) into a Pi Laptop. Not only did [Bram] build a QWERTY keyboard from scratch on perfboard, he also hacked together an on-screen keyboard so he can type with just a D-pad. He’s currently fighting with a dodgy audio amp, but we’re sure that’s just a temporary setback. We think Laptop-pi will be a killer portable for retro gaming!


That’s it for this week’s Hacklet, stay tuned for next week when we bring you more of what’s happening at Hackaday.io!

THP Hacker Bio: David Cook

thp-contestant-bio-david-cook

[David Cook] has been on the front page with gnarly hacks many times. We’re happy to present his Hackaday Projects profile as this week’s Hacker Bio.

His entry for The Hackaday Prize is something of a one-wireless-pair-to-rule-them approach to connected devices which he calls LoFi. We were delighted by his first demo video which is exactly what we envisioned for preliminary entries; [David] explains the concept and how he plans to implement it using a few visual aids to drive the point home.

Join us after the break to find out more about [David]. Oh, if you’re wondering about the times he’s been featured on Hackaday, check out his capacitor/coin cell swap which is one of our favorites.

Continue reading “THP Hacker Bio: David Cook”