Retrotechtacular: Programming By Card

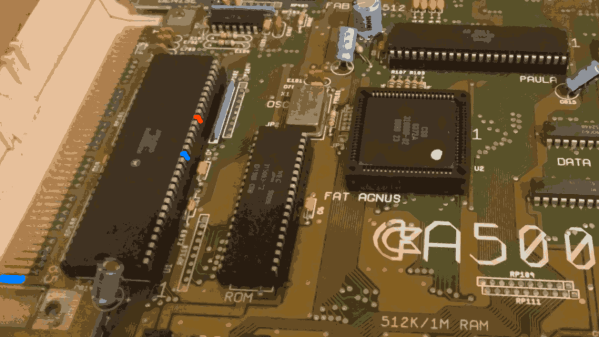
The recent Supercon 6 badge, if you haven’t seen it, was an old-fashioned type computer with a blinky light front panel. It was reminiscent of an Altair 8800, a PDP-11, or DG Nova. However, even back in the day, only a few people really programmed a computer with switches. Typically, you might use the switches to toggle in a first-level bootloader that would then load a better bootloader from some kind of storage like magnetic or paper tape. Most people didn’t really use the switches.

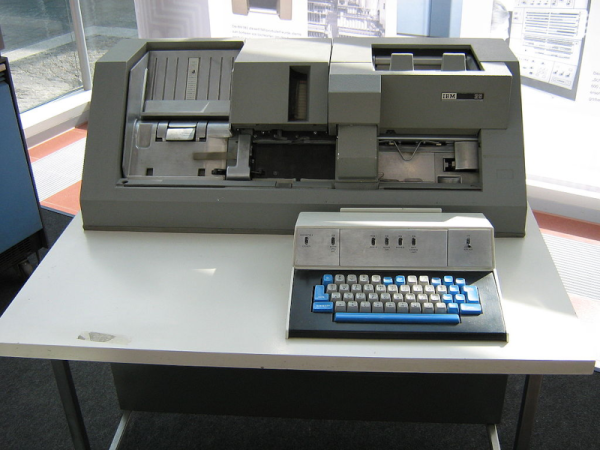
What most people did do, however, was punch cards.  Technically, Hollerith cards, although we mostly just called them cards, punched cards, or IBM cards. There were a lot of different machines you could use to punch cards, but none were as popular, I would guess, as the IBM 029. Certainly, the models in the series were overwhelmingly what people used to punch cards.

For the uninitiated, a card was about the size of an old-fashioned dollar bill — the ones in style when Herman Hollerith invented them. The card was made of material not quite as thick as a standard file folder and was divided into 80 columns and 12 rows. Later cards had more columns, but those never really caught on to the same scale as the classic 80-column card. Continue reading “Retrotechtacular: Programming By Card”

Z80 Gets New OS

If you have a soft spot for a Z80 computer but want a new operating system experience, try Zeal. You can watch a demo of the open-source OS in the video below.

As you might expect, the whole system is written in Z80 assembly language. The features you expect are there: files, directories, device drivers, a clock, and even memory banking to support up to 16M of memory. The work isn’t totally done, nor is the initial target computer — Zeal — but it looks like a great piece of work so far and will be of interest to anyone who has a Z80.

Continue reading “Z80 Gets New OS”

Cheap Scope Troubleshoots Commodore

[Adrian] had a Commodore computer to fix and decided to see how his latest tiny portable scope would work. He paid $57 for the tiny little test instrument although the current price seems higher. It claims to have 120MHz bandwidth along with 500 megasamples per second. There are several versions with different claimed specs, but we did find a similar device for under $60. You can see the unboxing and how it worked in the video below.

Of course, these kinds of instruments often overstate their specs, and [Adrian] was also suspicious. One odd feature of the device is it can echo its output to an NTSC video output so you can send the screen to an external monitor.

Continue reading “Cheap Scope Troubleshoots Commodore”

Commodore Datasette Does Its Own Calibration

Ah, the beloved Commodore 64. The “best-selling computer system of all time”. And hobbyists are keeping the dream alive, still producing software for it today. Which leads us to a problem with using such old equipment. When you get your copy of Petscii Robots on cassette, and try to fastload it, your machine might just consistently fail to load the program. That’s fine, time to pull out the cue-tips and rubbing alcohol, and give the read heads a good cleaning. But what if that doesn’t do the job? You may just have another problem, like tape speed drift.

There are several different ways to measure the current tape speed, to dial it in properly. The best is probably a reference cassette with a known tone. Just connect your frequency counter or digital oscilloscope, and dial in the adjustment pot until your Datasette is producing the expected tone. Oh, you don’t have a frequency counter? Well good news, [Jan Derogee] has a solution for you. See, you already have your Datasette connected to a perfectly serviceable frequency counter — your Commodore computer. He’s put out a free program that counts the pulses coming from the Datasette in a second. So play a reference cassette, run the program, and dial in your Datasette deck. Simple! Stick around after the break for a very tongue-in-cheek demonstration of the problem and solution.

Continue reading “Commodore Datasette Does Its Own Calibration”

A personal computer drive bay with a glowing LED display

Turbo Button Pays Charming Homage To Early Personal Computers

The PC turbo button and LED clock speed display were common features on early personal computers. Wanting to add a little retro chic to his modern battle-station, [Matthew Frost] assembled a charming and functional homage to the turbo button control panel.

In days past, this automotive nomenclature implied a performance boost when activated. Instead, ‘turbo mode’ would clock your x86 processor at its rated speed. Disabling ‘turbo’ would throttle the CPU, often all the way down to 4.77MHz. Inherited from the original IBM PC, some early computer programs relied on this specific clock speed, and would otherwise run too fast (or not at all) on faster hardware. PC marketing teams and engineers alike stopped including the turbo button and glowing clock speed numbers around the Pentium era.

This modern re-imagining of the turbo button uses an Arduino microcontroller, seven-segment display and tactile switches to emulate the look and feel of the original hardware. Instead of directly adjusting the CPU clock speed, hitting turbo switches between balanced and high-performance Windows power plans. The seven-segment display measures this clock speed in GHz to two decimal places. We’ll admit that it’s pretty satisfying to see those numbers inch higher when switching to turbo.

The rightmost button switches between measuring CPU speed, GPU utilization, network load and memory utilization, which improves on its original inspiration. The tubular key lock, also a common sight on early PCs, enables and disables networking for the entire system, which is great for keeping the kids off the ‘net (at least until they figure out how to remove the 5.25″ drive bay from the system and hot-wire the network adapter with a paperclip).

There are more details on the GitHub page, in case you want to build your own. This project could look especially fetching in PC sleeper builds, where new components are ‘hidden’ in old case hardware. And if this has made you feel nostalgic at all, you may want to hear our thoughts on why it’s all about the Pentiums.

Continue reading “Turbo Button Pays Charming Homage To Early Personal Computers”

You Can Now Bootstrap Your Amiga Without A Floppy With This One Weird Trick

Traditionally, most Amigas were intended to boot from a floppy disk. . An Amiga can readily make its own boot floppy, but only once it’s already booted up. If you don’t have a floppy ready to go, you’re out of luck, as PCs can’t readily make them for Amigas. [Roc] whipped up the amigaXfer bootstrapping method to solve this very problem.

Shorting a couple of pins together can unlock a serial debug mode that can be used for bootstrapping the machine.

Available on Github, the amigaXfer tool is able to perform several tasks with an Amiga via its serial port. The Amiga must first be turned on while plugged into another computer running amigaXfer via serial connection. When the Workbench floppy prompt comes up, the CrashEntry feature on amigaXfer should be triggered, and the BERR and GND pins on the Amiga’s 68000 CPU should be connected just for a split second, triggering the Amiga to go into a special serial debug mode. This enables amigaXfer to take control, allowing a disk to be formatted and written with a debug bootblock, and this disk can then be used to boot the Amiga without the need for the hack.

It’s a nifty way to get your Amiga up and running if you’ve just bought it off eBay and it didn’t come with any disks. From here, you can use amigaXfer to load other programs onto the Amiga via the same serial cable you used for the bootstrapping process, too. The hack isn’t limited to just the Amiga 500, either. It should work on a range of machines, including AmigaOS versions 1.x, 2.x, and 3.x.

Unlike the Commodore 64, we probably won’t see brand new replica Amigas anytime soon, but we can dream. As always, if you’ve got ’em, send your hottest Amiga projects into the tipsline!

Protected Mode On A Z80! (Almost)

The microprocessor feature which probably most enables the computing experience we take for granted today is protected mode. A chip with the required hardware can run individual software processes in their own environments, enabling multitasking and isolation between processes. Older CPUs lacked this feature, meaning that all the resources were available to all software. [Andy Hu] has done the seemingly impossible with a Zilog Z80, enabling a protected mode on the chip for the first time in over four decades. Has he found an elusive undocumented piece of silicon missed by every other researcher? Not quite, but it is a clever hack.

The Z80 has two address spaces, one for memory and the other for I/O. He’s taken the I/O request line and fed it through a flip-flop and some logic to call a hardware interrupt the first time an I/O call is made or when a RST instruction is executed. Coupled with a small piece of memory for register contents, and he’s made a Z80 with a fully-functional protected mode, for the cost of a few logic chips. It’s explained in the video below the break, and we hope you agree that it’s rather elegant given the resources in hand. It’s too late for the commercial 8-bit machines of the past, but it would be interesting to see what today’s retrocomputer designers make of it.

Continue reading “Protected Mode On A Z80! (Almost)”