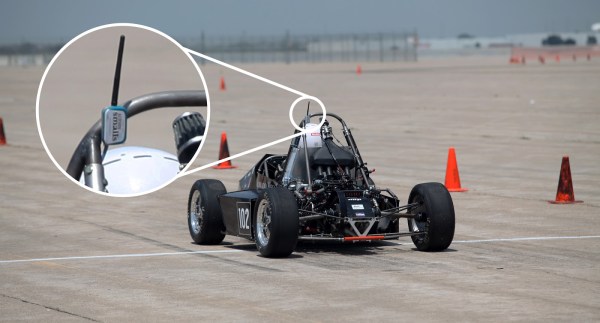
USB Charger Fooled Into Variable Voltage Source

USB chargers are everywhere and it is the responsibility of every hacker to use this commonly available device to its peak potential. [Septillion] and [Hugatry] have come up with a hack to manipulate a USB charger into becoming a variable voltage source. Their project QC2Control works with chargers that employ Quick Charge 2.0 technology which includes wall warts as well as power banks.

Qualcomm’s Quick Charge is designed to deliver up to 24 watts over a micro USB connector so as to reduce the charging time of compatible devices. It requires both the charger as well as the end device to have compatible power management chips so that they may negotiate voltage limiting cycles.

In their project, [Septillion] and [Hugatry] use a 3.3 V Arduino Pro Mini to talk to the charger in question through a small circuit consisting of a few resistors and diodes. The QC2.0 device outputs voltages of 5 V, 9 V and 12 V when it sees predefined voltage levels transmitted over the D+ and D- lines, set by Arduino and voltage dividers. The code provides function calls to simplify the control of the power supply. The video below shows the hack in action.

Quick Charge has been around for a while and you can dig into the details of the inner workings as well as the design of a compatible power supply from reference designs for the TPS61088 (PDF). The patent (PDF) for the Quick Charge technology has a lot more detail for the curious.

Similar techniques have been used in the past and will prove useful for someone looking for a configurable power supply on the move. This is one for the MacGyver fans.

Continue reading “USB Charger Fooled Into Variable Voltage Source”

Disco Flashlight Binary Analog Clock?

As multitools have lots of different functions in one case, so [Shadwan’s] clock design incorporates a multitude of features. He started the design as a binary clock using a Fibonacci spiral for the shape. However, the finished clock has four modes. The original binary clock, an analog clock, a flashlight (all lights on), and a disco mode that strobes multiple lights.

[Shadwan] used Rhino to model the case and then produced it using a laser cutter. The brains are — small wonder — an Arduino. A 3D-printed bracket holds everything together. You can see the result in the video below.

Continue reading “Disco Flashlight Binary Analog Clock?”

Hack Your Hot Air Station

It used to be hot air soldering gear was exotic, but not anymore. There are plenty of relatively inexpensive choices. Many of these appear to be the same despite having different brand names and model numbers. One that is common and inexpensive is the 858D. These run about $50. [Gabse] has one and decided to upgrade it using some open source controller hardware and software. There wasn’t a complete guide, so he created one himself.

According to the original GitHub page, the controller will work with the Youyue-858D and any clones. However, there are others like the Atten 858D that use a different controller. In addition, there have been several variants. [Gabse’s] guide is for the latest version. Information on other versions and brands might be on this discussion board thread.

Continue reading “Hack Your Hot Air Station”

Go Big Or Go Home: A Tablecloth Touchpad

Phone screens keep getting bigger. Computer screens keep getting bigger. Why not a large trackpad to use as a mouse? [MaddyMaxey] had that thought and with a few components and some sewing skills created a trackpad in a tablecloth.

The electronics in this project are right off the shelf. A Flora board for the brains and 4 capacitive touch boards. If you haven’t seen the Flora, it is a circular-shaped Arduino made for sewing into things. The real interesting part is the construction. If you haven’t worked with conductive fabric and thread, this will be a real eye-opener. [Maddy’s] blog has a lot of information about her explorations into merging fabric and electronics and also covers things like selecting conductive thread.

As an optional feature, [MaddyMaxey] added vibration motors that provide haptic feedback to her touchpad. We were hoping for a video, but there doesn’t seem to be one. The code is just the example program for the capacitive sensor boards, although you can see in a screenshot the additions for the haptic motors.

We’ve covered the Flora before, by the way. You could also make a ridiculously large touch surface using tomography, although the resolution isn’t quite good enough for mouse purposes.

Bitcoin Price Ticker

Are you a Bitcoin miner or trader, but find yourself lacking the compulsive need to check exchange rates like the drug-fuelled daytraders of Wall Street? Fear not – you too can adorn your home or office with a Bitcoin Price Ticker! The post is in Italian but you can read a translated version here.

It’s a straightforward enough build – an Arduino compatible board with an onboard ESP8266 is hooked up with an HD44780-compatible LCD. It’s then a simple matter of scraping the Bitcoin price from the web and displaying it on the LCD. It’s a combination of all the maker staples, tied together with some off-the-shelf libraries – it’s quick, and it works.

[Ed: Oh boo!  The images of the LCD were photoshopped.  Please ignore the next paragraph.]

What makes the build extra nice is the use of custom characters on the LCD. The HD44780 is a character based display, and this project appears to use a screen with two lines of sixteen characters each. However, a custom character set has been implemented in the display which uses several “characters” on the screen to create a single number. It’s a great way to make the display more legible from a distance, as the numbers are much larger, and the Bitcoin logo has been faithfully recreated as well. It’s small touches like this that can really set a project apart. We’d love to see this expanded to display other financial market information and finished off in a nice case.

If you’re wondering what you can actually do with Bitcoin, check out the exploits of this robotic darknet shopper. Oh, and Microsoft will take them, too.

Arduino Cinque – The RISC-V, ESP32, WiFi, Bluetooth Arduino

This weekend at the Bay Area Maker Faire, Arduino in conjunction with SiFive, a fabless provider of the Open Source RISC-V micros, introduced the Arduino Cinque. This is a board running one of the fastest microcontrollers available, and as an added bonus, this board includes Espressif’s ESP32, another wonderchip that features WiFi and Bluetooth alongside a very, very powerful SoC.

Details on the Arduino Cinque are slim at the moment, but from what we’ve seen so far, the Cinque is an impressively powerful board featuring the RISC-V FE310 SoC from SiFive, an ESP32, and an STM32F103. The STM32 appears to be dedicated to providing the board with USB to UART translation, something the first RISC-V compatible Arduino solved with an FTDI chip. Using an FTDI chip is, of course, a questionable design decision when building a capital ‘O’ Open microcontroller platform, and we’re glad SiFive and Arduino found a better solution. It’s unknown if this STM32 can be used alongside the FE310 and ESP32 at this point.

We’ve taken a look at SiFive’s FE310 SoC, and it is an extremely capable chip. It was released first at the HiFive1, and our hands-on testing revealed this is a chip that outperforms the current performance champ of the Arduino world, the Teensy 3.6. Of course, with any new architecture, there will be a few problems porting the vast number of libraries over to the FE310, but SiFive has included an Arduino compatible SDK. It’s promising, and we can’t wait to see SiFive’s work in more boards.

Pedometer For Calorie Conscious Hamster Owners

The Arduino has inspired many a creative projects that can be beneficial to humanity. The Arduino Hamster Wheel Pedometer by [John Mueller] on the other hand is a creation that is meant for the cute furry rodent pets. When [John Mueller]’s daughter wanted to keep track of her hamster’s night-time strolls, her maker-dad saw it as an opportunity to get her involved in technology. The project consists of a hamster-wheel with a magnet that triggers a reed switch on completing a revolution. The entire assembly is custom-made and [John Mueller] does an excellent job documenting the build with a lot of clear images.

The wheel is affixed to a shaft with a ball bearing at one end and the entire thing is mounted on the side of the cage so that it can be removed with ease for maintenance. The reed switch is embedded in the wooden mounting block such that the connecting cables pass from inside the assembly. This prevents the hamster from coming in contact with the cabling or damaging it in any way. An LCD and the Arduino Uno are placed outside the cage and are used to display the revolutions of the wheel as well as the equivalent miles travelled.

The code for the Arduino is also supplied for anyone who wants to replicate the project and the video below shows the working of the project. The project could also be extended to count calories burned as well as running speed. This project is a prime example of how technology can be used to assist and is similar to the IoT Hamster Wheels that tweets every movement of the Hamster Life.

Continue reading “Pedometer For Calorie Conscious Hamster Owners”