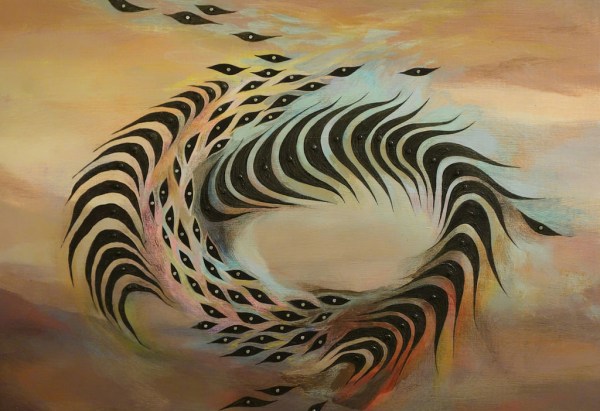
Arduino Calculator

High Cost Arduino Calculator Is Unwieldy, Still Cool Though

One of [Kale_3D]’s teachers had made an Arduino-powered calculator. It wasn’t robust and didn’t last too long in the classroom environment. After the non-functional calculator sat around the class for a while, [Kale_3D] decided he would give a shot at repairing it. Along the way the project didn’t just get repaired, it got a full rebuild.

This calculator uses a full 16 button matrix keypad. The Arduino deciphers button pushes with the help of the Keypad library, at which time the appropriate character is displayed on the 2×8 LCD screen. Selecting the function is a little different from normal since this project is limited to 16 buttons. Two of the buttons allow scrolling through not only standard arithmetic functions but trigonometric functions also. This was one of the features that the previous version was not capable of.

To protect the components, an enclosure was made out of 1/4″ laser cut wood. The pieces have notched edges to permit a nice fit. Even so, corner blocks were added to give the case even more rigidity.

Yes, this calculator is not practical, but that’s not the point. In the end [Kale_3D] felt that the project was definitely worth doing. He had learned a bunch of stuff about Arduino and especially code debugging! Most important of all he had a good time building it. There’s a video after the break showing how it works. The code and wiring diagrams are available for download on the project’s Instructable page.

Continue reading “High Cost Arduino Calculator Is Unwieldy, Still Cool Though”

Dial

Dial Is A Simple And Effective Wireless Media Controller

[Patrick] was looking for an easier way to control music and movies on his computer from across the room. There is a huge amount of remote control products that could be purchased to do this, but as a hacker [Patrick] wanted to make something himself. He calls his creation, “Dial” and it’s a simple but elegant solution to the problem.

Dial looks like a small cylindrical container that sits on a flat surface. It’s actually split into a top and bottom cylinder. The bottom acts as a base and stays stationary while the top acts as a dial and a push button. The case was designed in SOLIDWORKS and printed on a 3D printer.

The Dial runs on an Arduino Pro mini with a Bluetooth module. The original prototype used Bluetooth 2.0 and required a recharge after about a day. The latest version uses the Bluetooth low energy spec and can reportedly last several weeks on a single charge. Once the LiPo battery dies, it can be recharged easily once plugged into a USB port.

The mechanical component of the dial is actually an off-the-shelf rotary encoder. The encoder included a built-in push button to make things easier. The firmware is able to detect rotation in either direction, a button press, a double press, and a press-and-hold. This gives five different possible functions.

[Patrick] wrote two pieces of software to handle interaction with the Dial. The first is a C program to deal with the Bluetooth communication. The second is actually a set of Apple scripts to actually handle interaction between the Dial and the various media programs on his computer. This allows the user to more easily write their own scripts for whatever software they want. While this may have read like a product review, the Dial is actually open source! Continue reading “Dial Is A Simple And Effective Wireless Media Controller”

Ice Clock

Binary Clock Fit For Queen Elsa’s Ice Palace

When life gives you lemons, you make lemonade. When life gives you freezing cold temperatures and a yard full of snow, you make binary clocks out of ice. At least that’s what [Dennis] does, anyway.

[Dennis’] clock is made from several cylindrical blocks of ice stacked on top of one another. There are six columns of ice blocks. The blocks were made by pouring water into empty margarine containers and freezing them. Once they were frozen, [Dennis] bore a 5/16″ hole into the bottom of each block to house an LED. Wires ran from the LEDs back into the drainage port of a cooler.

The cooler housed the main electronics. The LED controller board is of [Dennis’] own design. It contains six TLC59282 chips allowing for control of up to 96 LEDs. Each chip has its output lines running to two RJ45 connectors. [Dennis] couldn’t just use one because one of the eight wires in the connector was used as a common power line. The main CPU is an Arduino. It’s hooked up to a DS3234 Real Time Clock in order to keep accurate time. The oscillator monitors temperature in order to keep accurate time even in the dead of winter. Continue reading “Binary Clock Fit For Queen Elsa’s Ice Palace”

heartbeat sensor

Simple And Inexpensive Heartbeat Detector

There are many ways to detect a heartbeat electronically. One of the simpler ways is to take [Orlando’s] approach. He’s built a finger-mounted pulse detector using a few simple components and an Arduino.

This circuit uses a method known as photoplethysmography. As blood is pumped through your body, the volume of blood in your extremities increases and decreases with each heartbeat. This method uses a light source and a detector to determine changes in the amount of blood in your extremities. In this case, [Orlando] is using the finger.

[Orlando] built a finger cuff containing an infrared LED and a photodiode. These components reside on opposite sides of the finger. The IR LED shines light through the finger while the photodiode detects it on the other side. The photodiode detects changes in the amount of light as blood pumps in and out of the finger.

The sensor is hooked up to an op amp circuit in order to convert the varying current into a varying voltage. The signal is then filtered and amplified. An Arduino detects the voltage changes and transmits the information to a computer via serial. [Orlando] has written both a LabVIEW program as well as a Processing program to plot the data as a waveform. If you’d rather ditch the PC altogether, you might want to check out this standalone heartbeat sensor instead.

Temperature Data Logger

Temperature Data Logger Logs Temperature Over Time

Temperature Data Logger[Husham] not only likes his electronics projects but clearly enjoys documenting them as well. He’s written a nice Instructable on a Temperature Data Logger that he has built and thankfully makes his code available for others to use. The end product is cleanly designed and made for weather-proof outdoor applications.

As you may expect, the brains behind this operation is an Arduino. It is coupled with a Real Time Clock to maintain accurate timing as well as an SD Card Module which is used to store the data collected. In this case, the temperature is read by a LM35 temperature sensor and that value, along with the time, is recorded to a .csv file on the SD card in one minute intervals.

There is also an LCD screen that displays the date, time and current temperature. To save battery life the LCD backlight is normally off. It can be turned on using a magnet that interacts with a hall effect sensor on the top of the case. This worked so well that [Husham] installed a second hall effect sensor on the side of the case that resets the Arduino. Speaking of the case, it is a weather proof PVC electrical box with a conduit adapter installed on the bottom side. A battery pack made up of two used laptop cells housed in a piece of conduit supplies 7.2 volts to the Arduino and other components. Unfortunately, there’s no word on how long the battery pack lasts. Once the data is logged, the SD card can be removed and the .csv file opened in spreadsheet software to make a graph showing temperature change over time.

Bluetooth Fuel Monitor

Bluetooth Enabled Fuel Consumption Monitor

[Malebuffy] bought himself a used boat last year. Fuel isn’t exactly cheap where he lives, so he wanted a way to monitor his fuel consumption. He originally looked into purchasing a Flowscan off the shelf, but they were just too expensive. In the interest of saving money, [Malebuffy] decided to build his own version of the product instead.

To begin, [Malebuffy] knew he would need a way to display the fuel data once it was collected. His boat’s console didn’t have much room though, and cutting holes into his recently purchased boat didn’t sound like the best idea. He decided he could just use his smart phone to display the data instead. With that in mind, [Malebuffy] decided to use Bluetooth to transmit the data from the fuel sensors to his smart phone.

The system uses an older Arduino for the brain. The Arduino gets the fuel consumption readings from a Microstream OF05ZAT fuel flow sensor. The Arduino processes the data and then transmits it to a smart phone via a Bluetooth module. The whole circuit is powered from the boat battery using a DC adapter. The electronics are protected inside of a waterproof case.

[Malebuffy’s] custom Android apps are available for download from his website. He’s also made the Arduino code available in case any one wants to copy his design.

Binary Clock

Binary Clock Would Make Doc Brown Proud

[Brett] was looking for a way to improve on an old binary clock project from 1996. His original clock used green LEDs to denote between a one or a zero. If the LED was lit up, that indicated a one. The problem was that the LEDs were too dim to be able to read them accurately from afar. He’s been wanting to improve on his project using seven segment displays, but until recently it has been cost prohibitive.

[Brett] wanted his new project to use 24 seven segment displays. Three rows of eight displays. To build something like this from basic components would require the ability to switch many different LEDs for each of the seven segment displays. [Brett] instead decided to make things easier by using seven segment display modules available from Tindie. These modules each contain eight displays and are controllable via a single serial line.

The clock’s brain is an ATmega328 running Arduino. The controller keeps accurate time using a DCF77 receiver module and a DCF77 Arduino library. The clock comes with three display modes. [Brett] didn’t want and physical buttons on his beautiful new clock, so he opted to use remote control instead. The Arduino is connected to a 433MHz receiver, which came paired with a small remote. Now [Brett] can change display modes using a remote control.

A secondary monochrome LCD display is used to display debugging information. It displays the time and date in a more easily readable format, as well as time sync information, signal quality, and other useful information. The whole thing is housed in a sleek black case, giving it a professional look.