Beating Simon

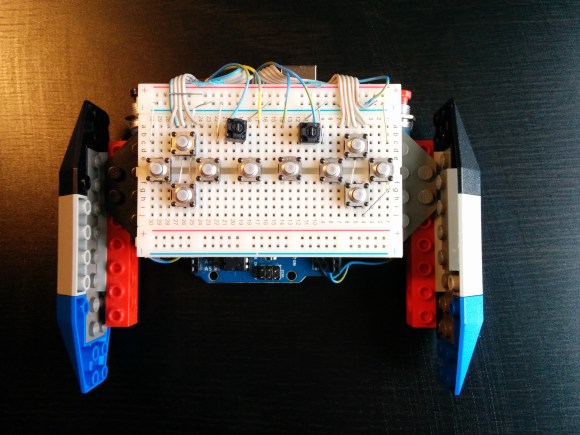
Virtually everyone has played Simon, that electronic memory game from the 70s, but who among us has actually beaten it? That was the goal of [Ben] and his 7-year-old daughter, and after a year of work, an Arduino, some servos, and a few Lego bricks, they’ve finally done it.

Instead of the large original Simon, [Ben] is using a key chain version of the game: much smaller, and much easier to build a device to sense the lights and push the buttons. The arms are made from Lego bricks, held up with rubber bands and actuated with two servos mounted on a cutting board.

To detect Simon’s lights, [Ben] connected four phototransistors to an Arduino. The Arduino records the pattern of lights on the Simon, and activates the Lego arms in response to that pattern. [Ben]’s version of Simon has only a maximum of 32 steps in the final sequence, but that still means each game takes 528 button presses – and a lot of annoying beeps – to complete.

Videos below.

Continue reading “Beating Simon”

Attiny PWM Generator And Servo Tester

PWM-Servo-Tester

Having the right tool for the job makes all the difference, especially for the types of projects we feature here at Hackaday. [Jana Marie] must agree with this sentiment, one of her latest projects involves building a tool to generate a PWM signal and test servos using an Attiny25/45/85.

Tools come in all kinds of different shapes and sizes. Even if it might not be as widely used as [Jana’s] earlier work that combines an oscilloscope and signal generator, having a tool that you can rely upon to test servos and generate a PWM can be very useful. This well written Instructable provides all the details you need to build your own, including the schematic and the necessary code (available on GitHub). The final PWM generator looks great. For simple projects, sometimes a protoboard is all you need. It would be very cool to see a custom PCB made for this project in the future.

What tools have you build recently? Indeed, there is a tool for every problem. Think outside the (tool) box and let us know what you have made!

A Tweeting Litter Box

SmartLitterBox

How can you not be interested in a project that uses load cells, Bluetooth, a Raspberry Pi, and Twitter. Even for those of our readers without a cat, [Scott’s] tweeting litter box is worth the read.

Each aspect of this project can be re-purposed for almost any application. The inexpensive load cells, which available from eBay and other retailers, is used to sense when a cat is inside the litter box. Typically sensors like the load cell (that contain a strain gauge) this use a Wheatstone bridge, which is very important for maximizing the sensitivity of resistive sensor. The output then goes to a HX711, which is an ADC specifically built for load cells. A simple alternative would be using an instrumentation amplifier and the built-in ADC of the Arduino. Now, the magic happens. The weight reading is transmitted via an HC-06 Bluetooth module to a Raspberry Pi. Using a simple Perl script, the excreted weight, duration, and the cat’s resulting body weight is then tweeted!

Very nice work! This is a well thought out project that we could see being expanded to recognize the difference between multiple cats (or any other animal that goes inside).

Cheap-Thermocam Gets An Impressive Rehaul

[Max Ritter] is a 21 year old student of information technology at the University of Applied Science at Weingarten, Germany. Three years ago he brought us the DIY Cheap-Thermocam, a tool for thermal imaging that cost <$100. Since then he’s made a few upgrades.

The original Cheap-Thermocam made use of an Arduino, the sensor from a thermometer gun and a few XY servos. In about 2 minutes the XY servos can scan and measure 1344 points using the thermometer’s sensor, creating a heat-vision map of 42 x 32 pixels — not amazing, but it worked — and it was cheap!

The new version (V3) has its own ARM Cortex M3 processor, it measures 3072 points in 2 minutes from -70°C to 380°C with an accuracy of 0.5°C, and it exports its images at a resolution of 640 x 480 –close to commercial offerings! It’s not capable of real-time scanning, but for the majority of purposes you need one of these for — it’s really not that necessary.

Continue reading “Cheap-Thermocam Gets An Impressive Rehaul”

Wiimote Controlled Extermination: Dalek-Style

Dalek Build

Convention-goers have likely strolled past a number of Daleks: the aliens drive around the event space, spouting threats of extermination and occasionally slapping folks with a rotating eyestalk. [James Bruton] has been hard at work building this Wii-remote-controlled Dalek with his fellow hackers at the SoMakeIt Hackerspace (you may remember our write-up from earlier this year).

Most Dalek builds seat a driver inside the body at the helm of a salvaged electric wheelchair, where they plunk around using a joystick control and simmer in an increasingly potent aroma. This version started like most, with a wooden structure from plans sourced at Project Dalek. Inside, however, [James] and his crew have tapped into the wheelchair’s motor controller to feed it a PWM signal from an Arduino Shrimp, which is linked to a Raspi. The Pi receives a Bluetooth signal from a Wiimote, and, through their custom Python script, directs the Dalek with ease.

They’re still working on finishing the Dalek’s body, but they’re using some clever tactics to push onward: using a 3D-printer to solve some of the nuanced styling choices. They’ve uploaded a gallery with additional photos on Facebook, and you can watch them goofing around with their creation (losing their balance and nearly exterminating themselves) in a video after the break.

Continue reading “Wiimote Controlled Extermination: Dalek-Style”

Developing The Grillino In 24 Hours

grillino

[Mastro Gippo] hit Shenzhen back in April and organized a challenge for himself: could he develop an electronic device from idea to product in only 24 hours? The result is the Grillino, a simple clone of the Annoy-a-Tron: a small, concealable device that makes chirping sounds at random intervals. It’s name was derived from a mix of the Italian word for a cricket—”grillo”—and, of course, “Arduino.”

Shenzhen was the perfect setting for his experiment, especially because [Mastro Gippo] was in town for the Hacker Camp we mentioned a few months ago. The build is pretty simple, requiring only a microcontroller, a battery, and a piezo speaker. What follows is a detailed journey of dizzying speed through the production process, from bags stuffed full of components, to 3D-printing a test jig, to searching for a PCB manufacturer that could fulfill his order overnight. Video and more below.

Continue reading “Developing The Grillino In 24 Hours”

Analog Shield And PCB Quadcopter

[youtube=https://www.youtube.com/watch?v=gXW76ESIv6k&w=580]


We spent a little bit of time at the TI booth at Maker Faire to film a pair of interviews. The first is with [Bill Esposito] who is grinding away on his PhD. at Stanford. He’s showing off an Analog Shield for Arduino. He describes it as “an attempt to bring the analog bench to an Arduino shield”. We think this is a fantastic idea as most who are learning digital electronics through Arduino have little or no experience with analog circuitry. This is a nice gateway drug for the concepts.

The analog shield has a supply good for +/- 7.5 volts, 4-channel ADC, 4-channel DAC, and gets 100k samples at 16-bits. He showed us a spectrum analyzer using Fast Fourier Transform on the incoming signal from a microphone. He also built a function generator around the shield. And finally a synthesizer which plays MIDI files.

In the second half of the video we take a look at [Trey German’s] work on a PCB-based quadcopter. His goal is to reduce the power consumption which will equate to longer flying times. To this end he chose the DRV8312 and a Piccolo to control each sensorless, brushless DC motor. The result should be 10% lower power consumption that his previous version.