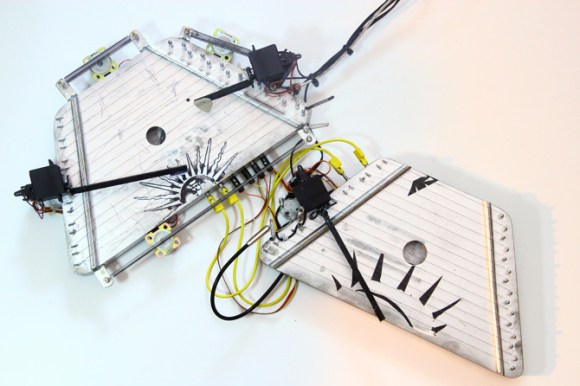
Turning A Router Into An Arduino Yún

yun

The Arduino Yún was the first of a new breed of Arduinos that added a big honkin’ Linux System on Chip to the familiar ATMega microcontroller and unique pin headers. It’s a surprisingly powerful system, but also very simple: basically, it’s just an Atheros AR9331 running Linux, an ATMega32u4 doing its Arduino thing, both connected by a serial connection. The Atheros AR9931 is also found in a router popular amongst hardware hackers. It really was only a matter of time before someone ported the Yun software to a router, then.

[Tony] took a TL-WR703N router and put OpenWRT on it. Turning this router into the Linux side of a Yún was a simple matter of uploading the Yún software to the root directory of the router and rebooting it. The Arduino side of the Yún is handled by an Arduino Mega connected to the USB port of the router. A quick update to Arduino’s boards.txt file, and a hacked together Yún is just a strip of duct tape away.

The Yún may not be extremely popular, but it does have a few interesting use cases. Maybe not enough to drop $70 on a board, but if you already have a WR703 router, this is a great way to experiment.

Thanks [Matt] for the tip.

Here’s The Dirt On Printing With Pollution

[Anirudh] and his friends were sitting around reminiscing about India. In particular, they recalled riding around in auto-rickshaws in stifling heat, watching their skin turn black from the exhaust. They started thinking about all of the soot and pollution in crowded cities the world over and wondered whether the stuff could be re-purposed for something like printer ink. That’s how they came up with their soot/pollution printer.

They created a soot-catching pump which they demonstrate with a burning candle. The pump mixes the soot particles with rubbing alcohol and an oil substrate and sends the ink to an HP C6602 inkjet cartridge. They used [Nicolas C Lewis]’s print head driver shield for Arduino to interface with the cartridge, turning it into a 96dpi printing head that uses only five pins.

[Anirudh] and his friends plan to design a carbon separator using charged plates to capture the soot particles from pollution sources and filter out dust. Be sure to check out their demonstration video after the jump.

Update: In response to [Hirudinea]’s comment about mining the carbon from cars, [Anirudh] is now looking for collaborators (tinkerers, filmmakers, DIY enthusiasts) to move forward with the idea of re-purposing carbon. Email him at anirudhs@mit.edu.


Continue reading “Here’s The Dirt On Printing With Pollution”

A Low Cost Arduino FPGA Shield

[technolomaniac] is kicking butt over at Hackaday Projects. He’s creating a low cost Arduino based FPGA shield. We’ve seen this pairing before, but never with a bill of materials in the $25 to $30 range. [technolomaniac’s] FPGA of choice is a Xilinx Spartan 6. He’s also including SDRAM, as well as an SPI Flash for configuration. Even though the Spartan 6 LX9 is a relatively small FPGA, it can pack enough punch that the Arduino almost becomes a peripheral. The main interconnect between the two will be the Arduino’s ability to program the Spartan via SPI. Thanks to the shared I/O pins though, the sky is the limit for parallel workflow.

[technolomaniac] spent quite a bit of time on his decoupling schematic. Even on a relatively small FPGA power decoupling is a big issue, especially when high speed signals come into play. Thankfully Xilinx provides guides for this task. We have to mention the two excellent videos [technolomaniac] created to explain his design. Documenting a project doesn’t have to be hours of endless writing. Sometimes it’s just easier to run a screen capture utility and click record. As of this writing, the schematic has just been overhauled, and [technolomaniac] is looking for feedback before he enters the all important layout stage. The design is up on his github repository in Altium format. Due to its high cost, Altium isn’t our first pick for Open Hardware designs. There are free viewers available, but [technolomaniac] makes it simple by putting up his schematic in PDF format (PDF link). Why not head over to projects and help him out?

Continue reading “A Low Cost Arduino FPGA Shield”

The Credit Card Sized GameBoy

Think you’ve seen every possible type of Arduino based hand held video game? [Kevin] managed to coax something new out of the theme with a very clever credit card sized console that uses some very interesting construction techniques.

The inspiration for this project began when [Kevin] dropped an SMD resistor into a drill hole on a PCB. This resistor fell right through the hole, giving him the idea creating a PCB with milled cutouts made to fit SMD components. With a little experimentation, [Kevin] found he could fit a TQFP32 ATMega328p  – the same microcontroller in the Arduino – in a custom square cutout. The rest of the components including a CR2016 battery and OLED display use the same trick.

The rest of the design involved taking Adafruit and Sparkfun breakout boards, and modifying the individual circuits until something broke. Then, off to Eagle to create a PCB.

[Kevin]’s experiment in extremely unusual PCB design worked, resulting in a credit-card sized “Game Boy” that’s only 1.6 millimeters thick. The controls are capacitive touch sensors and he already has an easter egg hidden in the code; enter the Konami code and the Hackaday logo pops up to the tune of [Rick Astley]’s magnum opus.

Now [Kevin] is in a bit of a bind. He’d like to take this prototype and turn it into a crowd sourced campaign. In our opinion, this “Game Boy in a wallet” would probably do well on a site like Tindie, but any sort of large scale manufacturing is going to be a rather large pain. If you have any wishes, advice, of complaints for [Kevin] he’s got a few links at the bottom of his project page.

Smart Thermostats For An Old Club House

20140220_210220

[Michael] is a Scout Leader in the Netherlands, where they have a great clubhouse—a “Landhuis.” The only problem? It’s old, and it’s not an efficient place to heat!

The building currently has two furnaces to cope with its many nooks and crannies, with individual thermostats in each of the five rooms. If a thermostat was activated in one of the rooms, it would control a valve in the furnace responsible for that room. Depending on which valve the furnace is attached to, a furnace would start. As you can imagine, this is an extremely inefficient system if you are heating two different rooms (and using two different furnaces!) It’s all on or off with no in-between.

As true scouts, they try to adhere to the simple principle of “why buy it when you can build it?” Commercial systems are expensive, and besides, they needed a project to work on! They’ve designed a smart(er) system using an Arduino Mega 2560 with five DS18B20 temperature sensors set up in each room, and even threw together a nice enclosure for it! They’ve included the source code on GitHub (in Dutch), so if you’re interested in setting up something similar you can check it out.

[Michael] will be around in the comments section, so if you have any feedback or questions, let him know!

Computers Playing Flappy Bird. Skynet Imminent. Humans Flapping Arms.

flappy-double

After viral popularity, developer rage quits, and crazy eBay auctions, the world at large is just about done with Flappy Bird. Here at Hackaday, we can’t let it go without showcasing two more hacks. The first is the one that we’ve all been waiting for: a robot that will play the damn game for us. Your eyes don’t deceive you in that title image. The Flappy Bird bot is up to 147 points and going strong. [Shi Xuekun] and [Liu Yang], two hackers from China, have taken full responsibility for this hack. They used OpenCV with a webcam on Ubuntu to determine the position of both the bird and the pipes. Once positions are known, the computer calculates the next move. When it’s time to flap, a signal is sent to an Arduino Mega 2560. The genius of this hack is the actuator. Most servos or motors would have been too slow for this application. [Shi] and [Liu] used the Arduino and a motor driver to activate a hard drive voice coil. The voice coil was fast enough to touch the screen at exactly the right time, but not so powerful as to smash their tablet.

If you would like to make flapping a bit more of a physical affair, [Jérémie] created Flappy Bird with Kinect. He wrote a quick Processing sketch which uses the Microsoft Kinect to look for humans flapping their arms. If flapping is detected, a command is sent to an Android tablet. [Jérémie] initially wanted to use Android Debug Bridge (ADB) to send the touch commands, but found it was too laggy for this sort of hardcore gaming. The workaround is to use a serial connected Arduino as a mouse. The Processing sketch sends a ‘#’ to the Arduino via serial. The Arduino then sends a mouse click to the computer, which is running  hidclient.  Hidclient finally sends Bluetooth mouse clicks to the tablet. Admittedly, this is a bit of a Rube Goldberg approach, but it does add an Arduino to a Flappy Bird hack, which we think is a perfect pairing.

Continue reading “Computers Playing Flappy Bird. Skynet Imminent. Humans Flapping Arms.”

Can’t Stand Your Noisy Fan? Here’s A Plan, Man

[Brian] adores his GW Instek GPC-1850D power supply, but it’s annoyingly loud and disruptive to his audio projects. The thing works great, so he decided to regulate the fan’s speed based on usage level to save his sanity.

Once [Brian] got under the hood, he found that it actually has four separate heatsinks: one for the bridge rectifiers and one for each power transistor on the three output channels. The heatsinks are electrically and thermally isolated from each other and change temperature based on the channel being used.

[Brian] and his associates had several Microchip MCP9803 temperature sensors kicking around the lab from previous projects, so they put one on each heatsink. The great thing about these is their address selection pins which let all four of them sit together on the I²C bus to Arduinoville. Each sensor is insulated and clamped to its heatsink with a piece of meccano and a dab of thermal paste.

[Brian] used an Arduino Mini and built the circuit on stripboard. The fan runs at 24V, so he’s sharing that with the Arduino through a 7805. He controls the speed of the fan with PWM from the Arduino fed through a MOSFET. The Arduino reads from each sensor and determines which one is hottest. [Brian] wanted the fan to run at all times, so he set a base speed of 20%. When the heatsinks reach 30°C/86°F, the fan speed is increased to 40%. After that, the speed increases at 5°C/9°F intervals until it reaches max speed at 65°C/149°F.

You can grab the code and schematic from [Brian]’s repo. If you want to study your heatsinks, build this heatsink tester first.