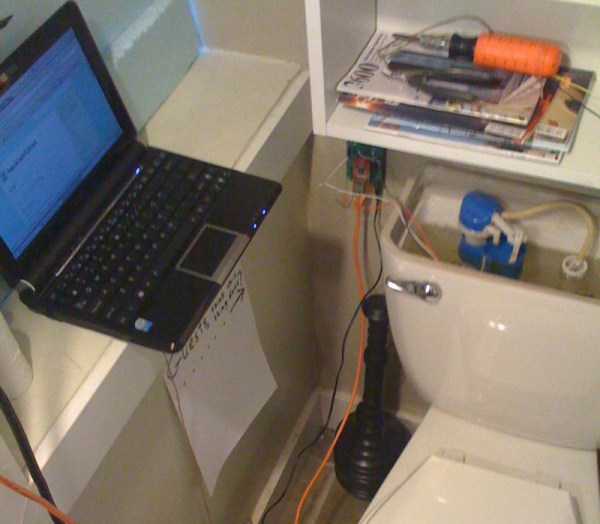
[scott] had a need to capture a mouse and wanted to learn about how to program an arduino, so he built an Arduino controlled mousetrap. It is made from things he had laying around the house, like some Tupperware containers and wooden rods. The program is pretty simple, when a trip wire is touched, the servo jerks the wooden rod out of the way, closing the container. You can see it working after the break. The trip wire seems like a big failure point. he states that it is just a wire, slightly above a tin foil strip. That seems like it would only be a tiny area that the mouse would need to touch to trigger it. What better switch could he design as cheap and quick as possible?
Arduino Hacks3063 Articles
STK500 As An Arduino
The AVR STK500 has been Atmel’s standard AVR development platform for many years. Recently though, hobbyists have embraced the Arduino. [Alessandro] has decided to bring the two together so that you can use the Arduino environment with the STK500. Unlike the Arduino, it comes with 8 LEDs, 8 switches, a variable power supply, and variable analog reference. It’s a great way to get hardware you might already have back into service.
Remote Thermometer Using Arduino
[Peter] sent in this writeup on how to build a remotely accessible thermometer. The hardware side is pretty easy on this one, all you need is an Arduino, a resistor and an thermistor. The software is where the main focus is. You can check the temperature via command line, but also via email. It can also tell you the temperature using the host computers sound hardware. You can see a video of it in action after the break. We have to wonder why he didn’t make it twitter.
4 Or More Servos On An Arduino
The latest version of the Arduino software allows you to use more than two servos at a time. Curious Inventor has posted a demo showing how to run 4 servos from a keyboard input. The code should also work just fine on Arduino clones, like the Roboduino pictured above. They point out that if you are running version 12 of the software, some manual additions will be necessary.
Flatpack Walker
If you’re into robotics, you’re probably already familiar with the 2 motor walker. This design, usually used in B.E.A.M. robotics is a pretty easy way to make a 4 legged walking robot. [Edwindertien] has made the design a little bit easier to build with these flatpack walker plans. He used 4mm thick birch, cut by laser to get his walker into shape, but the design would work with almost any material. His walker is Arduino powered, so it could be programmed for all kinds of behavior, especially if you add some sensors. You can see his bot in action after the break.
TinkerKit, Physical Computing Toolkit
TinkerKit is a collection of 20 different sensors and 10 actuators. It’s meant to make prototyping of physical computing devices much quicker/easier. The devices plug into a Sensor Hub Arduino shield. There is also a similar hub board that can emulate a keyboard; it translates sensor input directly to key strokes. It looks like a very ambitious project and it’s still in development. We love the idea though and think the wide variety of components will foster better final designs. The TinkerKit site covers the current component lineup and there’s a demo video embedded below.
Wireless Bootloading
[vimeo= 2976417]
Tired of having to physically connect to your microprocessor to upload new code? Just do it over a wireless connection. [Nathan] takes us through the process of setting up a wireless bootloader for the ATmega168. He is using the XBee base and remote modules for the wireless communication. While people have been doing wireless bootloading with the Arduino already, [Nathan] found that it was common for them to have timeout issues. His remedy was to make his own custom one that is much faster. He’s asking for help though. At this point it is tested and working, but he needs someone with more programming knowledge to help him make it “drop-in” compatible with the Arduino IDE.
Don’t forget to submit projects to our tip line.