It’s fair to say that Moore’s Law is not delivering on its promise of advancing semiconductor capabilities as fast as it used to, as the limits of current fabrication techniques are being met. Where this is being written for example there are two laptops, one from the last year and one that is 11 years old, and while the new one is undeniably faster it has not overtaken the other by as much as a ten year gap between 1990s machines would have revealed.
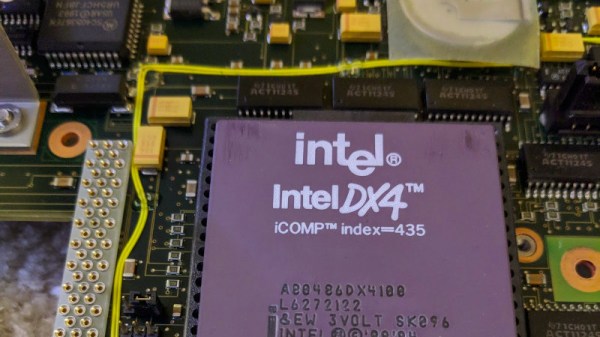
So with older laptops being still so relatively quick, what possible attraction could there be for working on a machine from the 1990s, when the Moore’s Law curve was steeper? It’s something [Jim W] is doing, with his HP Internet Advisor (J2522B), and when you see the machine in question perhaps you’ll understand why. The J2522B is a laptop, but it’s no ordinary ’90s road warrior’s status symbol. This 486-powered beast is a piece of test equipment, specifically one for examining Ethernet ports, thus it’s built like a tank and is mains powered only. It boasts a 486DX4, 16 MB of memory, a then-colossal 1.3 GB hard drive, and an ISA Fast Ethernet card. Oh, and WIndows 95, which with a couple of decades’ hindsight seems an amusing choice to power a piece of security test equipment. Impressive specs for the day, but the $20,000 price tag would still have been steep compared to a comparable laptop.
[Jim]’s machine is destined for classic gaming, though with only the little HP pop-out mouse you saw on their Omnibook range at the time, he needed a PS/2 port. Some chipset hunting found that, but at the cost of accidentally frying a MOSFET when a screen connector was incorrectly re-inserted. We’re then treated to a guide to substituting older MOSFETs with modern parts, useful in itself, but followed by a marvelous piece of bodge work as an SOIC-8 part is placed on a DPAK footprint.
This is an interesting series of posts, partly from a retro angle as they deal with an interesting machine, but also from a hacking angle as he’s getting closer to the vintage PC hardware than most of us to. Keep an eye on it, there is sure to be more in the pipeline.