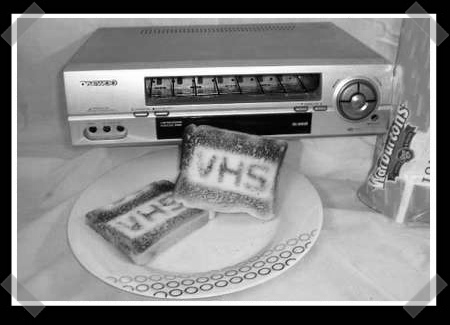
AVR Light Controller

halogen

[Matthias] sent us this project where he builds an AVR light controller. He had a halogen bike light laying around, but was unsatisfied with its lead-acid battery. He wanted to use a lithium-polymer battery but found that they can’t be used directly with halogen lamps due to their voltage. His produced 8.5 volts at full charge and can’t be discharged to below 5 volts. He new a power controller would be necessary to try to flatten that out for his lamp, which needed to stay between 6-12 volts.

He used an ATtiny45 doing PWM to change the voltage. Some other cool features he added were the high and low settings and an LED status light for warnings. You can find pictures, schematics and source code on his page as well as tons of great information. Great job [Matthias].

LED Push Buttons

led-button

[pros] has come up with a very elegant way of making lighted buttons (translated). Using a bunch of small push buttons harvested from old CD players, he rigged this unique way of mounting LEDs. Each LED has two buttons under it. They are wired in parallel, so if either of them is pushed, the button works. The LED isn’t actually soldered where it passes through the board. The anode and cathode are bent around and soldered to allow the LED a little bit of travel.  There’s a good picture of how he did this on the site. The rest of the details might be hard to decipher though, it looks to be in dutch.

[thanks Tom]

5 Cent Tilt Sensor

5cent

This is a 5 cent tilt sensor. We know it cost more than 5 cents, but it is in fact a tilt sensor that utilizes a 5 cent coin. We’ve all done quick hacks to make quick sensors for various projects. We’ve seen tons of them, from stealing springs out of pens and shoving a resistor through them for flexible contact switches, to tin foil touch sensors. This one is new to us though. The design is fairly simple, you insert 4 bits of wire to serve as contacts and the coin will make contact with only two at a time. It isn’t analog, it isn’t extremely precise, but it is super quick and easy. Thanks for sharing [ix].

Thermosonic Wedge Bonding

hot

In the past, if we’ve been doing smd soldering, we’ve used pretty basic hot plates. This project takes that idea a bit further.  Since [kc6qhp] will be using parts that aren’t conducive to soldering, he has to use wire bonding. After locating a fairly cheap wire bonding machine and microscope, he built the heated stage to fit perfectly with his other tools.  You’ll notice that he has machined a lip around the heat plate for small custom C-clamps as well as made it adjustable height. Very nice work [kc6qhp].

Sound Effects Box

vs

At first glance, this may look like a retro styled monome, but it is actually quite different. Merging a Project64 key pad and a Voice Shield for Arduino, [Spikenzie] has made a sound effects box. Each button triggers a unique sound that is stored in the Voice Shield. Of coarse, it will be like a game of memory trying to remember what sound is where. You can see a demo video here.

Leyden Jar Of DOOM.

layden

A leyden jar is basically just a simple home made capacitor. We’ve shown you how to make them before. This, however, is how you make a ridiculously large one. [Nickademuss] used a five gallon bucket to make his leyden jar. That’s five whole gallons of lightning. The video, which you can see after the break, shows it light up the entire room when it lets out a fairly formidable spark. This is dangerous folks, be careful.

Continue reading “Leyden Jar Of DOOM.”

Adding Right Click To A Macbook Pro

mbp_rc

Surprisingly, one of the most common complaints we hear from people trying out macs are the fact that there isn’t a right click. The latest version, the unibody, has an option that remedies this, but older versions are stuck without. While you could always plug a USB mouse in, that is hardly a hacker’s solution. [spiritplumber] sent us this mod he did, adding right click functionality to his Macbook Pro. It is worth noting that this is meant for the 2006 to 2008 version of the Macbook Pro. You’re on your own for different ones.

[spiritplumber] points out that there are test points on the back of the track pad that emulate certain events.  One of wich, just happens to be a right click. He shows us how to wire this, to a home made contact button under the right corner of the track pad. This can be potentially hazardous to your macbook, so be careful and follow his tips for soldering. If you want, you can do the same to the opposite side for your left click, or just leave it the way it is. You can see a video of it in action after the break.

Continue reading “Adding Right Click To A Macbook Pro”