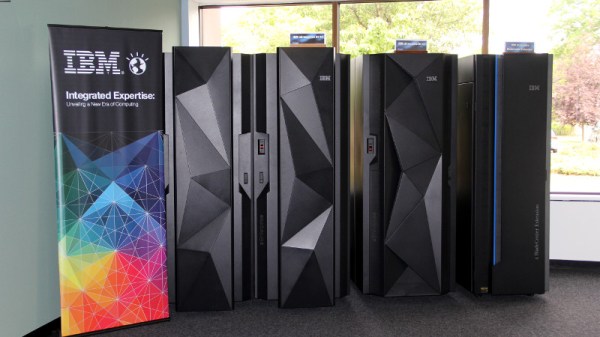
Micro-ATX Arduino Is The Ultimate Breakout Board

If you’ve been hanging around microcontrollers and electronics for a while, you’re surely familiar with the concept of the breakout board. Instead of straining to connect wires and components to ever-shrinking ICs and MCUs, a breakout board makes it easier to interface with the device by essentially making it bigger. The Arduino itself, arguably, is a breakout board of sorts. It takes the ATmega chip, adds the hardware necessary to get it talking to a computer over USB, and brings all the GPIO pins out with easy to manage header pins.

But what if you wanted an even bigger breakout board for the ATmega? Something that really had some leg room. Well, say no more, as [Nick Poole] has you covered with his insane RedBoard Pro Micro-ATX. Combining an ATmega32u4 microcontroller with standard desktop PC hardware is just as ridiculous as you’d hope, but surprisingly does offer a couple tangible benefits.

RedBoard PCB layout

The RedBoard is a fully compliant micro-ATX board, and will fit in pretty much any PC case you may have laying around in the junk pile. Everything from the stand-off placement to the alignment of the expansion card slots have been designed so it can drop right into the case of your choice.

That’s right, expansion slots. It’s not using PCI, but it does have a variation of the standard Arduino “shield” concept using 28 pin edge connectors. There’s a rear I/O panel with a USB port and ISP header, and you can even add water cooling if you really want (the board supports standard LGA 1151 socket cooling accessories).

While blowing an Arduino up to ATX size isn’t exactly practical, the RedBoard is not without legitimate advantages. Specifically, the vast amount of free space on the PCB allowed [Nick] to add 2Mbits of storage. There was even some consideration to making removable banks of “RAM” with EEPROM chips, but you’ve got to draw the line somewhere. The RedBoard also supports standard ATX power supplies, which will give you plenty of juice for add-on hardware that may be populating the expansion slots.

With as cheap and plentiful as the miniITX and microATX cases are, it’s no surprise people seem intent on cramming hardware into them. We’ve covered a number of attempts to drag other pieces of hardware kicking and screaming into that ubiquitous beige-box form factor.

CNC’d MacBook Breathes Easy

Sick of his 2011 Macbook kicking its fans into overdrive every time the temperatures started to climb, [Arthur] decided to go with the nuclear option and cut some ventilation holes into the bottom of the machine’s aluminum case. But it just so happens that he had the patience and proper tools for the job, and the final result looks good enough that you might wonder why Apple didn’t do this to begin with.

After disassembling the machine, [Arthur] used double-sided tape and a block of scrap wood to secure the Macbook’s case to the CNC, and cut out some very slick looking vents over where the internal CPU cooler sits. With the addition of some fine mesh he found on McMaster-Carr, foreign objects (and fingers) are prevented from getting into the Mac and messing up all that Cupertino engineering.

[Arthur] tells us that the internal temperature of his Macbook would hit as high as 102 °C (~215 °F) under load before his modification, which certainly doesn’t sound like something we’d want sitting in our laps. With the addition of his vents however, he’s now seeing an idle temperature of 45 °C to 60 °C, and a max of 82 °C.

In the end, [Arthur] is happy with the results of his modification, but he’d change a few things if he was to do it again. He’s somewhat concerned about the fact that the mesh he used for the grill isn’t non-conductive (he’s using shims of card stock internally to make sure it doesn’t touch anything inside), and he’d prefer the peace of mind of having used epoxy to secure it all together rather than super-glue. That said, it works and hasn’t fallen apart yet; basically the hallmarks of a successful hack.

It’s worth noting that [Arthur] is not the first person to struggle with the Macbook’s propensity for cooking itself alive. A few years back we covered another user who added vents to their Macbook, but not before they were forced to reflow the whole board because some of the solder joints gave up in the heat.

What You Need To Know About The Intel Management Engine

Over the last decade, Intel has been including a tiny little microcontroller inside their CPUs. This microcontroller is connected to everything, and can shuttle data between your hard drive and your network adapter. It’s always on, even when the rest of your computer is off, and with the right software, you can wake it up over a network connection. Parts of this spy chip were included in the silicon at the behest of the NSA. In short, if you were designing a piece of hardware to spy on everyone using an Intel-branded computer, you would come up with something like the Intel Managment Engine.

Last week, researchers [Mark Ermolov] and [Maxim Goryachy] presented an exploit at BlackHat Europe allowing for arbitrary code execution on the Intel ME platform. This is only a local attack, one that requires physical access to a machine. The cat is out of the bag, though, and this is the exploit we’ve all been expecting. This is the exploit that forces Intel and OEMs to consider the security implications of the Intel Management Engine. What does this actually mean?

Continue reading “What You Need To Know About The Intel Management Engine”

Biometric Authentication With A Cheap USB Hub

It’s fair to say that fingerprints aren’t necessarily the best idea for device authentication, after all, they’re kind of everywhere. But in some cases, such as a device that never leaves your home, fingerprints are an appealing way to speed up repetitive logins. Unfortunately, fingerprint scanners aren’t exactly ubiquitous pieces of hardware yet. We wouldn’t hold out much hope for seeing a future Raspberry Pi with a fingerprint scanner sitting on top, for example.

Looking for a cheap way to add fingerprint scanning capabilities to his devices, [Nicholas] came up with a clever solution that is not only inexpensive, but multi-functional. By combining a cheap USB hub with a fingerprint scanner that was intended as a replacement part of a Thinkpad laptop, he was able to put together a biometric USB hub for around $5 USD.

After buying the Thinkpad fingerprint scanner, he wanted to make sure it would be detected by his computer as a standard USB device. The connector and pinout on the scanner aren’t standard, so he had to scrape off the plastic coating of the ribbon cable and do some probing with his multimeter to figure out what went where. Luckily, once he found the ground wire, the order of the rest of the connections were unchanged from normal USB.

When connected to up his Ubuntu machine, the Thinkpad scanner came up as a “STMicroelectronics Fingerprint Reader”, and could be configured with libpam-fprintd.

With the pintout and software configuration now known, all that was left was getting it integrated into the USB hub. One of the hub’s ports was removed and filled in with hot glue, and the fingerprint scanner connected in its place. A hole was then cut in the case of the hub for the scanner to peak out of. [Nicholas] mentions his Dremel is on loan to somebody else at the moment, and says he’ll probably try to clean the case and opening up a bit when he gets it back.

[Nicholas] was actually inspired to tackle this project based on a Hackaday post he read awhile back, so this one has truly come full circle. If you’d like to learn more about fingerprint scanning and the techniques being developed to improve it, we’ve got some excellent articles to get you started.

Modder Puts Computer Inside A Power Supply

When building a custom computer rig, most people put the SMPS power supply inside the computer case. [James] a.k.a [Aibohphobia] a.k.a [fearofpalindromes] turned it inside out, and built the STX160.0 – a full-fledged gaming computer stuffed inside a ATX power supply enclosure. While Small Form Factor (SFF) computers are nothing new, his build packs a powerful punch in a small enclosure and is a great example of computer modding, hacker ingenuity and engineering. The finished computer uses a Mini-ITX form factor motherboard with Intel i5 6500T quad-core 2.2GHz processor, EVGA GTX 1060 SC graphics card, 16GB DDR4 RAM, 250GB SSD, WiFi card and two USB ports — all powered from a 160 W AC-DC converter. Its external dimensions are the same as an ATX-EPS power supply at 150 L x 86 H x 230 D mm. The STX160.0 is mains utility powered and not from an external brick, which [James] feels would have been cheating.

For those who would like a quick, TL;DR pictorial review, head over to his photo album on Imgur first, to feast on pictures of the completed computer and its innards. But the Devil is in the details, so check out the forum thread for a ton of interesting build information, component sources, tricks and trivia. For example, to connect the graphics card to the motherboard, he used a “M.2 to powered PCIe x4 adapter” coupled with a flexible cable extender from a quaint company called Adex Electronics who still prefer to do business the old-fashioned way and whose website might remind you of the days when Netscape Navigator was the dominant browser.

As a benchmark, [James] posts that “with the cover panel on, at full load (Prime95 Blend @ 2 threads and FurMark 1080p 4x AA) the CPU is around 65°C with the CPU fan going at 1700RPM, and the GPU is at 64°C at 48% fan speed.” Fairly impressive for what could be passed off at first glance as a power supply.

The two really interesting take away’s for us in this project are his meticulous research to find specific parts that met his requirements from among the vast number of available choices. The second is his extremely detailed notes on designing the custom enclosure for this project and make it DFM (design for manufacturing) friendly so it could be mass-produced – just take a look at his “Table of Contents” for a taste of the amount of ground he is covering. If you are interested in custom builds and computer modding, there is a huge amount of useful information embedded in there for you.

Thanks to [Arsenio Dev‏] who posted a link to this hilarious thread on Reddit discussing the STX160.0. Check out a full teardown and review of the STX160.0 by [Not for Concentrate] in the video after the break.

Continue reading “Modder Puts Computer Inside A Power Supply”

Home Server Has AMD CPU And IKEA Case

Readers who took part in the glory days of custom PC building will no doubt remember the stress of having to pick a case for their carefully-curated build. You may have wanted to lower the total cost a bit by getting a cheap case, but then you’d be stuck looking at some econo-box day in and day out. Plus, how do you post pictures online to boast about your latest build if there are no transparent windows and a lighting kit?

While some may have spent more time choosing their lighted case fans than their optical drive, [Miroslav Prašil] was surely not one of them. When he decided to build a new NAS for his home network, [Miroslav] decided he wanted to put all his money into the device’s internals, and house his build in a wooden storage crate from IKEA. While the low cost was certainly a major factor in the decision, it turns out the crate actually offers a decent amount of room for hardware components. As an added bonus, it doesn’t look completely terrible sitting out in the living room.

In a detailed series of posts on his blog, [Miroslav] walks us through the entire process of building what he has come to call the “NAScrate”. Wanting gigabit Ethernet and a real SATA controller, [Miroslav] went for the ASRock C70M1, a Mini-ITX board with integrated dual-core AMD processor. While not exactly a powerhouse, it will certainly wipe the floor with the fruit-inspired single board computers that so often dominate these types of builds.

To get his clearances worked out, [Miroslav] rendered the entire build in OnShape, which gave him enough confidence in his design to move on to actual construction. The build involves several 3D printed parts, most notably some clever hard drive mounting brackets which allow the drives to be stacked into a space-saving arrangement while still leaving room for airflow between them.

[Miroslav] deftly avoids any religious debates by leaving off his particular choice for software and operating system on his newly constructed NAS, but he does mention that something like FreeNAS would be a logical choice.

While this may be the first wooden one we’ve covered so far, home servers in general are a favorite project for hackers, from budget-friendly scratch builds all the way up to re-purposed enterprise hardware.

Minecraft And Forge: Try This Amazing Way To Visualize Logic

I’ve got virtual circuits on the mind lately. There are a myriad of tools out there that I could pick up to satisfy this compulsion. But the one I’m reaching for is Minecraft. I know what you’re thinking… a lot of people think Minecraft is getting long in the tooth. But chances are you never tried some of the really incredible things Minecraft can do when it comes to understanding logic structures. This goes way beyond simple circuits and easily hops back and forth over the divide between hardware logic and software logic.

Continue reading “Minecraft And Forge: Try This Amazing Way To Visualize Logic”