Picture this: you need to buy a simple tool like a glue gun. There’s usually not a whole lot going on in that particular piece of technology, so you base your decision on the power rating and whether it looks like it will last. And it does last, at least for a few years—just long enough to grow attached to it and get upset when it breaks. Sound familiar?
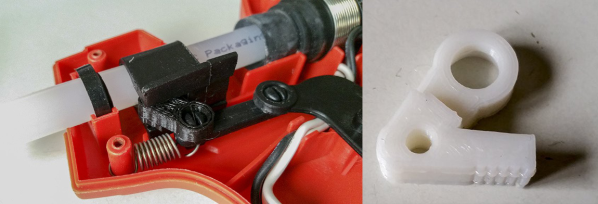
[pixelk] bought a glue gun a few years ago for its power rating and its claims of strength. Lo and behold, the trigger mechanism has proven to be weak around the screws. The part that pushes the glue stick into the hot end snapped in two.
It didn’t take much to create a replacement. [pixelk] got most of the measurements with calipers and then got to work in OpenSCAD. After printing a few iterations, it fit well enough, but [pixelk] saw a chance to improve on the original design and added a few teeth where the part touches the glue stick. The new part has been going strong for three months.
We think this entry into our Repairs You Can Print contest is a perfect example of the everyday utility of 3D printers. Small reproducible plastic parts are all around us, just waiting to fail. The ability to not only replace them but to improve on them is one of the brightest sides of our increasingly disposable culture.
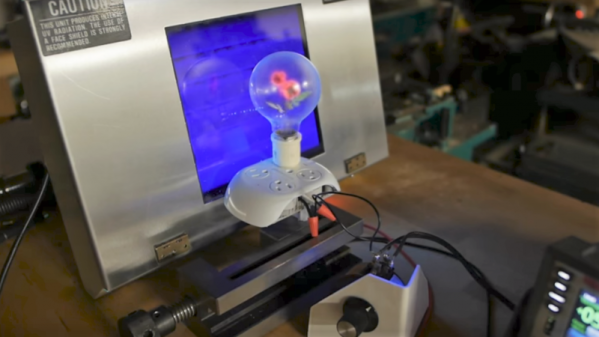
The Flashing Light Prize is back this year with a noble twist. And judging from the small set of entries thus far, this is going to be an interesting challenge.
Last year’s Flashing Light Prize was an informal contest with a simple goal: flash an incandescent lamp in the most interesting way possible. This year’s rules are essentially the same as last year, specifying mainly that the bulb itself has to light up — no mechanical shutters — and that it has to flash at 1 Hz with a 50% duty cycle for at least five minutes. But where last year’s contest specified incandescent lamps, this year you’ve got to find a way to flash something with neon in it. It could be an off-the-shelf neon pilot light, a recycled neon sign, or even the beloved Nixie tube. But we suspect that points will be awarded for extreme creativity, so it pays to push the envelope. Last year’s winner used a Wimhurst machine to supply the secondary of an ignition coil and flash a pair of bulbs connected across the primary, so the more Rube Goldberg-esque, the better your chances.
There are only a handful of entries right now, with our favorite being [Ben Krasnow]’s mashup of electricity, mechanics, chemistry, and physics. You’ve got until March 15th to post your flashing neon creation, and there are two categories this year, each with a £200 prize. Get your flash on and win this one for Hackaday.
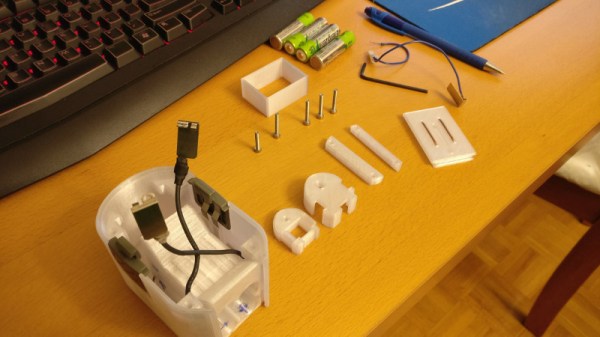
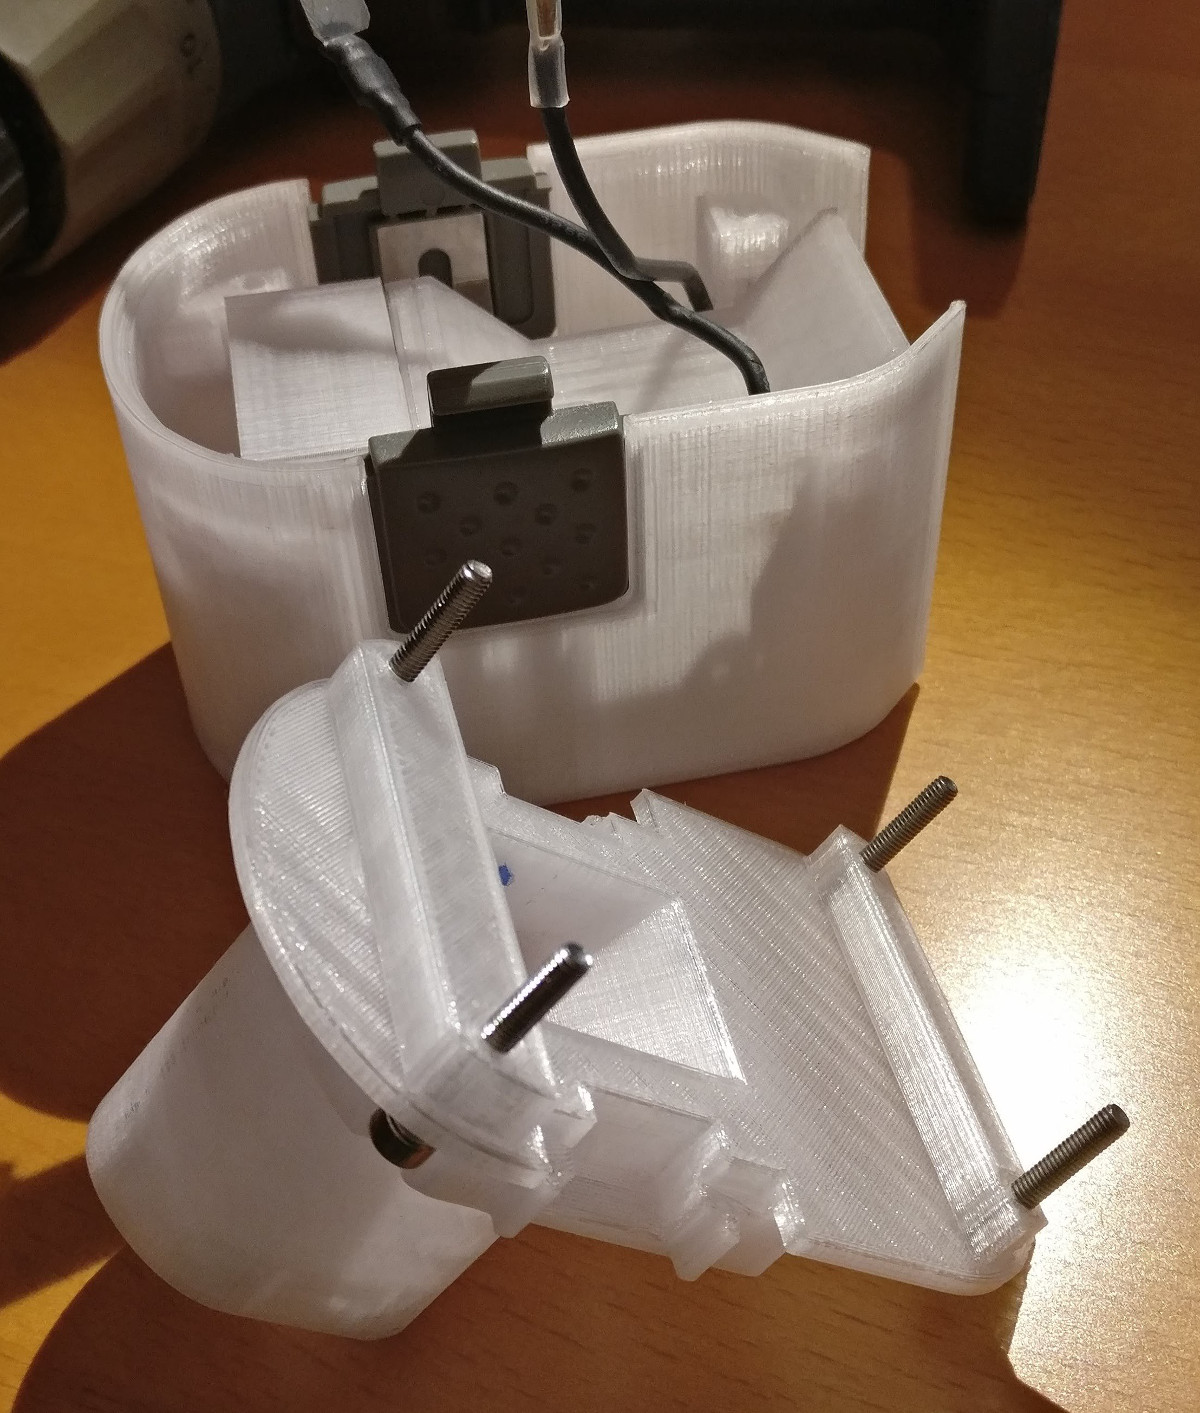
The greatest enemy of proprietary hardware and components is time. Eventually, that little adapter cable or oddball battery pack isn’t going to be available anymore, and you’re stuck with a device that you can’t use. That’s precisely what happened to [Larry G] when the now antiquated 7.2V NiCd batteries used by his cordless drill became too hard to track down. The drill was still in great shape and worked fine, but he couldn’t power the thing. Rather than toss a working tool, he decided to 3D print his own battery pack.
The 3D modeling on the battery pack is impeccable
He could have just swapped new cells into his old pack, but if you’re going to go through all that trouble, why not improve on things a little? Rather than the NiCd batteries used by the original pack, this new pack is designed around readily available AA NiMH batteries. For the light repairs and craft work he usually gets himself into, he figures these batteries should be fine. Plus he already had them on hand, and as we all know, that’s half the battle when putting a project together.
Interestingly, the original battery pack was wired in such a way that it provided two voltages. In older tools such as this one, this would be used for rudimentary speed control. Depending on which speed setting the drill is on, it would either connect to 4 or 6 cells in the original pack. [Larry] didn’t want to get involved with the extra wiring and never used the dual speeds anyway, so his pack only offers the maximum speed setting. Though he does mention that it may be possible to do PWM speed control in the battery itself via a 555 timer if he feels like revisiting the project.
[Larry] tells us the pack itself was rendered completely from scratch, using only the original battery pack and trial-and-error to get the fit perfect. He reused the side-mounted release buttons to save time, but otherwise everything is 3D printed in PETG for its strength and chemical resistance.
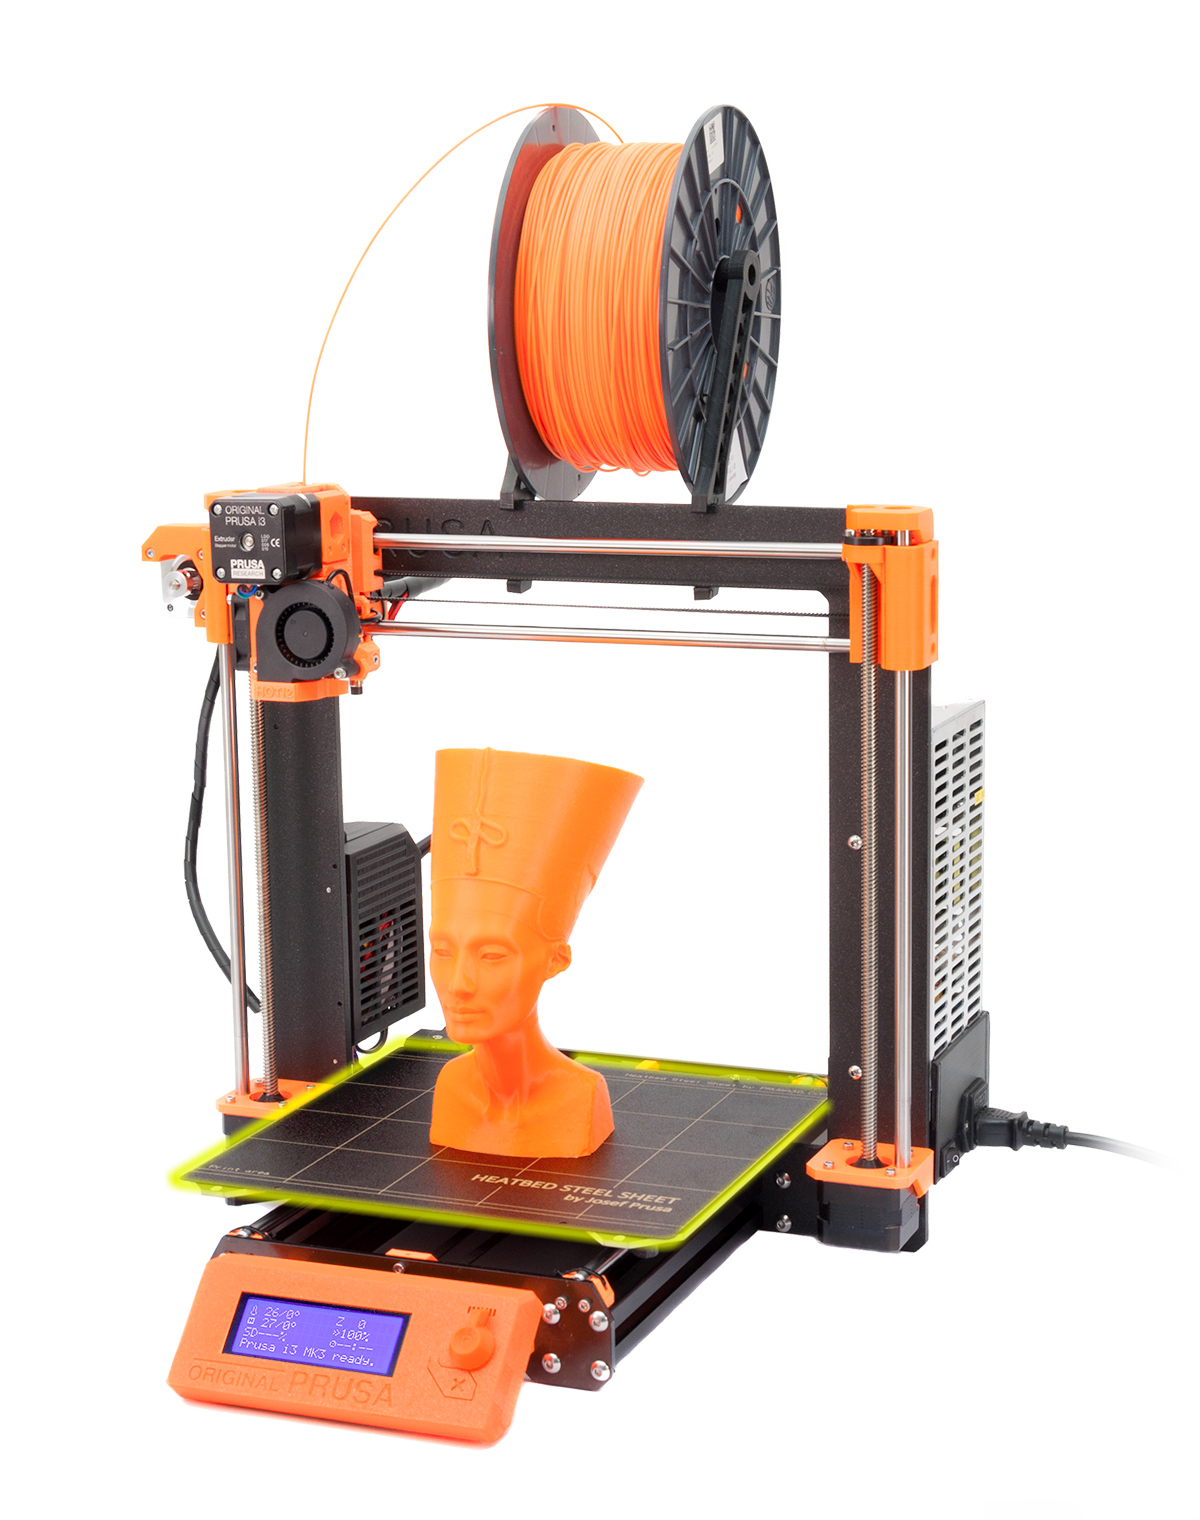
The twenty best projects will receive $100 in Tindie credit, and for the best projects by a Student or Organization, we’ve got two brand-new Prusa i3 MK3 printers. With a printer like that, you’ll be breaking stuff around the house just to have an excuse to make replacement parts.
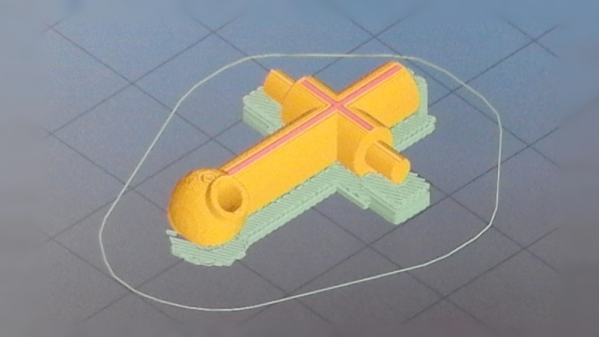
Today, when we say “Jesus nut”, we’re not referring to the people who spend their days proselytizing down at the mall. The term, likely spawned in the Vietnam war, refers to the main nut holding the rotors on to the mast of a helicopter which is in the shape of the Christian cross. If the “Jesus nut” was to fail, the rotors would detach from the craft, and there would be little for crews to do except to pray.
[Marius] was presented with a failed Jesus nut, though thankfully from an R/C helicopter, meaning there was no loss of life. A friend needed the part replaced for their FQ777 copter, so it was time to bust out the 3D printer and get to work.
The first step was to reconstruct the broken piece so it could be measured and then modeled in CAD software with the help of calipers to determine the original dimensions. What followed will be familiar to many 3D printing enthusiasts — a case of educated trial and error, experimenting with different filaments and print settings until a usable part was produced. [Marius] notes on the part’s Thingiverse page that they achieved the best print with an 0.2mm layer height, and printing two parts at once to allow the layers more time to cool during each pass. It was then a simple matter of tidying up the part with sandpaper and a drill bit before installing it on the vehicle.
[Marius] reports that the part was successful, being both strong enough to withstand the forces involved as well as having a fit that was just right to suit the rotor pin which needs to be able to turn freely within the Jesus nut. While they’re not always the right tool for the job, 3D printed replacement parts can sometimes surprise you. These prints that are used in repair work often don’t attract the same interest as printing cosplay armor, kinetic art, and low-poly Pokemon. But they quickly prove how transformative having a 3D printer, and the skills to use it, are. That’s why we’re running the Repairs You Can Print contest… take a few minutes to show off the really useful repairs you’ve pulled off with your 3D printer!
The Repairs You Can Print Contest on Hackaday.io is a challenge to show off the real reason you bought a 3D printer. We want to see replacement parts, improved functionality, or a tool or jig that made a tough repair a snap. Think of this as the opposite of printing low poly Pokemon or Fallout armor. This is a contest to demonstrate the most utilitarian uses of a 3D printer. Whether you fixed your refrigerator, luggage, jet engine, vacuum cleaner, bike headlight, or anything else, we want to see how you did it!
The top twenty projects in the Repairs You Can Print contest will be rewarded with $100 in Tindie credit. That’s a Benjamin to spend on parts, upgrades, and components to take your next project to the next level!
Students and Organizations Can Win Big
The Best Student and Best Organization will win a Prusa i3 MK3!
This contest is open to everyone, but we’re also looking for the best projects to come from students and hackerspaces. We’ll be giving away two amazing 3D printers to the best Student entry and best Organization entry. These two top projects will be awarded an Original Prusa i3 MK3 with the Quad Material upgrade kit. This is one of the finest 3D printers you can buy right now, and we’re giving these away to the best student, hackerspaces, robotics club, or tool lending library.
If you have a project in mind, head on over to Hackaday.io and create a project demonstrating your 3D printed repair!
What is This Contest All About?
This contest is all about Repairs You Can Print, but what does that actually mean? Instead of printing Pokemon or plastic baubles on your desktop CNC machine, we’re looking for replacement parts. We’re looking for commercial, off the shelf items that were broken, but repaired with the help of a 3D printer. Is your repair good enough to show off as part of the contest? Yes! That’s the point, we want to see the clever repair jobs that people often don’t spend much time talking about because they just work.
Need some examples? Sure thing.
The underside of a vacuum cleaner
A 3D printed wheel for a broken vacuum cleaner
A while back, [Elliot Williams], one of the fantastic Hackaday Editors, had a broken vacuum cleaner. The wheels were crap, but luckily they were designed as a single part that snaps into a swivel socket. Over six or so years, the original wheels in this vacuum gave out, but a replacement part was quickly printed and stuffed into the socket. The new wheels have been going strong for a year now. That’s an entire year of use for a vacuum for five cents worth of plastic and an hour’s worth of printing time.
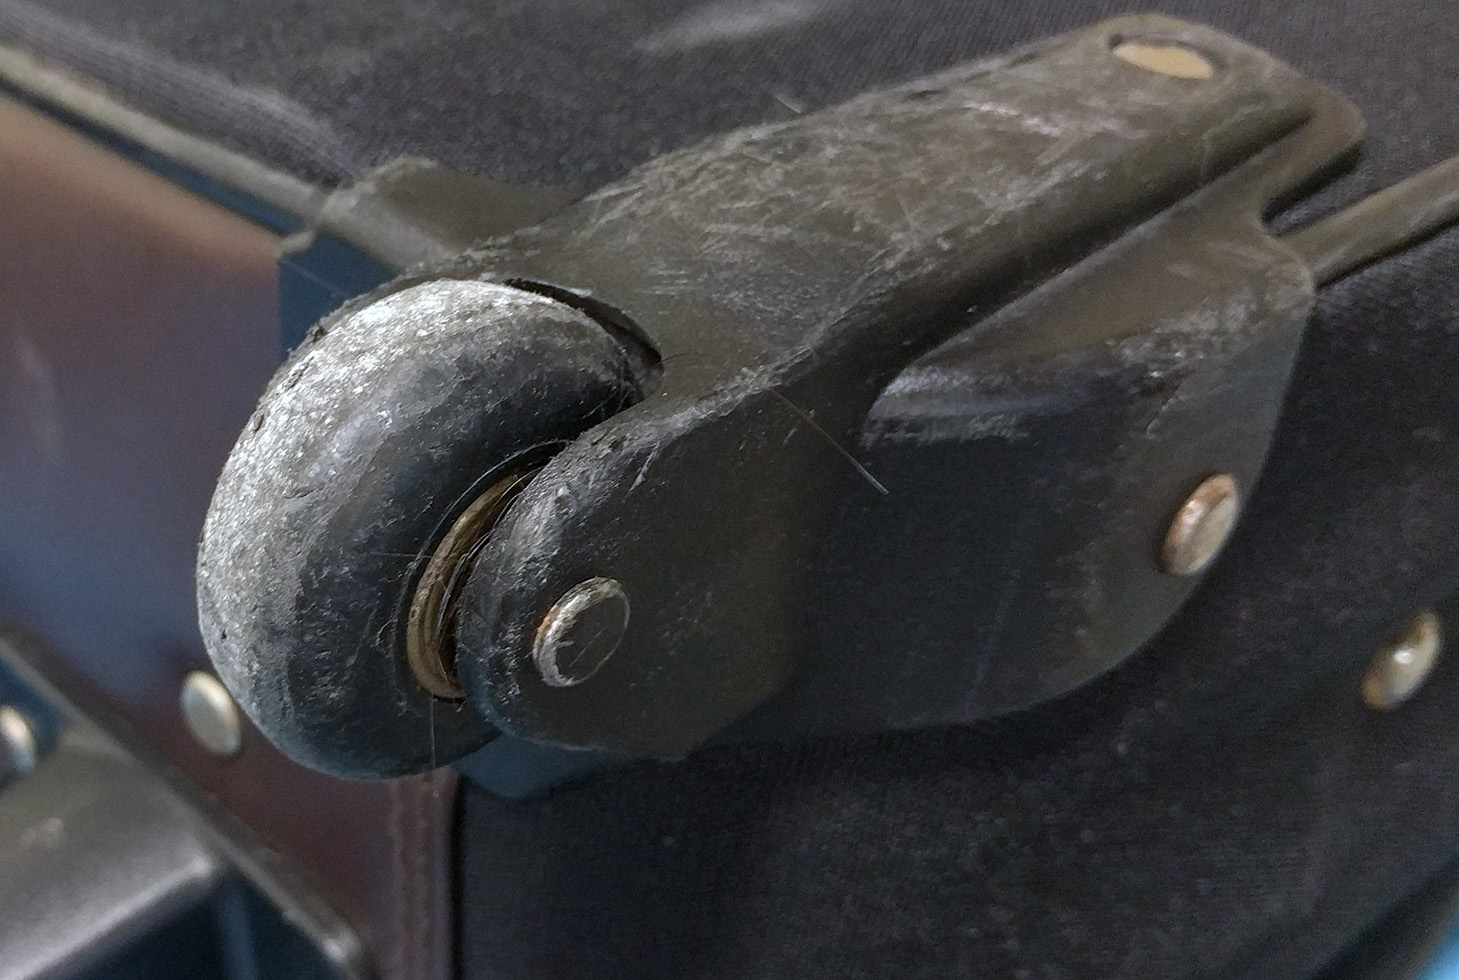
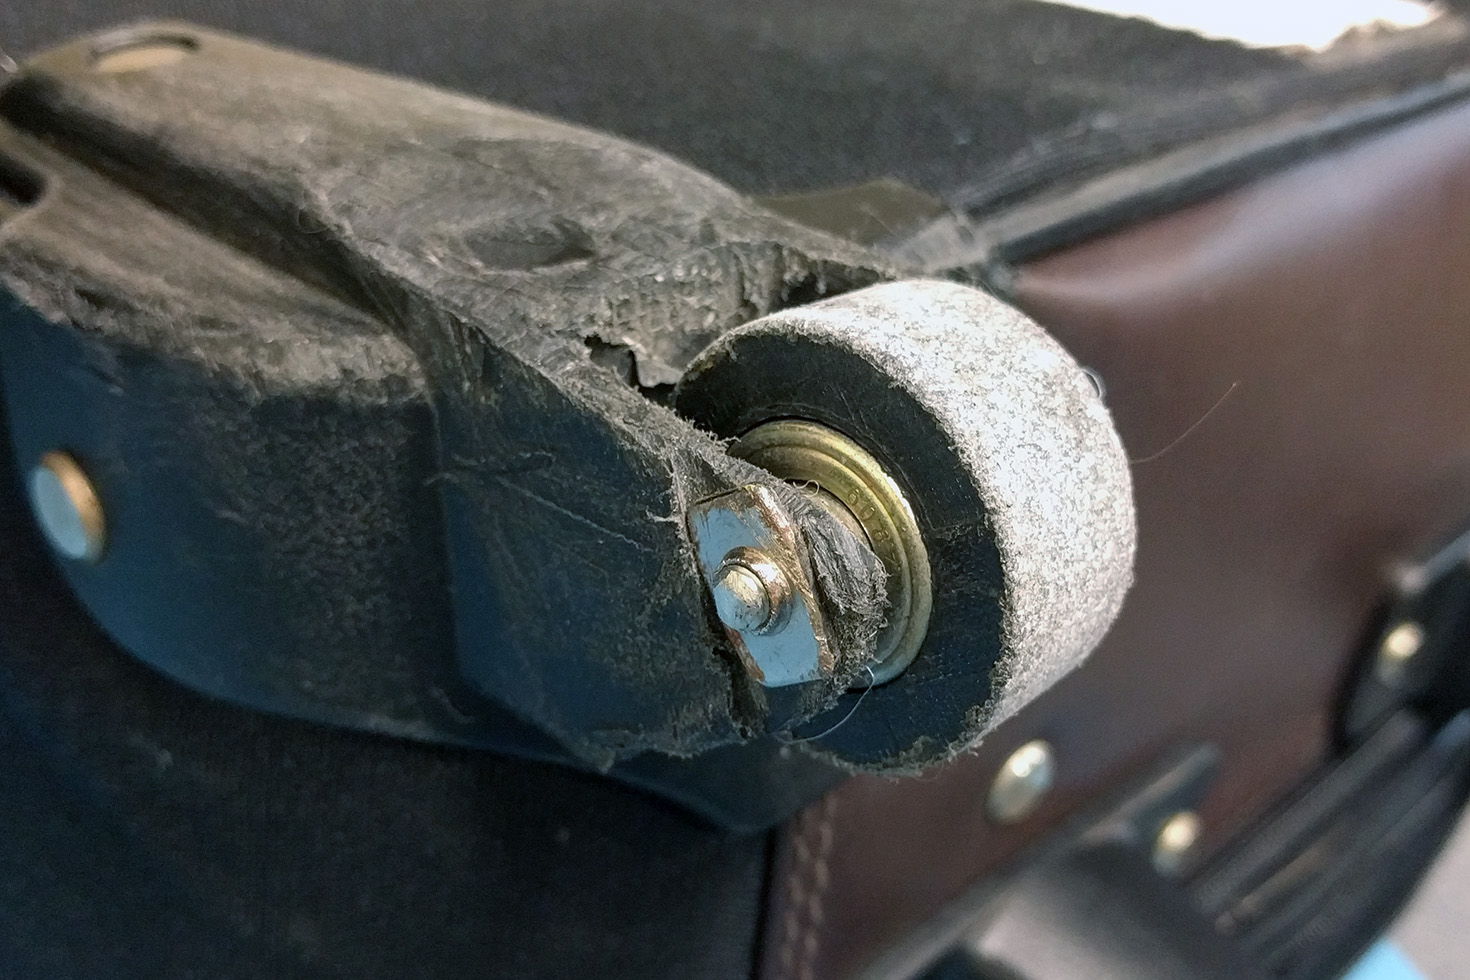
The stock wheel on my luggage
A 3D printed wheel on my luggage. The original was destroyed at either ORD or PHL.
Need another example? My suitcase was apparently dragged behind a luggage cart for miles at either ORD or PHL. When it arrived on the baggage carousel, one wheel was shredded, and the wheel mount was ground down to almost the axle. The rest of the bag was still good, and I just removed the old wheel, salvaged the bearings, and printed a new wheel out of PLA. This suitcase has now traveled 60,000 miles with a 3D printed wheel, and it’s only now looking worse for wear.
How To Get In On The Action
We’re looking for the best repairs, jigs, and tools you’ve ever printed. To get started, head on over to Hackaday.io, create a new project, and document your repair. The Repairs You Can Print contest will run from Tuesday, January 16th, 2018 through 12 PM PST Tuesday, February 20th, 2018. Here’s a handy count down timer for ‘ya.
Here’s a fun entry into our coin cell challenge. The power source is the actuating force in [Frank]’s blinky LED Christmas tree, which takes advantage of the physical structure of coin cells and our old pal gravity to roll out some holiday cheer. Talk about forward voltage!
We love the concept, and the circuit couldn’t be more simple. A coin cell is released at the top of the tree and rolls down a series of angled foam board railings covered with 1/4″ copper tape. As the coin cell travels, the negative terminal shimmies along the face of the tree, which has corresponding ground rail tapes. There’s no microcontroller here—all that’s needed for blinks are breaks in the negative rail tape.
The challenging part of a project like this is the execution. Getting a coin cell to ride the rails without falling off required angle experimentation prior to and during the build. Now that it’s done, keeping the tree tilted back against the wall is key. [Frank] explored several options for returning the coin cell to the top using a camera motor and the gear assembly from an old inkjet, but for now, his six-year-old does the job without complaint. Check out his work ethic after the break.
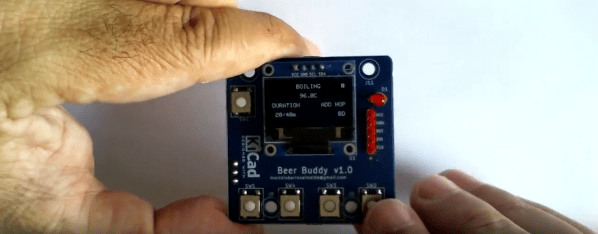
Whether coffee, tea, or beer is your jam, brewing is a delicate pas de deux of time and temperature. Proper brewing of any of these beverages can elevate the experience from average to amazing. With this in mind, [Marcelo] created a time and temperature tool to dial in his beer-brewing process.
BrewBuddy is a complex application-specific timer with an integrated thermometer. It lets him program time and temperature profiles for both the mashing process and the boiling process and store up to 10 steps for each. BrewBuddy doesn’t control the brewing temperature, but it does unify temperature-taking and time-marking into one convenient device that can last about 20 hours on a single CR2032.
The system is based on an STM32 and an LMT86 analog temperature sensor which has been modified to sit inside a stainless steel tube. There are four directional buttons to navigate through intuitive menus to set the desired times and temperatures. As each step completes, the status LED lights up and BrewBuddy waits for confirmation via button push before moving on to the next step. If there’s a problem, the timer can be paused and resumed using the up/down buttons. [Marcelo] is working to perfect the case design, but he already has the board files and firmware up on GitHub. Open up a cold one and check out the demo videos after the break.
After boiling and cooling comes fermentation, and that requires careful monitoring of the sugar content. Here’s a tool for that.
 [pixelk] bought a glue gun a few years ago for its power rating and its claims of strength. Lo and behold, the trigger mechanism has proven to be weak around the screws. The part that pushes the glue stick into the hot end snapped in two.